
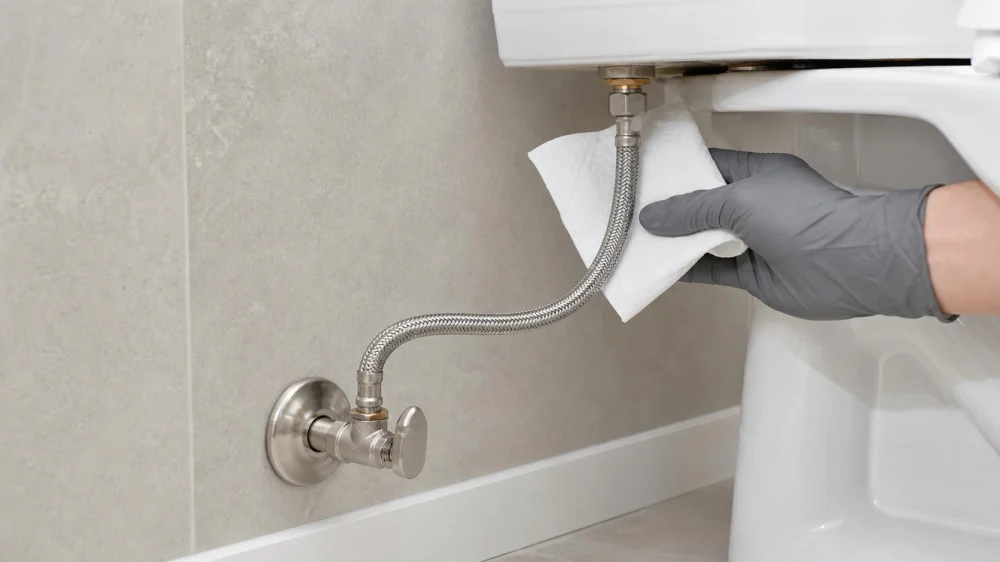
How to Inspect a Toilet Supply Line for Leak Risks
On this page
Quick answer
Inspect the toilet supply line with the floor dry and the fixture undisturbed. Look for corrosion, cracked plastic, frayed braid, kinks, swelling, damp fittings, or mineral tracks. Wipe each connection with a dry tissue and watch through a normal refill cycle. If a leak continues, the valve will not close, or parts are damaged, stop and call a plumber.
This guide is for US homeowners performing a visible maintenance check. It does not assume that a connector can be safely repaired, reused, or replaced in every installation.
What the supply line does
The toilet supply line is the short connector that carries pressurized water from the wall or floor shutoff valve to the toilet fill valve. Common versions include braided connectors, reinforced polymer lines, and rigid tubing. The fittings, materials, and installation details vary.
A small connector deserves attention because it remains pressurized whenever the shutoff valve is open. A slow seep can damage flooring or create staining, while a failed fitting or split line can release water quickly. Inspection is useful even when the toilet bowl and tank appear to work normally.
Warning signs to check
- Active moisture: droplets, a wet valve stem, dampness beneath a coupling, or water returning after the area is dried.
- Mineral tracks: white, green, blue, or rusty deposits around a fitting can mark repeated seepage or corrosion.
- Damaged braid or jacket: fraying, cuts, bulges, flat spots, or exposed inner material weaken confidence in the connector.
- Sharp bends: a kink or connector pulled sideways places stress on the line and its fittings.
- Cracked plastic: splits or discoloration at a plastic coupling, fill-valve shank, or older rigid line need careful evaluation.
- Floor clues: swelling, soft trim, staining, odor, or recurring dampness can indicate a leak even when the source is not obvious.
Water beside a toilet does not always come from the supply line. Condensation, a leaking tank bolt, tank-to-bowl seal, wax ring, fill-valve spray, or nearby plumbing can create a similar pattern.
A safe inspection sequence
- Clear the area. Remove stored items without bumping the valve or line. Use good lighting and keep electrical cords and devices away from water.
- Dry everything. Wipe the floor, valve, connector, and bottom of the tank. A dry starting point makes new moisture easier to locate.
- Look without twisting. Trace the line from valve to tank. Check the full length, both couplings, and the nearby floor. Do not flex an aged connector to “test” it.
- Use a dry tissue. Gently touch the tissue below each fitting and around the valve stem. A small wet mark can reveal seepage that is hard to see.
- Flush once. Watch the line while the tank refills. Movement, spray, or moisture appearing only during refill may help locate the source.
- Recheck after a short interval. Dry any questionable spot and see whether moisture returns under normal conditions.
Do not place your face close to a pressurized damaged line. If the connector is swollen, actively spraying, separating, or severely corroded, close the water only if the valve operates safely and contact a plumber.
Check the shutoff valve
Know whether the local toilet shutoff can stop water before attempting maintenance. Turn it gently in the closing direction only if it is accessible, dry, and in serviceable condition. Older multi-turn valves may be stiff or begin leaking at the stem when disturbed.
Do not force a seized handle with pliers. Excess torque can break the handle, stem, valve, or pipe in the wall. If the valve will not move, will not stop the refill, or starts leaking, leave it alone and use the home's main water shutoff only if you already know it works and the situation requires it. Arrange professional repair.
After any valve test, return the fixture to its intended operating condition and confirm that no new leak has appeared. A valve that closes incompletely is not reliable isolation for connector replacement.
Tighten, replace, or call a plumber?
When a minor adjustment may be reasonable
If a new, undamaged connector has a slight seep at an accessible fitting, the installation instructions may allow a limited adjustment. Support mating parts, follow the connector and toilet manufacturer's instructions, and avoid overtightening. Plastic fill-valve shanks and coupling nuts can crack or strip.
When replacement is the better choice
Replace rather than patch a connector with fraying, kinks, bulges, cracks, damaged fittings, or uncertain compatibility. A connector removed during toilet work may not be suitable for reuse; follow manufacturer guidance and local plumbing requirements. Never cover a pressurized leak with tape, sealant, or a clamp as a permanent repair.
When to call a plumber
Professional help is the safer choice when the shutoff does not isolate water, the valve or wall pipe moves, corrosion is extensive, the connection style is unfamiliar, clearance is poor, floor damage is present, or the leak source remains uncertain. Multi-unit buildings may require building management or coordinated shutoff procedures.
Reduce future leak risk
- Keep the area around the valve and connector visible rather than packed with cleaning products.
- Avoid pushing bins, plungers, or shelving against the line.
- Use a connector with the correct length, end fittings, pressure rating, and approvals for the installation.
- Route flexible lines in a smooth curve without a twist, sharp bend, or pull on either fitting.
- Inspect after toilet cleaning, floor work, moving the fixture, or any event that may disturb the connection.
- Know the location and operating condition of the main water shutoff before an emergency.
There is no single replacement interval that overrides product instructions, material condition, local code, and installation history. Visible deterioration or a leak is more urgent than an arbitrary calendar reminder.
Toilet connector checklist
- Floor and fittings are dry at the start.
- No corrosion, cracks, fraying, bulges, or kinks are visible.
- The line follows a relaxed route without being stretched.
- Both couplings remain dry during and after refill.
- The valve stem and wall connection remain dry.
- The shutoff operates gently and fully without forcing.
- No soft flooring, staining, or persistent odor is present.
- Replacement parts match the toilet, valve, and local requirements.
- A plumber is called when isolation or leak location is uncertain.
Limitations and important notes
This visual inspection cannot prove the hidden condition of an inner hose, concealed pipe, valve, or floor assembly. It also cannot predict when a part will fail. Product instructions and applicable plumbing codes control installation and replacement decisions.
Shut off water and seek urgent help for spraying water, rapidly spreading moisture, ceiling leakage below the bathroom, a moving wall pipe, or a valve that breaks. Avoid contact with water near energized electrical equipment. Suspected sewage leakage requires different cleanup precautions than a clean-water supply leak.
Frequently asked questions
Can I reuse a toilet supply line after removing the toilet?
Do not assume so. Follow the connector manufacturer's guidance and inspect both fittings. Many installers prefer a new compatible connector rather than relying on a disturbed seal.
Why is there white crust around the fitting?
It may be mineral residue left by repeated moisture, but it can also come from past work. Dry and monitor the area; active moisture or corrosion needs correction.
Should I use thread tape on the connector nut?
Many toilet connectors seal with a washer rather than tapered pipe threads. Adding tape where it is not specified can interfere with the connection. Follow the product instructions.
How tight should the plastic tank nut be?
Use the toilet and connector instructions. Overtightening can damage plastic threads or seals, so “as tight as possible” is not a safe rule.
Is water on the floor always from the wax ring?
No. Dry the area and observe when the water appears. Supply fittings, tank hardware, condensation, and bowl-base seals can all produce moisture near a toilet.
Sources and evidence notes
The guidance here follows common plumbing inspection practice: start dry, observe under normal pressure, identify the source before repairing, avoid forcing valves, replace damaged pressurized connectors, and follow manufacturer instructions for fittings.
No connector lifespan, universal tightening torque, failure prediction, or product endorsement is assumed. On-site conditions and the listed instructions for each component determine the correct repair.
Next steps
Use a flashlight and dry tissue to inspect the valve, both ends of the connector, and the floor during one refill cycle. Photograph any corrosion or moisture without disturbing the line. If the connector is damaged or the shutoff cannot isolate water reliably, give those observations to a licensed plumber and keep the area clear until it is repaired.


 K & T Plumbing5.0 (4 reviews)
 Midwest Sewer & Plumbing5.0 (5 reviews)
 Miller Plumbing & Heating4.0 (8 reviews)
 Every Plumbing & Heating, Inc.4.0 (51 reviews)
 MR PLUMBER, LLC4.0 (55 reviews)
 Houseman Supply Inc4.0 (34 reviews)
 How to Repair a Clogged Garbage Disposal: Troubleshooting Tips
 How to Spot a Hidden Water Leak and Fix It Early
 Plumbing Solutions for Fixing Low Flow Toilets in Your Home
 How to Replace a Leaky Shower Valve Step by Step: Easy Guide for Homeowners
 What to Know About Septic System Plumbing for Homeowners Guide
 Why You Should Have Your Pipes Inspected Regularly