
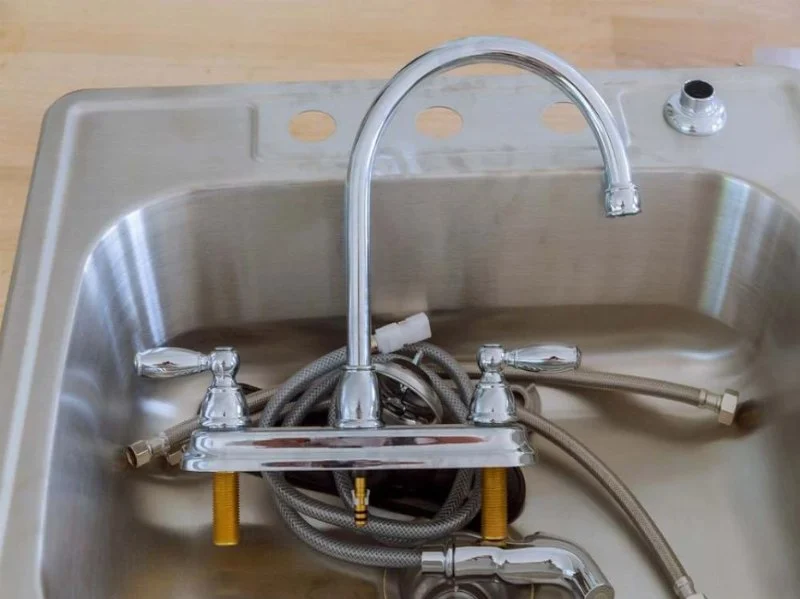
- prepare-tools-for-faucet-installation
- remove-old-sink-faucet-safely
- install-new-sink-faucet-step-by-step
- avoid-common-faucet-installation-mistakes
- choose-quality-plumbing-supplies
- when-to-call-a-professional-plumber
Preparing Before You Install a New Sink Faucet
Installing a new sink faucet may seem like a complicated plumbing project, but many homeowners can complete the job in less than an hour with the right preparation. A faucet replacement is one of the most common kitchen and bathroom upgrades because it improves both appearance and daily convenience.
Many people search for ways to install a new sink faucet because they want to update an outdated fixture, stop annoying leaks, or improve water efficiency without paying for a major renovation. With basic tools, careful planning, and patience, replacing a faucet can become a manageable weekend DIY project.
1. Check Your New Faucet Compatibility
Before removing your existing faucet, inspect your sink configuration. Faucets are designed with different mounting styles, including single-hole, centerset, and widespread designs. Choosing a faucet that matches your sink openings can save time and prevent unexpected installation problems.
For example, a homeowner named Sarah wanted to replace an old kitchen faucet after noticing corrosion around the base. She purchased a modern single-handle faucet but discovered her sink had three mounting holes. Instead of forcing the installation, she used a compatible deck plate and completed the upgrade successfully.
2. Gather Essential Tools
A successful faucet installation depends on having the correct supplies nearby. Typical tools include:
- Adjustable wrench
- Basin wrench
- Screwdriver
- Bucket or container for leftover water
- Plumber’s tape
- Cleaning cloth
- Flashlight for dark cabinet areas
Having everything prepared before starting prevents unnecessary interruptions. Many failed DIY plumbing projects happen because homeowners begin removing the old fixture before checking whether they have the right replacement parts.
Removing Your Old Sink Faucet Carefully
The first physical step in replacing a faucet is removing the existing fixture. Although this process is usually simple, rushing can create leaks or damage plumbing connections.
1. Turn Off the Water Supply
Locate the shutoff valves underneath the sink and turn them clockwise until the water stops completely. After closing the valves, open the faucet handle to release remaining pressure inside the pipes.
Place a bucket underneath the connections because small amounts of water usually remain inside the supply lines. This simple preparation keeps your cabinet dry and makes cleanup easier.
2. Disconnect the Supply Lines
Use an adjustable wrench to loosen the hot and cold water supply connections. Work slowly because older connections may be tight due to mineral buildup or corrosion.
If the connections are difficult to remove, avoid applying excessive force. Damaging the shutoff valve or supply pipe can turn a simple faucet replacement into a larger plumbing repair.
3. Remove the Mounting Hardware
Most faucets are secured underneath the sink with mounting nuts or brackets. A basin wrench is especially useful because it allows access to areas that are difficult to reach by hand.
Once the mounting hardware is removed, lift the old faucet away from the sink surface. Clean the area thoroughly before installing the new fixture.
Step-by-Step Process to Install a New Sink Faucet
After removing the old faucet, the installation process becomes much easier. Most modern faucets include detailed instructions, but understanding the general process helps homeowners work confidently.
1. Place the Faucet Through the Sink Opening
Insert the faucet through the mounting hole from above the sink. Make sure the faucet sits evenly and that any included gasket is positioned correctly.
The gasket helps prevent water from collecting around the faucet base. Skipping this step can lead to moisture damage over time.
2. Secure the Faucet Underneath
Move underneath the sink and attach the mounting hardware. Tighten the mounting nut by hand first, then use a wrench for final tightening.
A common mistake is over-tightening. Too much pressure can damage the faucet base or create stress on the sink material. The goal is a secure fit, not maximum force.
3. Connect the Water Supply Lines
Attach the hot and cold water lines to the correct valves. Usually, the left connection supplies hot water and the right connection supplies cold water.
Use plumber’s tape when recommended by the manufacturer, especially on threaded connections. Proper sealing reduces the risk of slow leaks that may appear days after installation.
4. Test the New Faucet
Slowly open the shutoff valves and check all connections. Turn on the faucet and allow water to run for several seconds to remove air from the lines.
Inspect underneath the sink while the water is running. Look for dripping around supply connections, mounting points, and valve areas.
Common Mistakes When Replacing a Sink Faucet
1. Forgetting to Measure Before Buying
One of the biggest mistakes homeowners make is buying a faucet based only on appearance. A beautiful faucet may not fit the existing sink holes or plumbing arrangement.
Always measure your sink configuration before purchasing. This small step saves time and prevents unnecessary returns.
2. Ignoring Old Plumbing Conditions
Sometimes the faucet is not the only aging component. Older homes may have worn shutoff valves, rusty supply lines, or outdated connectors.
During installation, take the opportunity to inspect nearby plumbing parts. Replacing weak components can prevent future water damage.
3. Installing Without Checking Leaks
A faucet may appear correctly installed but still have a small hidden leak. Always test the fixture carefully before considering the project complete.
A few extra minutes of inspection can prevent expensive cabinet repairs caused by long-term moisture exposure.
Why Quality Plumbing Supplies Matter
The quality of your faucet installation depends not only on your technique but also on the products you use. Durable faucets, reliable connectors, and proper installation materials contribute to long-lasting performance.
Homeowners looking for dependable parts and professional recommendations can explore options through Plumbers Supply Hub to find suitable plumbing products for different repair and replacement projects.
1. Choosing the Right Faucet Material
Faucets are available in materials such as stainless steel, brass, and chrome finishes. Each option has different durability and maintenance characteristics.
For busy kitchens, many homeowners prefer finishes that resist fingerprints and water spots. Bathrooms may benefit from designs that match existing fixtures and décor.
2. Understanding Water Efficiency
Modern faucets often include features designed to reduce unnecessary water consumption while maintaining strong performance.
Replacing an older faucet with an efficient model can improve daily convenience and may help reduce household water usage.
When Professional Plumbing Help Is Recommended
Although many faucet replacements are suitable for DIY homeowners, some situations require professional assistance.
1. Serious Corrosion or Damaged Pipes
If supply connections are severely corroded or pipes appear damaged, forcing removal may create additional problems. A professional plumber can safely repair or replace damaged components.
2. Major Kitchen or Bathroom Renovations
If faucet replacement is part of a larger renovation involving countertops, sinks, or plumbing relocation, professional planning can help ensure everything works correctly.
3. Persistent Water Problems
If low water pressure, leaks, or drainage problems continue after installation, the issue may involve the larger plumbing system rather than the faucet itself.
Making Faucet Installation Easier for First-Time DIY Homeowners
The biggest advantage of learning how to install a new sink faucet is gaining confidence with basic home maintenance. Many homeowners start with a simple faucet replacement and later become comfortable handling other small plumbing improvements.
The key is preparation, careful work, and knowing your limits. A one-hour faucet project can become a satisfying upgrade that improves the look and function of your kitchen or bathroom.
Whether you are replacing a leaking fixture, updating your home style, or improving water efficiency, a properly installed faucet provides long-term value. With quality supplies and the right approach, this project can be completed successfully even by many beginners.
 Mayo Plumbing Co Inc5.0 (2 reviews)
 CGC Home Services4.0 (80 reviews)
 Illinois Plumbing Drain Services5.0 (4 reviews)
 Advanced Plumbing4.0 (366 reviews)
 Tim Jones and Son Plumbing3.0 (15 reviews)
 NB Plumbing5.0 (9 reviews)
 How to Install a Pot Filler Faucet in the Kitchen: A Step-by-Step Guide
 How to Test Backflow Preventers Annually
 How to Install a Secondary Drain for Air Conditioners
 How to Extend the Life of Your Plumbing System with Regular Maintenance
 How to Choose a Reliable Plumbing Service in Your Area
 What Causes Frozen Pipes and How You Can Prevent It - Expert Tips