
- How to Replace a Float Valve in a Rain Barrel System
- 1. Why Float Valves are Crucial for Rain Barrel Systems
- 2. Signs You Need to Replace the Float Valve
- 3. Step-by-Step Guide to Replacing the Float Valve
- 4. Choosing the Right Float Valve for Your Rain Barrel
- 5. Maintenance Tips for Keeping Your Float Valve in Good Condition
- 6. Explore Plumbers Supply Hub for Best Products
How to Replace a Float Valve in a Rain Barrel System
A rain barrel is an eco-friendly and cost-effective way to collect rainwater for use in gardens, lawns, and other outdoor spaces. One of the key components of a rain barrel is the float valve, which helps regulate the water level in the barrel. Over time, float valves can wear out or malfunction, leading to overflows or inefficiency in water usage. In this guide, we’ll walk you through the process of replacing a float valve in your rain barrel system, ensuring your system remains functional and effective.

1. Why Float Valves are Crucial for Rain Barrel Systems
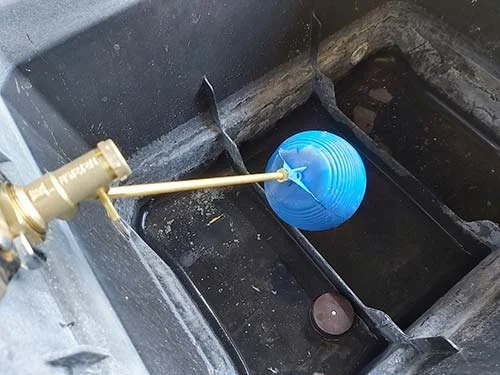
Float valves play an essential role in maintaining the proper water level in a rain barrel. Without a properly functioning float valve, your rain barrel could either overflow or become too empty, reducing the efficiency of your system. The float valve acts as a shut-off mechanism, automatically halting the flow of water when the barrel reaches its desired level. This prevents water wastage and ensures you always have enough water for your needs.
Sierra Plumbing & Drain Cleaning
PomonaLos Angeles CountyCalifornia
2479 Alder St, Pomona, CA 91767, USA
1.1. Preventing Overflow
The primary function of a float valve is to stop water from overflowing when the rain barrel is full. Without this control, excess water could spill out, creating waste and damaging your surroundings.
1.2. Efficient Water Collection
With a functioning float valve, your rain barrel is more efficient at collecting and storing water. It ensures the barrel operates at optimal capacity without wasting resources, especially during heavy rainfall.
2. Signs You Need to Replace the Float Valve
Like all components of a rain barrel system, the float valve can wear out or become damaged over time. Here are a few signs that indicate it might be time for a replacement.
2.1. Inconsistent Water Flow
If you notice that the water flow is irregular or that water is not shutting off properly when the barrel is full, it’s likely that the float valve is no longer functioning correctly.
2.2. Leaks Around the Valve Area
Leaking around the float valve area, especially when the rain barrel is full, is a common sign of valve damage or wear. This could indicate a faulty seal or a broken valve mechanism.
2.3. Difficulty Adjusting the Water Level
If you find that the water level is not being controlled as expected or that the float valve is not adjusting the level properly, it's time to replace it with a new one.
3. Step-by-Step Guide to Replacing the Float Valve
Replacing a float valve in a rain barrel is a straightforward process. Follow this step-by-step guide to do it yourself and restore your rain barrel to full working order.
3.1. Gather Your Tools and Materials
Before starting, make sure you have the following tools and materials:
- Replacement float valve
- Wrench or pliers
- Rubber gasket or sealant
- Bucket or container to drain water from the barrel
3.2. Drain the Rain Barrel
First, drain any remaining water from the rain barrel. This step is crucial to ensure that no water spills out during the replacement process.
3.3. Remove the Old Float Valve
Using a wrench or pliers, carefully loosen the old float valve. Depending on your system, this may involve unscrewing the valve or simply detaching it from the connector.
3.4. Install the New Float Valve
Install the new float valve by following the manufacturer's instructions. Ensure that the valve is securely connected and that any gaskets or seals are in place to prevent leaks.
3.5. Test the System
After installation, refill the barrel with water and check for proper operation. The float valve should regulate the water level, and no leaks should be present.
4. Choosing the Right Float Valve for Your Rain Barrel
When selecting a replacement float valve, it’s essential to choose the right type for your rain barrel system. Here are a few factors to consider:
4.1. Size and Fit
Ensure that the float valve fits the size and design of your rain barrel. A poorly fitted valve can cause leaks and may not function properly.
4.2. Material
Look for a valve made from durable, weather-resistant materials such as brass, stainless steel, or high-quality plastic. These materials will ensure longevity and reliable performance.
4.3. Flow Capacity
Choose a float valve that matches the flow capacity of your rain barrel to ensure it effectively regulates the water level.
5. Maintenance Tips for Keeping Your Float Valve in Good Condition
Regular maintenance is key to extending the lifespan of your float valve and ensuring optimal performance. Here are some maintenance tips to follow:
5.1. Regular Inspection
Inspect the float valve periodically for any signs of wear, corrosion, or leakage. Early detection of issues can help prevent costly repairs.
5.2. Clean the Valve
Clean the float valve regularly to remove dirt, algae, or debris that can affect its function. Use a soft brush or cloth to wipe it down, and ensure no obstructions block the mechanism.
5.3. Lubricate Moving Parts
Apply a small amount of silicone lubricant to the moving parts of the float valve to keep it operating smoothly and prevent sticking or jamming.
6. Explore Plumbers Supply Hub for Best Products
At Plumbers Supply Hub, we offer a wide selection of rain barrel parts and float valves to suit your needs. Browse our inventory for high-quality products designed to help you maintain an efficient and functional rain barrel system. Visit us today to explore our top-rated products.


 Plumbing Boys4.0 (42 reviews)
 McHenry Plumbing, Inc.4.0 (31 reviews)
 Palmer Plumbing & Heating LLC5.0 (4 reviews)
 Fix It All Plumbing LLC4.0 (9 reviews)
 Make It Drain Plumbing5.0 (38 reviews)
 Agent Rooter Plumbing5.0 (183 reviews)
 How to Prevent Water Heater Leaks with Regular Maintenance
 How to Repair a Junction That Is Leaking Under Slab: A Comprehensive Guide
 How to Clear Stubborn Hair Clogs from Bathroom Drains – Effective Solutions
 How to Recognize the Early Signs of Plumbing Problems Before They Become Expensive
 How to Replace a Plastic Pipe Fitting That Fails
 How to Replace a Showerhead with Low Flow Design for Water Conservation