

- #Identifying-Failed-Plastic-Pipe-Fittings - plastic pipe failure signs - how to spot pipe issues
- #Step-by-Step-Guide-to-Replace-a-Plastic-Pipe-Fitting - pipe fitting replacement - plastic pipe repair
- #Common-Issues-and-Tips - common plastic pipe problems - tips for DIY repairs
- #Plumbing-Products-for-DIY-Repairs - plumbing supplies - Plumbers Supply Hub recommendations
Identifying Failed Plastic Pipe Fittings
1. Plastic pipes are commonly used in homes due to their affordability, ease of installation, and resistance to corrosion. However, over time, these materials can weaken or become damaged, especially at the fittings, which are more vulnerable to stress and pressure. Identifying a failed plastic pipe fitting early can save homeowners from larger plumbing issues and costly repairs.
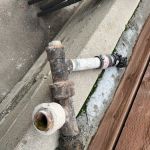
2. Some of the most common signs that a plastic pipe fitting has failed include water leakage, low water pressure, and visible cracks or splits around the fitting. If you notice water pooling around pipes, it’s a clear indicator that something isn’t functioning correctly. In some cases, there may be a musty smell or mold growth near the affected area, signaling that moisture has been leaking for a longer period.
3. Another sign of a failing pipe fitting is a decrease in water flow. If your shower, sink, or faucet seems to deliver less water than usual, it could be due to a clog or a damaged fitting. By inspecting the pipes and fittings around the affected area, you may notice a damaged or deteriorated section that needs replacement.
Jerez Plumbing | Emergency Plumber, Hydrojetting, Drain Cleaning, and Tankless Water Heater Repair in La Puente, CA
La PuenteLos Angeles CountyCalifornia
448 S 5th Ave, La Puente, CA 91746, USA
Step-by-Step Guide to Replace a Plastic Pipe Fitting
1. Replacing a plastic pipe fitting may sound like a daunting task, but with the right tools and a bit of know-how, it’s a manageable DIY project. The first step in replacing a plastic pipe fitting is to turn off the water supply. Make sure the water to the area where you’ll be working is completely shut off to avoid any unwanted leaks or floods.
2. Next, use a pipe cutter or hacksaw to remove the damaged fitting. If the fitting is located in a tight space, you may need to remove part of the surrounding pipes to get better access. Once you’ve removed the faulty fitting, be sure to clean the edges of the pipe thoroughly to remove any debris or dirt.
3. After preparing the pipes, apply PVC primer and cement to the exposed ends of the pipes and the new fitting. This step is crucial as it ensures a strong, leak-proof seal. Quickly insert the new fitting into place and hold it firmly for a few seconds to allow the cement to bond. Once secured, let the fitting dry for the recommended time before turning the water back on.
4. After installation, turn the water supply back on slowly, and check the area for any signs of leaks. If you notice any leaks, turn the water off immediately and check the fitting again. Ensure that everything is sealed properly, and if necessary, reapply PVC cement to any loose connections.

Common Issues and Tips
1. While replacing a plastic pipe fitting is a relatively simple task, there are some common issues that can arise. One of the most frequent problems is improper alignment of the new fitting. If the pipes are not lined up properly, the seal won’t be secure, leading to leaks. Always double-check your alignment before applying cement to ensure a tight, secure fit.
2. Another issue is not giving the PVC cement enough time to cure before turning the water back on. Rushing this step can result in leaks or a weak seal. Always follow the manufacturer’s recommendations for drying time to ensure the fitting has bonded properly.
3. If you’re unsure about replacing a plastic pipe fitting on your own, there’s no harm in calling a professional plumber for help. While DIY repairs can save you money, sometimes the expertise of a professional is necessary to handle more complex issues or ensure the job is done correctly.
Plumbing Products for DIY Repairs
1. When undertaking a pipe fitting replacement project, it’s important to have the right tools and products at your disposal. For DIY repairs, you’ll need a pipe cutter or hacksaw, PVC primer and cement, and the correct replacement fitting. If you need guidance on the best products for your repair, consider visiting Plumbers Supply Hub to find top-quality tools and fittings suited for your needs.
2. In addition to basic tools, there are also specialized products available that make plumbing repairs easier. For example, pipe repair clamps can temporarily seal a leaky fitting until you can replace it, and pipe insulation can help prevent future damage due to temperature fluctuations.
3. To avoid issues down the line, always invest in high-quality materials and follow all manufacturer guidelines. Regular inspections of your plumbing system can help catch any potential problems before they turn into more expensive issues.


 California Rooter & Plumbing4.0 (26 reviews)
 Danny Churchill Plumbing4.0 (6 reviews)
 Fix Concierge5.0 (1 reviews)
 Stinson Plumbing LLC4.0 (185 reviews)
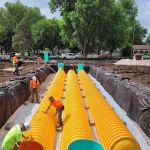 Hander, Inc. Plumbing & Heating4.0 (201 reviews)
 Prestige Plumbing Services, Inc5.0 (5 reviews)
 How to Unclog a Sink with a Drain Snake: A Quick and Effective Guide
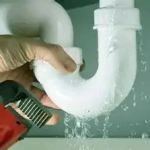 How to Detect Hidden Damage After a Plumbing Leak
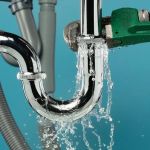 How to Handle Plumbing Leaks While on Vacation | Plumbers Supply Hub
 How to Replace a Broken Drain Elbow | Plumbers Supply Hub
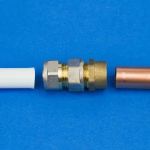 How to Replace Copper Pipes with PEX Safely – Expert Guide
 How to Handle a Plumbing Leak: A Homeowner’s Emergency Guide