
How to Replace a Shower Niche Drain: A Step-by-Step Guide
- 1- Why You Might Need to Replace Your Shower Niche Drain
- 2- Tools Required for Replacing the Drain
- 3- Step-by-Step Process for Replacing the Shower Niche Drain
- 4- Common Challenges and How to Overcome Them
- 5- Finishing Touches and Maintenance Tips
1- Why You Might Need to Replace Your Shower Niche Drain
A shower niche drain is an essential part of your shower setup, responsible for directing water away from the base of your niche and into your drainage system. Over time, however, the drain can become clogged, cracked, or simply worn out. Some of the common reasons why you might need to replace your shower niche drain include:
- Slow drainage or water pooling in the niche area.
- Cracked or damaged drain covers due to wear and tear.
- Corrosion or rust buildup in older plumbing systems.
- Improper installation leading to leaks or inefficient water flow.
If you notice any of these issues, it’s time to replace the drain to prevent further water damage or plumbing issues. You can find a wide range of replacement parts at Plumbers Supply Hub, where you can get high-quality products to ensure a perfect fit and long-lasting results.
2- Tools Required for Replacing the Drain
Replacing a shower niche drain is a manageable DIY project if you have the right tools. Here’s a list of the essential tools you’ll need:
- Adjustable wrench or pliers
- Screwdriver (flathead and Phillips)
- Utility knife
- Caulk remover or scraper
- Replacement drain cover and flange
- Plumber’s putty
- Silicone sealant
- Bucket or container for catching water
Having all of these tools on hand will help ensure that you can complete the job efficiently and without unnecessary interruptions. You can find most of these tools, along with the replacement parts, at Plumbers Supply Hub, your go-to source for plumbing supplies.
3- Step-by-Step Process for Replacing the Shower Niche Drain
Now that you have the necessary tools, let’s walk through the process of replacing the shower niche drain step-by-step:
- Turn Off the Water Supply: Before starting any plumbing work, make sure to turn off the water supply to your shower to avoid any mess.
- Remove the Old Drain Cover: Use a screwdriver or wrench to remove the existing drain cover. You may need to use a utility knife to cut through any sealant or adhesive around the edges.
- Clean the Niche Area: Once the cover is removed, clean the surrounding area, scraping off any old caulk, debris, or grime that may have built up.
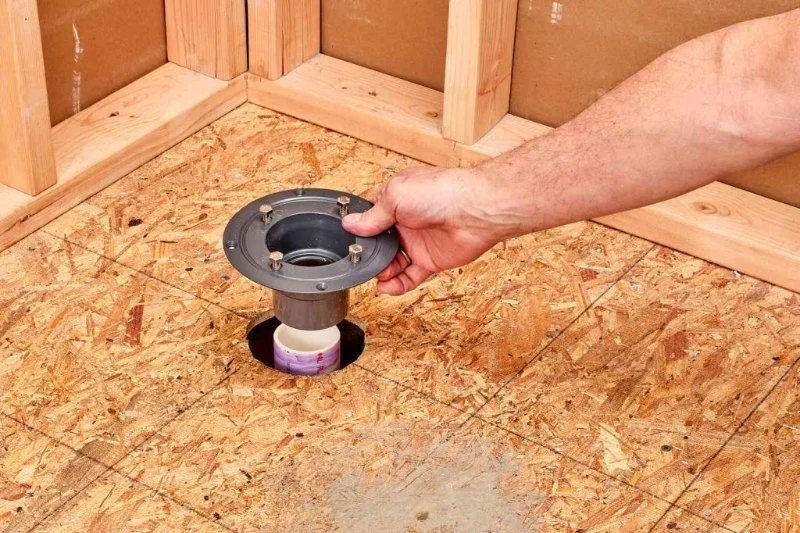
- Install the New Drain Flange: Apply plumber’s putty around the edges of the new drain flange and place it into the drain opening. Press down firmly to ensure it’s seated properly.
- Attach the New Drain Cover: Secure the new drain cover over the flange and tighten it with a screwdriver or wrench. Make sure it’s snug but not too tight to avoid damage.
- Seal and Test: Apply silicone sealant around the edges of the new drain cover to prevent leaks. Once the sealant has dried, turn the water back on and test the drain by running water through the shower to ensure it flows properly.
By following these steps, you can easily replace your shower niche drain and restore your shower’s functionality. If you encounter any issues during the installation process, don’t hesitate to consult a professional plumber.
4- Common Challenges and How to Overcome Them
While replacing a shower niche drain is a relatively straightforward project, there are a few common challenges that might arise. Here’s how to overcome them:
- Difficulty Removing the Old Drain: If the old drain is stuck or difficult to remove, try using a caulk remover or apply a lubricant to loosen it. If necessary, seek help from a professional.
- Improper Drain Alignment: If the new drain doesn’t align properly, check the alignment of the flange and adjust as needed. Ensuring a proper fit is essential to prevent leaks.
- Leaks After Installation: If you notice leaks after installation, check the sealant and make sure it’s fully applied around the edges. Reapply silicone sealant if necessary.
Most of these challenges can be easily fixed with patience and the right tools. If you encounter any serious issues, it might be worth calling in a professional plumber to ensure the drain is properly installed.
5- Finishing Touches and Maintenance Tips
Once you’ve replaced your shower niche drain, there are a few finishing touches and maintenance tips to keep in mind:
- Regularly clean the drain cover to prevent soap scum and debris buildup.
- Inspect the sealant around the drain every few months to ensure it hasn’t worn down or cracked.
- Consider applying a drain protector to prevent large debris from clogging the drain in the future.
Taking these simple steps will ensure that your shower niche drain remains in excellent condition for years to come. If you need any replacement parts or tools, visit Plumbers Supply Hub for top-quality products that suit your needs.


 Zane Plumbing Co5.0 (15 reviews)
 Minneapolis & Suburban Sewer and Water4.0 (34 reviews)
 Holland Heating & Plumbing4.0 (20 reviews)
 Mitch Clemmons Plumbing4.0 (142 reviews)
 Crow River Plumbing & Heating3.0 (3 reviews)
 RootBusters Plumbing, Sewer and Drains Inc.5.0 (291 reviews)
 How to Prevent Backups in the Main Sewer Line
 How to Reset a Tripped Pressure Switch in a Well Pump
 How to Prevent Water Heater Leaks with Regular Maintenance
 How to Replace a Sink Trap That Rusted Through
 How to Clean Out a Septic Drain Field Safely
 How to Choose a Tankless Water Heater for a Family Home