
- Understanding Valve Stems
- Tools Needed for the Job
- Step-by-Step Guide to Replacing the Valve Stem
- Troubleshooting Tips for Stubborn Valve Stems
- Preventative Maintenance for Valve Stems
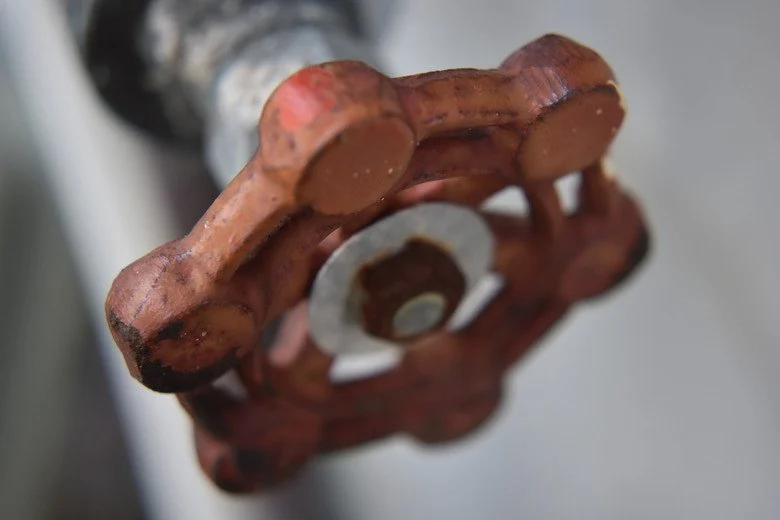
Understanding Valve Stems
Valve stems are integral components of plumbing systems, commonly found in faucets, toilets, and even certain appliances. They control the flow of water, allowing users to turn it on or off. However, over time, valve stems may become stuck or difficult to turn due to mineral buildup, wear and tear, or corrosion. Knowing how to replace a valve stem that won’t turn can save you time and prevent costly plumbing issues down the road.

Temecula Valley Backflow, Inc.
TemeculaRiverside CountyCalifornia
PO Box 890068, Temecula, CA 92589, USA
Tools Needed for the Job
Before beginning the replacement process, it’s important to have the right tools at hand. Here's a list of what you’ll need:
- Adjustable wrench
- Replacement valve stem
- Plumber’s tape
- Pipe wrench (for stubborn stems)
- Penetrating oil (for lubrication)
- Flathead screwdriver
- Rubber gloves
Having these tools ready will make the process more efficient and reduce any chances of frustration. Additionally, ensure that you’re working in a well-lit space to avoid losing any small components during the repair.

Roto-Rooter Plumbing & Water Cleanup
5057 Troy Rd Ste G, Springfield, OH 45502, USA
Step-by-Step Guide to Replacing the Valve Stem
Now that you’re prepared, let’s dive into the step-by-step guide to replacing a valve stem that won’t turn.
- Turn off the Water Supply: Always begin by turning off the water supply to prevent any leaks or water damage. You can typically find the shut-off valve near the fixture where the valve stem is located.
- Remove the Handle: Use a flathead screwdriver to carefully pry off the handle of the faucet or valve. You may need to loosen a screw or use a wrench to remove any fastenings securing the handle in place.
- Loosen the Packing Nut: Once the handle is removed, use your adjustable wrench to loosen the packing nut around the valve stem. This nut holds the stem in place, and it must be loosened before you can remove it.
- Remove the Valve Stem: After loosening the packing nut, gently pull the valve stem out. If the stem is stuck, apply penetrating oil to loosen any corrosion or mineral buildup. Let the oil sit for a few minutes before attempting to pull the stem again.
- Install the New Valve Stem: Take your replacement valve stem and install it in the same position as the old one. Ensure that the new stem is properly aligned before tightening it into place. Use plumber’s tape around the threads to ensure a watertight seal.
- Tighten the Packing Nut: Once the new valve stem is in place, reattach the packing nut and tighten it using your adjustable wrench. Be sure not to overtighten, as this could cause damage to the valve.
- Reattach the Handle: Finally, reattach the handle and tighten any screws or fasteners that were holding it in place. Test the handle by turning it to ensure it operates smoothly.
Troubleshooting Tips for Stubborn Valve Stems
If your valve stem still won’t turn after following the steps above, there could be other underlying issues at play. Here are some troubleshooting tips:
- Excessive Corrosion: If the valve stem is severely corroded, it may require a more aggressive cleaning method, such as soaking the stem in vinegar or using a wire brush to scrub away the corrosion.
- Examine the Valve Body: Sometimes, the issue may be with the valve body itself. Inspect the valve’s interior for cracks or damage that might prevent the stem from turning. If the valve body is damaged, replacing the entire valve may be necessary.
- Professional Help: If the stem remains immobile despite all efforts, it’s time to call a professional plumber. They can assess the situation and determine if the valve stem or other components need to be replaced.
Preventative Maintenance for Valve Stems
Once you've successfully replaced the valve stem, consider taking steps to prevent future issues. Here are a few tips for maintaining your valve stems:
- Regular Cleaning: Periodically clean your valve stems to prevent buildup of minerals, rust, or other debris that could cause them to become stuck.
- Inspect for Leaks: Regularly check the valve stem for any signs of leaks. Tightening the packing nut can sometimes solve minor leaks.
- Use Proper Lubrication: Apply lubricant to the valve stem occasionally to keep it moving smoothly and to prevent rusting.
By performing regular maintenance, you can extend the lifespan of your valve stems and reduce the likelihood of needing future replacements.
For more plumbing tips, tools, and services to help with valve stem replacements and other plumbing repairs, visit Plumbers Supply Hub for expert guidance and top-quality products!


 LA JJ Plumbing 플러밍4.0 (6 reviews)
 Gensons Plumbing4.0 (42 reviews)
 Proper Plumbing5.0 (19 reviews)
 Moede & Sons Inc4.0 (29 reviews)
 My Professional Plumber4.0 (741 reviews)
 Murphy and Son's Plumbing4.0 (29 reviews)
 How to Fix a Dripping Faucet Without Calling a Plumber | Plumbers Supply Hub
 How to Replace a Sink Overflow Tube: A Complete Step-by-Step Guide
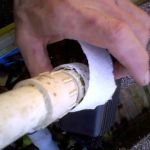 How to Repair a Crack in a Plastic Drain Pipe
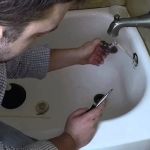 What to Do When Your Bathtub Drains Slowly: Solutions and Tips
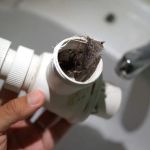 How to Repair a Swollen P-Trap After a Clog
 How to Detect a Hidden Slab Leak: A Complete Guide for Homeowners