
- Why Replace Your Shower Pan or Base?
- Tools and Materials Needed for Shower Pan Replacement
- Steps to Replace a Shower Pan or Base
- Common Challenges and Solutions
- Finishing Touches and Sealing Your Shower Pan
1. Why Replace Your Shower Pan or Base?
Replacing a shower pan or base may seem like a daunting task, but it can greatly improve the functionality and aesthetics of your bathroom. Over time, shower pans can become worn, cracked, or damaged, leading to leaks, water damage, and potential mold growth. A worn-out shower base not only affects the appearance of your bathroom but also compromises its waterproof integrity.
If you’re dealing with issues like leaks, cracks, or a lack of proper drainage, replacing the shower pan is essential to maintaining a safe and dry bathroom environment. Additionally, upgrading to a modern shower base can enhance your bathroom’s look, making it a worthwhile investment for both functionality and resale value.

2. Tools and Materials Needed for Shower Pan Replacement
Before beginning the process of replacing a shower pan, it’s important to have all the necessary tools and materials. Having everything on hand will help you work efficiently and avoid unnecessary interruptions. Here’s a list of the essential items:

2.1 Tools
- Utility Knife – for cutting caulking or old adhesive.
- Screwdriver or Drill – for removing screws and bolts holding the old base in place.
- Pipe Wrench – if you need to disconnect any plumbing or drain pipes.
- Level – to ensure the new shower pan is installed correctly and sits evenly.
- Measuring Tape – to take accurate measurements of the new shower pan and the space it will occupy.
2.2 Materials
- Shower Pan or Base – available in a variety of materials, such as acrylic, fiberglass, or tile.
- Shower Drain – a compatible drain for your new shower pan or base.
- Mortar or Cement Backer Board – to ensure a sturdy base for your new pan.
- Waterproofing Sealant – to prevent leaks and moisture from seeping under the new shower base.
- Silicone Caulk – for sealing around the edges of the shower base to prevent water leakage.
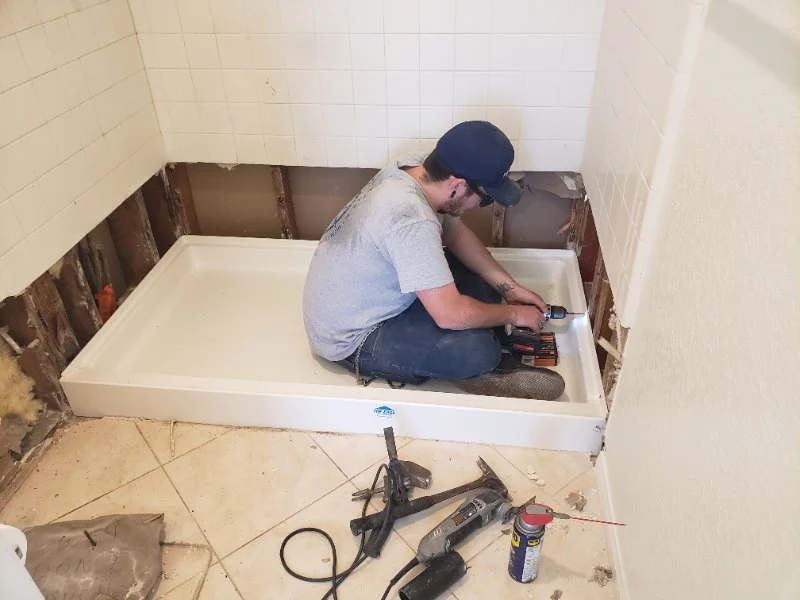
3. Steps to Replace a Shower Pan or Base
Replacing a shower pan or base is a manageable DIY project that can be completed in a few steps. Here’s a detailed guide on how to replace your shower pan safely and effectively:
3.1 Step 1: Remove the Old Shower Pan
The first step is to remove the old shower pan or base. If it’s made of acrylic or fiberglass, you may need to cut it into sections to remove it easily. Use a utility knife to cut through the caulking around the edges, and unscrew any fasteners that are holding the base in place. Carefully lift out the old shower pan, taking care not to damage any plumbing connections or the surrounding tile or wall surfaces.
3.2 Step 2: Inspect the Drain and Plumbing
Once the old shower pan is removed, inspect the drain and plumbing for any issues. If the drain pipe needs to be replaced or adjusted, now is the time to do it. Ensure that the drain is properly aligned with the new shower pan to avoid future leaks.
3.3 Step 3: Prepare the Subfloor
Before installing the new shower pan, ensure that the subfloor is level and free of debris. If necessary, add a layer of mortar or cement backer board to create a stable, even surface for the new shower base. Use a level to ensure the subfloor is properly aligned, as an uneven base could cause the pan to crack or warp over time.
3.4 Step 4: Install the New Shower Pan or Base
Now it’s time to install the new shower pan. Carefully place it in position, ensuring that it fits snugly into the space and aligns with the drain. If the pan requires adhesive, apply it to the bottom of the pan before positioning it. Once in place, press down firmly to ensure a secure bond with the subfloor. Follow the manufacturer’s instructions for specific installation steps, as some pans may require additional steps like securing them with screws or clips.
3.5 Step 5: Connect the Drain
Connect the drain assembly to the plumbing, ensuring that all connections are tight and secure. Use a pipe wrench to tighten any bolts and make sure the drain is aligned properly to avoid leaks. Test the drain by running water to ensure that it flows smoothly and without obstruction.
3.6 Step 6: Seal the Edges
Once the shower pan is securely installed, apply a waterproofing sealant around the edges to prevent water from seeping underneath the pan. Use silicone caulk to seal the perimeter of the shower base, paying special attention to the corners and joints. Allow the caulk to dry completely before using the shower.
4. Common Challenges and Solutions
While replacing a shower pan is straightforward, you may encounter a few challenges along the way. Here are some common issues and how to resolve them:
4.1 Issue: Uneven Subfloor
If the subfloor is uneven, it may cause the shower pan to sit improperly, leading to leaks and damage. To fix this, use a leveling compound or add additional mortar to create a flat surface. A level is essential to ensure the subfloor is properly aligned before installing the new shower base.
4.2 Issue: Drain Misalignment
Misaligned drains are a common issue during installation. If the drain does not line up with the new shower pan, you may need to adjust the plumbing. This could involve repositioning the drain pipe or using an adjustable drain kit to ensure a proper fit.
4.3 Issue: Leaks at the Edges
If you notice leaks around the edges of the shower pan, it may be due to insufficient caulking or sealant. Ensure that the silicone caulk is applied evenly around the perimeter and corners. Press down firmly to create a watertight seal, and allow it to cure before using the shower.
5. Finishing Touches and Sealing Your Shower Pan
After installing the shower pan, the final step is to ensure it is fully sealed and ready for use. Here are a few finishing touches to complete the installation:
5.1 Install Shower Walls
Once the pan is installed and sealed, you can proceed with installing the shower walls. Whether you’re using tiles, acrylic panels, or other materials, make sure to follow the manufacturer’s instructions for proper installation.
5.2 Test the Shower
Before using your newly installed shower, test it for leaks by running water and checking all connections. Make sure there are no signs of water seepage, and that the drainage system works properly.
Replacing a shower pan or base is a manageable DIY project that can enhance the functionality and appearance of your bathroom. With the right tools, materials, and attention to detail, you can complete the replacement safely and effectively. For more expert plumbing advice and quality materials, visit Plumbers Supply Hub, where we offer a wide range of plumbing products to support your home improvement projects.


 OC REPIPES5.0 (117 reviews)
 Eco Plumbers, Electricians, and HVAC Technicians4.0 (732 reviews)
 Ryan Plumbing5.0 (4 reviews)
 Mojicas drain cleaning experts and leak detection4.0 (58 reviews)
 Inexpensive Plumbing & Drain4.0 (1 reviews)
 Pristine Plumbing4.0 (1351 reviews)
 What to Do When Your Sink Leaks Only at the Base: Causes & Fixes
 How to Test for Bacteria in Household Water Supply
 How to Fix a Leaking Hose Bibb: A DIY Plumbing Solution
 How to Prevent Toilet Clogs: Simple Tips Every Homeowner Should Know
 How to Replace a Shower Glass Door Without Causing Leaks
 When to Call a Professional for Sewer Line Issues