
- Why Replace a Tub Drain with a Hair Trap Feature?
- Tools and Materials Needed for the Job
- Step-by-Step Guide to Replacing a Tub Drain
- Common Challenges and Solutions
Why Replace a Tub Drain with a Hair Trap Feature?
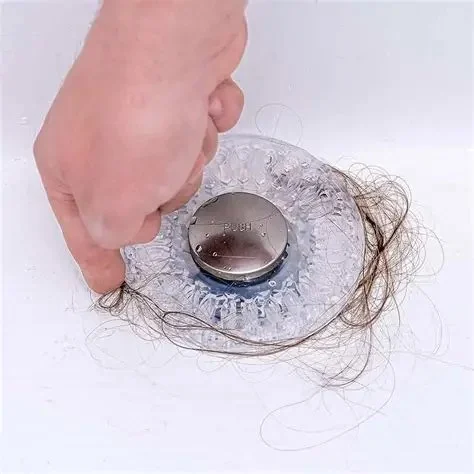
Clogged drains are one of the most common plumbing issues in the bathroom, with hair being one of the main culprits. A tub drain without a hair trap can quickly become blocked, leading to slow drainage, foul odors, and potential water damage. Replacing your tub drain with a hair trap feature is a simple but effective way to prevent hair from clogging your pipes, which can save you time and money on repairs in the long run.
A hair trap is designed to catch hair before it can go down the drain, making it much easier to clean and maintain your plumbing system. Installing a drain with a hair trap feature not only reduces the likelihood of clogs but also ensures smoother water flow and a more efficient drainage system. If you’ve been dealing with frequent drain blockages or slow draining, upgrading to a tub drain with a hair trap is a smart investment for any homeowner.
Tools and Materials Needed for the Job
Replacing a tub drain with a hair trap feature is a relatively straightforward DIY task, but it does require some basic plumbing tools. Here’s a list of what you’ll need:

Victor's Plumbing & Water Heater Repair
Los AngelesLos Angeles CountyCalifornia
19301 Ventura Blvd suite 259, Tarzana, CA 91356, USA
1. Pipe Wrench or Adjustable Wrench
A pipe wrench or adjustable wrench is essential for loosening and tightening the drain components. You'll use it to unscrew the old drain and secure the new one in place.
2. Drain Removal Tool
If the old drain is stuck or difficult to remove, a drain removal tool can help. This tool is designed to grab onto the drain and unscrew it from the pipe, making the removal process easier.
3. Hair Trap Drain
The most important part of the replacement is the new drain with a hair trap feature. Make sure to choose a high-quality tub drain with a built-in hair trap that fits your tub size. These are available at most hardware stores and plumbing supply shops.
4. Teflon Tape or Plumber’s Putty
Teflon tape or plumber’s putty is needed to seal the connections and prevent leaks when installing the new drain. The putty helps create a watertight seal, while the tape helps to secure the threaded connections.
5. Screwdriver or Drill
Depending on the type of drain you're installing, you may need a screwdriver or drill to secure the new drain into place. This is especially true for drains that require screws for installation.
Step-by-Step Guide to Replacing a Tub Drain
Now that you have your tools and materials ready, follow these simple steps to replace your tub drain with a hair trap feature:
1. Turn Off the Water Supply
Before starting any plumbing work, make sure to turn off the water supply to your tub. This will prevent any accidents and avoid getting wet while you’re working. Once the water is turned off, drain any remaining water from the tub by opening the drain or using a towel to soak it up.
2. Remove the Old Drain
Use your pipe wrench or adjustable wrench to loosen and remove the existing tub drain. If the drain is stuck, apply some lubricant and let it sit for a few minutes before trying again. A drain removal tool can also be helpful here. Once it’s loose, carefully remove the drain from the tub.
3. Clean the Drain Area
Once the old drain is removed, clean the area around the drain hole thoroughly. Use a cloth or sponge to wipe away any debris, old plumber’s putty, or residue from the previous installation. This will ensure the new drain fits snugly and creates a watertight seal.
4. Install the New Drain with Hair Trap Feature
Place the new drain with the hair trap feature into the drain hole and align it properly. Apply plumber’s putty or Teflon tape around the edge of the drain to create a secure seal. Use your wrench or screwdriver to tighten the drain into place, but be careful not to overtighten and risk damaging the tub or drain components.
5. Test for Leaks
Once the new drain is installed, turn the water supply back on and check for any leaks around the drain. If you notice any leaks, tighten the drain slightly or apply additional plumber’s putty or tape to ensure a better seal. Run some water into the tub to test the drainage and confirm that the hair trap is working effectively.
Common Challenges and Solutions
While replacing a tub drain with a hair trap feature is a relatively simple task, there are a few common challenges you may encounter. Here are some potential issues and how to address them:
1. Stubborn Old Drain
If the old drain is difficult to remove due to corrosion or tight connections, you may need to use a drain removal tool or apply penetrating oil to loosen it. Patience is key when dealing with stubborn parts, and a little lubrication can make a big difference in easing the removal process.
2. Incorrect Drain Size
Before purchasing a new drain, it’s essential to measure your tub drain hole and choose the appropriate size. If the new drain doesn’t fit properly, you may need to return it and select the correct size. Always double-check measurements before starting the installation.
3. Leaks After Installation
If you notice leaks after installing the new drain, check the connections and seals. Tighten the drain or reapply plumber’s putty or Teflon tape to the threads to ensure a better seal. If the leaks persist, consider disassembling the drain and inspecting the parts for any damage.
By following this guide and addressing these common challenges, you can successfully replace your tub drain with a hair trap feature. This small upgrade can significantly reduce clogs and maintain a clean, efficient drainage system in your bathroom.


 1-Tom-Plumber4.0 (555 reviews)
 Right Choice Rooter & Plumbing Service4.0 (82 reviews)
 Cottonwood Co-Op Agronomy Center5.0 (5 reviews)
 Lloyd's Ideal Plumbing LLC4.0 (8 reviews)
 PF Plumbing4.0 (1753 reviews)
 Alfa Backflow Inc.4.0 (52 reviews)
 What Causes Discolored Water and When to Worry: Causes, Effects, and Solutions
 Tankless Water Heaters: Are They Worth the Investment? Pros and Cons Explained
 What Causes Discolored Water and When to Worry
 How to Replace a Broken Valve in a Water Line
 How to Choose a Reliable Plumbing Service in Your Area
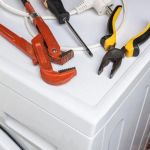 How to Install a Washing Machine: A Complete DIY Guide