
How to Replace Copper Pipes with PEX Safely
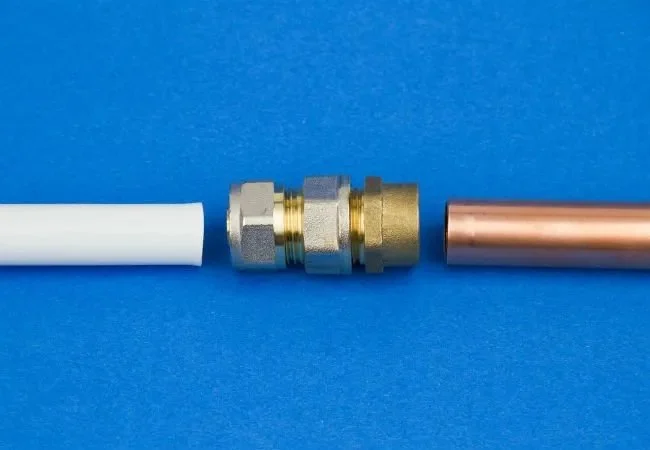
Replacing copper pipes with PEX (cross-linked polyethylene) is a common plumbing upgrade for many homeowners. PEX pipes are flexible, durable, and cost-effective, making them a popular choice for new plumbing installations and renovations. However, replacing copper pipes with PEX requires careful planning and execution to ensure a safe and efficient installation. This step-by-step guide will walk you through the process of replacing copper pipes with PEX, highlighting essential safety tips, tools, and techniques to make the job easier.
- 1. Understanding the Benefits of PEX
- 2. Tools and Materials You’ll Need
- 3. Step-by-Step Guide to Replacing Copper Pipes with PEX
- 4. Common Mistakes to Avoid
- 5. Final Tips for a Successful PEX Installation
1. Understanding the Benefits of PEX
PEX piping has become increasingly popular for residential plumbing due to its many advantages over traditional copper pipes. Here are some reasons why PEX is a great choice for your home:
- Flexibility: PEX is highly flexible, which makes installation easier, especially in tight spaces. It can be bent and curved without the need for fittings, which reduces the risk of leaks.
- Corrosion Resistance: Unlike copper, PEX pipes won’t corrode over time, making them more durable and longer-lasting.
- Lower Cost: PEX is more affordable than copper, both in terms of material costs and labor for installation.
- Ease of Installation: PEX is easier and faster to install, requiring fewer joints and fittings, which can reduce installation time.
These benefits make PEX an excellent alternative to copper pipes, especially for DIY plumbing projects.

Gosch's Plumbing, Heating, & Duct Cleaning
329 2nd Ave SE, Cresco, IA 52136, USA
2. Tools and Materials You’ll Need
Before you start the process of replacing copper pipes with PEX, make sure you have the right tools and materials on hand. Here’s what you’ll need:
- PEX Tubing: Choose the appropriate diameter and length of PEX tubing for your installation.
- PEX Fittings and Connectors: These include elbows, tees, couplings, and adapters that are necessary to connect the PEX tubing to existing plumbing systems.
- Pipe Cutter: A pipe cutter will allow you to easily cut copper pipes and PEX tubing to the correct size.
- Crimp Tool: This tool is used to secure PEX fittings to the tubing by applying a crimp ring.
- PEX Expansion Tool: Some PEX installations require the use of an expansion tool to make connections with expansion fittings.
- Plumber’s Tape and Thread Sealant: Used for sealing threaded connections to prevent leaks.
- Safety Gear: Wear safety glasses, gloves, and a dust mask to protect yourself during the installation process.
3. Step-by-Step Guide to Replacing Copper Pipes with PEX
Now that you have your materials and tools, follow these steps to replace your copper pipes with PEX safely:
- Shut Off the Water Supply: Before starting, make sure you shut off the water supply to the pipes you’ll be working on. This will prevent any water from flowing while you’re cutting and installing the new PEX pipes.
- Remove the Copper Pipes: Use your pipe cutter to remove the old copper pipes. Cut the pipes carefully and make sure to leave enough space for installing the new PEX tubing.
- Prepare the PEX Tubing: Cut the PEX tubing to the desired lengths. Use a sharp cutter to ensure clean, precise cuts. Avoid any jagged edges that could interfere with fitting the connections properly.
- Install the PEX Fittings: Attach the appropriate PEX fittings to your tubing. Depending on the system you’re installing, you may need to use crimp or push-fit fittings. Use a crimp tool or expansion tool to secure the connections.
- Connect the PEX Tubing to the Existing Plumbing: Use PEX connectors or adapters to connect the new PEX tubing to the existing plumbing system. Make sure the connections are tight and secure to prevent leaks.
- Test the System: Once everything is connected, turn the water supply back on and test for leaks. Check all connections thoroughly, ensuring there are no signs of water escaping.
4. Common Mistakes to Avoid
While replacing copper pipes with PEX is a relatively straightforward task, it’s important to avoid some common mistakes:
- Incorrect Fitting Connections: Ensure you’re using the correct type of fittings for your system. Using the wrong connectors can lead to leaks or failed installations.
- Improper Cutting: Always make sure your cuts are clean and straight. Jagged or uneven cuts can make it difficult to connect the PEX tubing to fittings properly.
- Forgetting to Test for Leaks: After installation, always test the system for leaks before closing the walls or finishing the project. It’s much easier to fix leaks if they’re caught early.
5. Final Tips for a Successful PEX Installation
For a smooth and successful PEX installation, keep these final tips in mind:
- Plan Ahead: Take your time to plan the layout and determine the best route for your new PEX pipes. Proper planning will help ensure a more efficient and tidy installation.
- Use Quality Materials: Always choose high-quality PEX tubing and fittings to ensure the longevity of your plumbing system.
- Follow Local Codes: Make sure your installation complies with local plumbing codes and regulations. Check with a licensed plumber or contractor if you’re unsure.
Replacing copper pipes with PEX is a great way to update your plumbing system and enjoy the benefits of durable, flexible pipes. By following this guide, you’ll be able to complete the installation safely and efficiently, saving both time and money. For additional plumbing supplies, visit Plumbers Supply Hub.


 Exp Plumber Fullerton5.0 (24 reviews)
 Boones Plumbing And Heating2.0 (9 reviews)
 LZ Plumbing Inc.4.0 (28 reviews)
 Livonia Plumbing Services5.0 (22 reviews)
 Corsillo Plumbing & Sewer Cleaning Co.4.0 (63 reviews)
 Master Plumbers Inc.4.0 (44 reviews)
 How to Install a New Showerhead: A Step-by-Step DIY Plumbing Guide
 How to Fix a Sink That Squirts Water When Used
 What to Check When You Have Low Water Pressure in Your Home
 How to Repair a Broken Thread on a Pipe
 How to Repair a Junction That Is Leaking Under Slab
 Why Your Water Bill Is High and How to Lower It with Plumbing Solutions