

The Complete Guide to Replacing a Kitchen Sink Drain
Over time, kitchen sink drains can become clogged, damaged, or worn out, leading to leaks and poor drainage. Replacing a kitchen sink drain is a relatively simple DIY task that can save you money on professional plumbing services. In this guide, we’ll walk you through the entire process of replacing your kitchen sink drain, from gathering the right tools to finishing up the installation. With the right knowledge and a little effort, you’ll have a fully functioning drain in no time!

Jetter Clean Advanced Drain Cleaning Fairmont
FairmontMartin CountyMinnesota
111 W 4th St, Fairmont, MN 56031, USA
1. Why You Might Need to Replace Your Kitchen Sink Drain
Kitchen sinks are exposed to daily use, so it’s no surprise that drain problems can arise. There are several reasons why you might need to replace your kitchen sink drain:

24/7 Pro-Rooter/Plumbing
ComptonLos Angeles CountyCalifornia
13008 S Harris Ave, Compton, CA 90221, USA
1.1 Clogs and Poor Drainage
Over time, debris like grease, food particles, and soap scum can build up in your kitchen sink drain, leading to blockages. While some clogs can be cleared with a plunger or drain cleaner, persistent blockages may require replacing the drain altogether.
1.2 Leaks Around the Sink
If you notice water pooling around your kitchen sink or damp spots under the sink, it could be a sign of a leak in your drain. Leaky drains can cause water damage and mold growth, so it’s essential to replace the drain as soon as possible to prevent further damage.
1.3 Age of the Drain
Over time, even high-quality kitchen sink drains can wear out due to regular use and exposure to harsh cleaning chemicals. If your drain is old, rusty, or showing signs of corrosion, replacing it can improve both the functionality and aesthetics of your kitchen sink.
2. Tools and Materials You Will Need
Before you start replacing your kitchen sink drain, gather all the necessary tools and materials. Here’s what you’ll need:
- - Wrench or pipe wrench
- - Screwdriver
- - Plumber’s putty
- - Replacement drain assembly (including drain, flange, and locknut)
- - Adjustable pliers
- - Teflon tape (optional)
- - Bucket or container to catch water
3. Step-by-Step Guide to Replacing Your Kitchen Sink Drain
Now that you have all the tools and materials ready, it’s time to get started with the drain replacement. Follow these steps for a smooth and successful installation:
3.1 Turn Off the Water Supply
Before you begin working on your kitchen sink, make sure to turn off the water supply. You don’t want any unexpected water flow while you’re working on the drain. Also, place a bucket or container underneath the drain to catch any water that might spill out during the process.
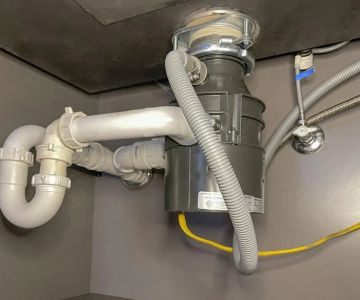
3.2 Remove the Old Drain
Start by loosening and removing the locknut that holds the drain assembly in place. Use your pipe wrench or adjustable pliers to carefully loosen it. Once the locknut is removed, you can pull the old drain out from the sink. Be careful not to damage the sink surface while removing the drain.
3.3 Clean the Area
Once the old drain is removed, clean the area around the drain hole. This step is essential to ensure a secure seal when installing the new drain. Use a rag to wipe away any debris, old putty, or grime that may have accumulated around the drain hole.
3.4 Apply Plumber’s Putty
Apply a thin layer of plumber’s putty around the lip of the new drain flange. The putty helps create a watertight seal between the drain and the sink, preventing leaks. Press the flange firmly into the sink drain hole, ensuring it’s seated evenly.
3.5 Install the New Drain
Insert the new drain assembly through the flange and into the sink hole. Then, secure it in place with the locknut. Use your wrench or pliers to tighten the locknut, making sure the drain is firmly attached to the sink. Be careful not to overtighten, as this could cause damage.
3.6 Connect the Drain Pipes
Once the drain is securely in place, reconnect the drain pipes to the new drain assembly. If necessary, wrap the threads with Teflon tape to ensure a tight seal and prevent leaks. Tighten the connections with a wrench or pliers, but again, be careful not to overtighten.
3.7 Test the New Drain
Turn the water supply back on and check for leaks. Run water through the sink and check the connections under the sink for any signs of leaking. If you notice any leaks, tighten the connections a little more until the issue is resolved.
4. Tips for Maintaining Your New Kitchen Sink Drain
Now that you’ve successfully replaced your kitchen sink drain, it’s important to maintain it to avoid future issues. Here are a few tips to keep your drain in top condition:
4.1 Regularly Clean Your Drain
Regularly clean your drain to prevent clogs and buildup. Use a drain cleaner or a mixture of baking soda and vinegar to keep your drain clear. Avoid pouring grease or large food particles down the drain to prevent blockages.
4.2 Check for Leaks
Periodically check the connections under the sink for leaks. Tighten any loose connections and replace any worn-out parts as needed to maintain the integrity of your drain system.
4.3 Use a Drain Screen
To prevent debris and food particles from going down the drain, consider using a drain screen. This simple tool can help catch large items and reduce the risk of clogs, keeping your sink drain in optimal condition.
5. How Plumbers Supply Hub Can Help
If you’re looking for high-quality drain replacement parts or need expert advice, Plumbers Supply Hub is here to help. We offer a wide selection of plumbing tools, parts, and accessories to assist you in your DIY projects. Visit us today to find the perfect products for your next kitchen sink drain replacement!


 Roto-Rooter of Morristown TN3.0 (37 reviews)
 Daniel's Plumbing Services LLC5.0 (50 reviews)
 Ardmore Plumbing Heating & Cooling0.0 (0 reviews)
 Drain Guys LLC4.0 (60 reviews)
 Walbrandt Plumbing Services LLC5.0 (69 reviews)
 Precision USA Plumbing & Heating4.0 (56 reviews)
 How to Clean and Maintain Your Shower Head for Better Flow
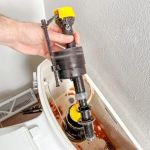 How to Replace a Toilet Fill Valve Quietly
 What Happens When You Pour Grease Down the Drain
 How to Install a New Toilet: A Complete Step-by-Step Guide
 How to Fix a Leaky Water Heater: Step-by-Step Instructions
 How to Replace an In-Line Check Valve