
- 1. Why Replace Copper Pipes With PEX?
- 2. Preparing for the Replacement Process
- 3. Step-by-Step Guide to Replacing Copper Pipes With PEX
- 4. Tools and Materials You Need for the Job
- 5. Tips for Safe Installation of PEX Pipes
1. Why Replace Copper Pipes With PEX?
Copper pipes have been the standard for plumbing for decades, but they come with some significant drawbacks, including susceptibility to corrosion and high costs for installation and repairs. In contrast, PEX (cross-linked polyethylene) piping offers numerous advantages, such as greater flexibility, resistance to corrosion, and lower material costs.
Replacing copper pipes with PEX can be a smart decision for homeowners looking to improve the efficiency of their plumbing system and save money on repairs and installation. PEX pipes are especially beneficial for areas with hard water or extreme temperatures where copper pipes might suffer from corrosion or freezing. Moreover, PEX can be installed with fewer connections, reducing the risk of leaks over time.

2. Preparing for the Replacement Process
Before you dive into replacing your copper pipes with PEX, it’s essential to take the proper steps to ensure the job is done safely and efficiently. Proper preparation helps you avoid costly mistakes and ensures that the installation process goes smoothly. Here are the key steps to follow:

2.1 Shut Off the Water Supply
The first step in any plumbing replacement project is to turn off the water supply to your home. Find the main water valve and turn it off to prevent any flooding or water damage while working on your pipes.
2.2 Assess the Existing Plumbing
Take some time to assess the copper pipes that need to be replaced. Determine which sections of piping are problematic and need to be swapped out. If you're replacing all the copper pipes, make sure to plan your approach to minimize disruptions to your water supply.
2.3 Gather the Necessary Tools
Ensure you have all the tools you’ll need for the job (which we’ll cover in the next section). It’s always a good idea to have extra materials on hand in case anything goes wrong during the installation process.
3. Step-by-Step Guide to Replacing Copper Pipes With PEX
Replacing copper pipes with PEX might seem daunting, but with the right tools and a bit of knowledge, you can handle it yourself. Here’s a step-by-step guide:
3.1 Cut Out the Copper Pipes
Start by cutting out the copper pipes that need to be replaced. Use a pipe cutter or a hacksaw to cut the pipes at the right places. Make sure you leave enough space to insert the PEX connectors.
3.2 Prepare the PEX Pipes
Measure and cut the PEX pipes to the required lengths. You can use a PEX pipe cutter for a clean, precise cut. PEX pipes are flexible, so you won’t have to worry about the piping being too rigid to fit into your existing plumbing setup.
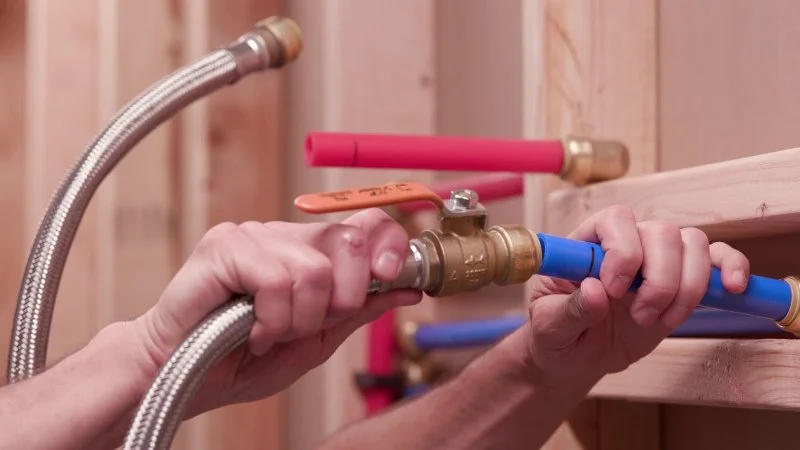
3.3 Connect the PEX to the Existing Plumbing System
To connect the PEX pipes to the existing plumbing, use PEX fittings (such as crimp, clamp, or push-fit fittings) to make secure connections. Make sure the fittings are compatible with the PEX pipe and copper pipe you’re working with.
3.4 Test the System
Once the new PEX pipes are in place, turn the water back on and check for any leaks. If everything looks good, your installation is complete. If you find any leaks, tighten the fittings and test again until the system is secure.
4. Tools and Materials You Need for the Job
Before starting the job, make sure you have the right tools and materials for a smooth installation:
4.1 PEX Pipes
Choose high-quality PEX pipes that are rated for your local water conditions. Look for PEX-A, PEX-B, or PEX-C pipes, with PEX-A being the most flexible and durable choice.
4.2 PEX Fittings and Connectors
PEX fittings come in a variety of styles, including crimp, clamp, and push-fit. Choose the ones that best suit your plumbing system and skill level. Crimping tools are often required for secure connections.
4.3 Pipe Cutter or Hacksaw
A PEX pipe cutter or hacksaw is necessary to cut both copper and PEX pipes cleanly and accurately.
4.4 Crimping Tool
If you're using crimp fittings, a crimping tool will be required to securely attach the fittings to the PEX pipes.
5. Tips for Safe Installation of PEX Pipes
While replacing copper pipes with PEX is generally safe, there are a few important safety tips to follow:
5.1 Wear Protective Gear
Always wear safety goggles and gloves when working with pipes to protect yourself from sharp edges and debris.
5.2 Check Local Plumbing Codes
Before starting the installation, make sure to check local plumbing codes to ensure that PEX piping is allowed and that you follow all necessary regulations.
5.3 Hire a Professional If Necessary
If you’re not comfortable with the installation process or if you have complicated plumbing needs, consider hiring a professional plumber. Professional plumbers have the experience to handle the job quickly and correctly.
For the best PEX plumbing materials and professional advice, visit Plumbers Supply Hub to find top-quality products and services tailored to your needs.


 A & B Plumbing, Heating & A/C, Inc.3.0 (37 reviews)
 All Referral Plumbing4.0 (3 reviews)
 NCD Corsillo Plumbing LLC4.0 (5 reviews)
 Reliable Plumbing LLC5.0 (23 reviews)
 SoCal Plumbing and Design, Inc.0.0 (0 reviews)
 Hume Plumbing Inc5.0 (6 reviews)
 How to Clean Out a Septic Tank Filter Safely: Step-by-Step Guide
 How to Repair a Slab Leak Under the Floor: Step-by-Step Expert Guide
 Plumbing Tips for Improving Your Home’s Water Quality
 How to Repair a Cracked Pipe Without Replacing It
 How to Fix a Sink That Drains Slowly Over Time: Expert Tips for a Faster Drain
 How to Replace a Shower Niche Drain: Step-by-Step Guide for Homeowners