
How to Replace a Toilet Tank Gasket
- 1- Why Replacing a Toilet Tank Gasket is Important
- 2- Signs You Need to Replace the Gasket
- 3- Tools and Materials You Will Need
- 4- Step-by-Step Guide to Replacing the Toilet Tank Gasket
- 5- Common Mistakes to Avoid
- 6- Plumbers Supply Hub Recommendations
1. Why Replacing a Toilet Tank Gasket is Important
The toilet tank gasket plays a critical role in preventing water leaks between the tank and the toilet bowl. Over time, gaskets can wear out due to constant exposure to water, pressure, and environmental factors. If the gasket is damaged or worn out, it can cause water to leak from the tank, which can lead to significant water damage and costly repairs. Replacing the gasket ensures your toilet functions properly and avoids water waste or potential structural damage.
2. Signs You Need to Replace the Gasket
Recognizing the signs that your toilet tank gasket needs to be replaced is key to preventing bigger issues down the line. Here are a few common indicators:

1. Water Leaks Around the Toilet Base
If you notice water pooling around the base of the toilet, it may be due to a faulty gasket. This is often the first sign of trouble, especially if the leaks happen when the toilet is in use. Leaks can sometimes go unnoticed, but they can cause significant water damage over time.
2. Constantly Running Toilet
A toilet that runs continuously after flushing could be another indication of a damaged gasket. This happens when the seal between the tank and bowl is compromised, preventing the tank from fully sealing after a flush.
3. Difficulty Flushing or Poor Performance
If your toilet isn’t flushing properly or the water level is consistently low in the tank, the gasket may not be sealing correctly, affecting the toilet’s performance.
3. Tools and Materials You Will Need
Before starting the gasket replacement, make sure you have the necessary tools and materials. Having everything prepared will make the process smoother and more efficient.
Tools:
- Wrench or adjustable pliers
- Flathead screwdriver
- Bucket or towel for water spillage
- Gloves (optional, for cleanliness)
Materials:
- Replacement toilet tank gasket
- New tank bolts (if necessary)
- Rubber washers (optional)
4. Step-by-Step Guide to Replacing the Toilet Tank Gasket
Now that you have your tools and materials ready, follow these simple steps to replace the toilet tank gasket:
Step 1: Turn Off the Water Supply
Before you begin, turn off the water supply to the toilet. You can usually find the water valve near the wall behind the toilet. Turn it clockwise to shut it off. Flush the toilet to empty the tank of water.
Step 2: Disconnect the Water Supply Line
Use an adjustable wrench to disconnect the water supply line from the bottom of the tank. Be prepared for some residual water to leak out, so have a towel or bucket handy.
Step 3: Remove the Toilet Tank from the Bowl
Next, use your wrench to remove the tank bolts that connect the toilet tank to the bowl. Carefully lift the tank off the toilet bowl and set it aside. You may need a flathead screwdriver to loosen stubborn bolts.
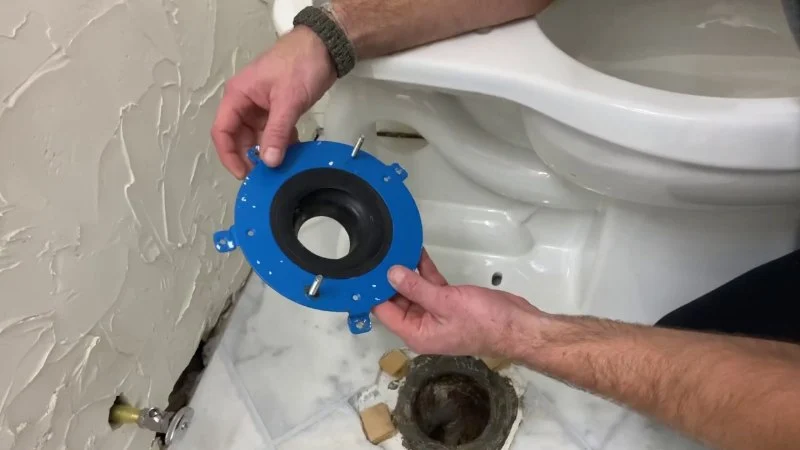
Step 4: Replace the Gasket
With the tank removed, locate the old gasket. It’s usually positioned between the tank and the bowl. Remove the old gasket and clean the area to ensure there’s no debris. Place the new gasket in position, ensuring it fits snugly.
Step 5: Reassemble the Toilet
Once the gasket is securely in place, carefully lift the tank back onto the toilet bowl. Align the tank bolts with the holes and tighten them using your wrench. Be sure not to overtighten, as this could crack the porcelain.
Step 6: Reconnect the Water Supply
Reconnect the water supply line to the bottom of the tank, and turn the water supply valve back on. Check for any leaks and tighten the connections if necessary. Allow the tank to refill and flush the toilet a few times to ensure everything is functioning properly.
5. Common Mistakes to Avoid
When replacing a toilet tank gasket, there are a few common mistakes to avoid to ensure the job is done correctly:
1. Not Cleaning the Area
Failing to clean the surface where the gasket sits can lead to poor sealing and potential leaks. Make sure to wipe down the area thoroughly before installing the new gasket.
2. Over-tightening the Bolts
While it’s important to tighten the tank bolts securely, over-tightening them can crack the tank or cause leaks. Tighten the bolts firmly but avoid using excessive force.
3. Using an Incorrect Gasket
Ensure you are using the correct gasket for your toilet model. Using the wrong size or type of gasket can lead to poor sealing and water leakage.
6. Plumbers Supply Hub Recommendations
If you’re looking for high-quality toilet tank gaskets and other plumbing supplies, visit Plumbers Supply Hub. They offer a wide selection of products, including gaskets, tank bolts, and other essential parts. With reliable service and top-notch products, Plumbers Supply Hub ensures that your plumbing repairs are handled with care.


 OC REPIPES5.0 (117 reviews)
 Eco Plumbers, Electricians, and HVAC Technicians4.0 (732 reviews)
 Ryan Plumbing5.0 (4 reviews)
 Mojicas drain cleaning experts and leak detection4.0 (58 reviews)
 Inexpensive Plumbing & Drain4.0 (1 reviews)
 Pristine Plumbing4.0 (1351 reviews)
 What to Do When Your Sink Leaks Only at the Base: Causes & Fixes
 How to Test for Bacteria in Household Water Supply
 How to Fix a Leaking Hose Bibb: A DIY Plumbing Solution
 How to Prevent Toilet Clogs: Simple Tips Every Homeowner Should Know
 How to Replace a Shower Glass Door Without Causing Leaks
 When to Call a Professional for Sewer Line Issues