
- 1. Preparing for the Installation
- 2. Gathering the Necessary Tools
- 3. Step-by-Step Installation Guide
- 4. Troubleshooting Common Issues
- 5. Garbage Disposal Maintenance Tips
1. Preparing for the Installation
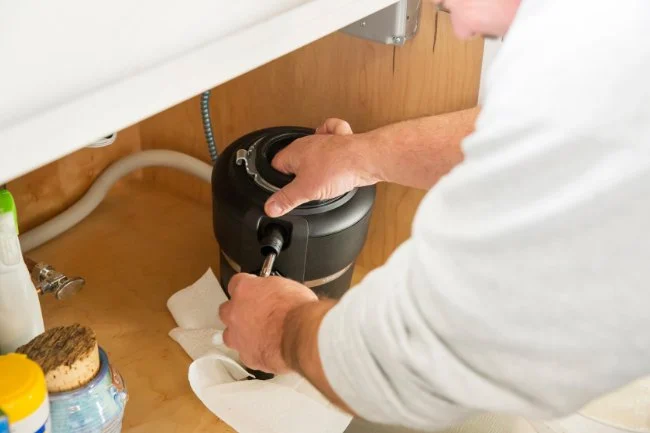
Installing a new garbage disposal may seem daunting, but with the right preparation, it can be a straightforward task. The first step is to turn off the power to your existing disposal (if you're replacing one) and ensure the water supply is also turned off. You should also have a clear workspace under your sink, removing any items that could obstruct your work.
Before beginning, it’s essential to double-check the type of garbage disposal you are installing to ensure it matches the existing setup in your kitchen. If you’re replacing an old model, check for compatibility with the plumbing and electrical system. If you’re installing one from scratch, you may need additional parts like plumbing adapters or an electrical outlet near the disposal unit.

Knoxville Plumbing & Drain Cleaning
6283 Clinton Hwy, Knoxville, TN 37912, USA
2. Gathering the Necessary Tools
Having the right tools for the job is crucial to ensure the installation process goes smoothly. Here’s a list of tools and materials you will need:
- Adjustable Wrench
- Plumber’s Putty
- Channel Lock Pliers
- Screwdriver (Flathead and Phillips)
- Pipe Wrench
- Electrical Tape (if needed)
- Garbage Disposal Installation Kit (typically included with the disposal)
Ensure that you have these tools within arm’s reach before starting the installation process. This will save you time and prevent unnecessary delays during the job.
Plymwr Plumbing
RiversideRiverside CountyCalifornia
6150 Rutland Ave suite 9, Riverside, CA 92503, USA
3. Step-by-Step Installation Guide
Now that you’re prepared, here’s a step-by-step guide to installing your new garbage disposal:
Step 1: Disconnect the Old Disposal (If Replacing)
If you’re replacing an old garbage disposal, start by disconnecting it from the sink flange. Use a wrench to loosen the mounting bolts, and carefully remove the old unit from the sink’s drain. Don’t forget to disconnect the electrical wiring from the existing unit.
Step 2: Install the Sink Flange
The sink flange is the part that connects the garbage disposal to the sink. Apply a small amount of plumber’s putty around the sink opening to create a seal. Then, insert the sink flange into the drain hole, pressing it firmly to ensure a tight seal.
Step 3: Mount the Garbage Disposal
Next, attach the mounting ring to the sink flange. Depending on the model, you might need to use a mounting bracket and screws. Follow the instructions included with your new garbage disposal to ensure you mount it securely to the sink.
Step 4: Wiring the Disposal
If your garbage disposal requires hardwiring, you’ll need to connect the electrical wiring to the unit. Use electrical tape to ensure a secure connection. Make sure the wires are attached according to the manufacturer’s instructions. If you’re not comfortable with wiring, it’s best to consult a professional plumber or electrician.
Step 5: Connect the Plumbing
Connect the drain lines to the garbage disposal using the pipe wrench. Make sure the connections are tight to avoid leaks. Then, attach the dishwasher drain hose (if applicable) to the appropriate outlet on the disposal unit.
Step 6: Test the Disposal
Once everything is connected, turn on the power and water supply to the disposal. Run some water through the disposal to test if it’s working properly. If everything sounds good and there are no leaks, you’ve successfully installed your new garbage disposal!
4. Troubleshooting Common Issues
Even with a perfect installation, you may encounter issues along the way. Here are some common problems and solutions:
Problem: Garbage Disposal Isn’t Turning On
Solution: Check the power source and make sure the disposal is plugged in. If it’s hardwired, check the circuit breaker. If the disposal still doesn’t turn on, inspect the reset button located on the bottom of the unit.
Problem: Disposal Is Leaking
Solution: A leak could be caused by loose plumbing connections or improper sealing around the sink flange. Tighten any loose connections and apply more plumber’s putty if necessary.
5. Garbage Disposal Maintenance Tips
To keep your new garbage disposal working efficiently, regular maintenance is key. Here are a few tips:
- Clean Regularly: Use a mixture of vinegar and baking soda to clean the disposal. Run hot water through it to flush out any debris.
- Avoid Hard Materials: Never put hard materials like bones, metal objects, or grease down the disposal, as they can cause damage.
- Use Cold Water: Always run cold water while using the disposal to help solidify grease and prevent clogs.
By following these maintenance tips, you’ll ensure that your garbage disposal stays in top condition for years to come.
If you need additional supplies or expert advice on installing a garbage disposal, visit Plumbers Supply Hub. They offer high-quality products and professional plumbing services to help you with your home improvement projects.


 HOP Hands On Professional5.0 (13 reviews)
 Mark Woodman Plumbing & Heating4.0 (69 reviews)
 Ingram Plumbing Inc4.0 (51 reviews)
 Regal Plumbing & Rooter4.0 (77 reviews)
 TNTXtreme5.0 (1 reviews)
 CLJ PLUMBING4.0 (4 reviews)
 How to Install a Water Pressure Regulator: A DIY Plumbing Project
 How to Replace a Broken Drain Elbow | Plumbers Supply Hub
 How to Choose the Right Sealant for Pipe Joints
 How to Troubleshoot Plumbing Issues in Older Homes
 How to Extend the Life of Your Plumbing System with Regular Maintenance
 How to Prevent and Fix Toilet Clogs | Expert Solutions