
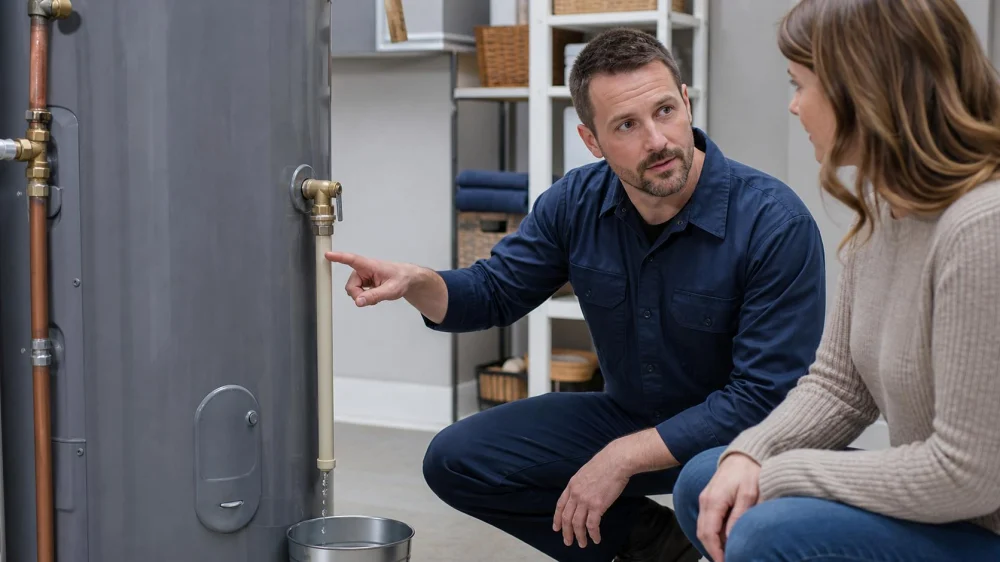
Water Heater Relief Valve Dripping? Do Not Cap the Discharge Pipe
On this page
Quick answer
Water dripping or flowing from the pipe connected to a water heater’s temperature-and-pressure relief valve—often called the T&P valve—is not something to stop with a cap, plug, clamp, closed valve, or kink. The relief path is a critical safety feature. Discharge can indicate debris or valve failure, excessive water pressure or temperature, thermal expansion in a closed plumbing system, or another installation problem.
Keep people away from the outlet because the water may be dangerously hot. Do not operate the test lever or adjust controls while diagnosing an active leak. Photograph the source from a safe distance, protect the area only without obstructing flow, and call a licensed plumber promptly. For forceful discharge, steam, unusual tank noise, deformation, gas odor, electrical arcing, or flooding, leave the area and call emergency services or the utility as appropriate.
Roto-Rooter Plumbing & Water Cleanup
106 E 18th St, Columbia, TN 38401, USA
Confirm where the water comes from
From a dry, safe viewpoint, trace the moisture upward. The discharge pipe usually begins at a brass valve on the top or side of a tank and ends at an approved visible or indirect discharge location. Water may instead come from a supply connection, drain valve, tank seam, condensate line, venting problem, nearby appliance, or pipe above the heater.
Do not touch water to judge temperature, crawl behind the heater, remove panels, or step into standing water near electrical equipment. Use a flashlight and zoom photo. If the source cannot be distinguished without contact, treat it as potentially hot and energized and wait for a professional.

Quantum Plumbing
Elk Grove VillageCook CountyIllinois
731 Lively Blvd, Elk Grove Village, IL 60007, USA
Understand what the relief valve does
The T&P valve is designed to open when conditions exceed its rated temperature or pressure, allowing water to escape through the discharge pipe. It is not a routine drain, faucet, or nuisance component. The heater, valve, and discharge piping must be correctly selected and installed under the equipment instructions and local code.
Removing or blocking the valve defeats an essential layer of protection. The discharge pipe also matters: its material, diameter, routing, termination, and lack of restriction allow hot water or steam to leave in a controlled direction. Only a qualified person should judge whether the assembly complies.
Take immediate safety steps
- Keep children, pets, and occupants away from the heater and discharge point.
- Avoid contact with the water, valve, tank, vent, and nearby piping.
- Do not place a tight container, hose, cap, or obstruction over the outlet.
- Keep combustible storage and belongings away from the appliance.
- Call a licensed plumber and describe whether the discharge is a drip, trickle, or forceful flow.
- Follow emergency shutdown instructions only when the manufacturer, utility, or emergency professional says it is safe for your situation.
A shallow open pan positioned without approaching hot water may reduce property damage in some layouts, but it must never restrict or submerge the pipe end. When placement is unsafe, isolate the room instead.
Document the discharge pattern
Record when the drip begins, how long it lasts, and whether it follows a long shower, dishwasher or laundry use, a heating cycle, plumbing repair, pressure-regulator change, or utility work. Note recent thermostat changes, a new backflow device, check valve, expansion tank, water meter, or heater installation. Do not recreate a dangerous event merely to test the pattern.
Photograph the whole heater, rating label without sharing serial information publicly, relief valve, pipe route, termination, drain pan, visible expansion tank, and surrounding damage. Keep installation, service, and warranty records ready. These details help the plumber choose instruments and parts before arriving.
Know the possible causes
A valve can fail to reseat because of mineral deposits, corrosion, age, damage, or prior operation. Excess building supply pressure can stress fixtures. As heated water expands, pressure can rise when a check valve, pressure-reducing valve, or backflow device prevents water from moving back toward the supply. An absent, waterlogged, isolated, or incorrectly sized expansion tank may fail to manage that change.
A control or thermostat problem can cause unsafe temperature, while an incorrectly rated valve or restricted discharge pipe can compromise the system. The U.S. Department of Energy’s water-equipment maintenance guidance identifies pressure control and water-heater settings as factors associated with relief-valve discharge. Diagnosis requires actual pressure, temperature, equipment, and system information—not a guess based only on the drip.
Know what never to do
Never cap, plug, crimp, reduce, elevate, or close the relief discharge. Do not install a shutoff between the tank and relief valve. Do not tie the line into a sealed drain, leave the outlet where people can be scalded, or substitute a valve with an unverified rating. Do not hang a bucket from the pipe or let the pipe end sit under water.
Do not repeatedly lift the test lever to “flush it out” during active leakage; hot discharge can cause severe burns and an older valve may not reseat. Testing and replacement must follow the heater manufacturer’s instructions, site conditions, and local code. Do not lower temperature, adjust gas controls, reset breakers, or alter pressure equipment as a trial fix without qualified direction.
Arrange qualified diagnosis
Tell the plumber the heater fuel or energy type, approximate age, tank size, model, discharge pattern, visible pressure-reducing or expansion equipment, and recent plumbing changes. Ask whether the person is licensed for the appliance, relief system, and any gas or electrical work involved. Verify permits or inspection requirements for replacement.
Request a written diagnosis rather than only a new valve. If high pressure or thermal expansion caused the discharge, replacing the valve alone may not correct the system condition. If the tank itself leaks, the safe repair may be replacement rather than patching.
Know what the professional may check
A qualified technician may measure static and dynamic water pressure, temperature, and pressure change during a heating cycle. The inspection can include the relief-valve rating and condition, discharge pipe, heater controls, supply pressure regulator, check or backflow devices, thermal expansion tank size and precharge, shutoffs, venting or combustion where applicable, electrical safety, tank corrosion, drainage, and code clearance.
After repair, ask for the cause, measurements, replaced part numbers, final settings, permit documentation, and maintenance plan. Confirm how future valve testing should be performed under the current manufacturer instructions and who should do it. Keep the service record with the heater manual.
Recognize an emergency
Leave the area and call emergency services for steam, forceful continuous discharge, a bulging or visibly deformed tank, banging or rumbling with overheating signs, a gas odor, a hissing gas line, smoke, sparks, arcing, a burning smell, carbon-monoxide alarm, or water contacting energized equipment. Do not enter standing water to reach a shutoff or breaker.
For a suspected gas leak, avoid flames, switches, phones, and electrical devices inside the affected space; leave and call the gas utility or emergency services from outdoors. For scalding, cool the burn with cool running water without ice and seek medical help. Property protection comes after personal safety and an unobstructed relief path.
 W L Marion Plumbing & Services3.0 (4 reviews)
 Pro Master Plumbing And Rooter0.0 (0 reviews)
 Shawn and Son Plumbing, LLC5.0 (129 reviews)
 Low Cost Rooter5.0 (3 reviews)
 Happy Cowboy Plumbing5.0 (57 reviews)
 Drain Solutions LLC5.0 (45 reviews)
 How to Install a Water Softener: DIY Plumbing Tips
 How to Repair a Condensation Issue on Cold Pipes
 Why Your Toilet Tank Is Leaking and How to Fix It
 How to Perform a DIY Plumbing Inspection for Homeowners
 How to Install a Washing Machine: A Complete DIY Guide
 Plumbing Solutions for Preventing Backflow and Contamination