
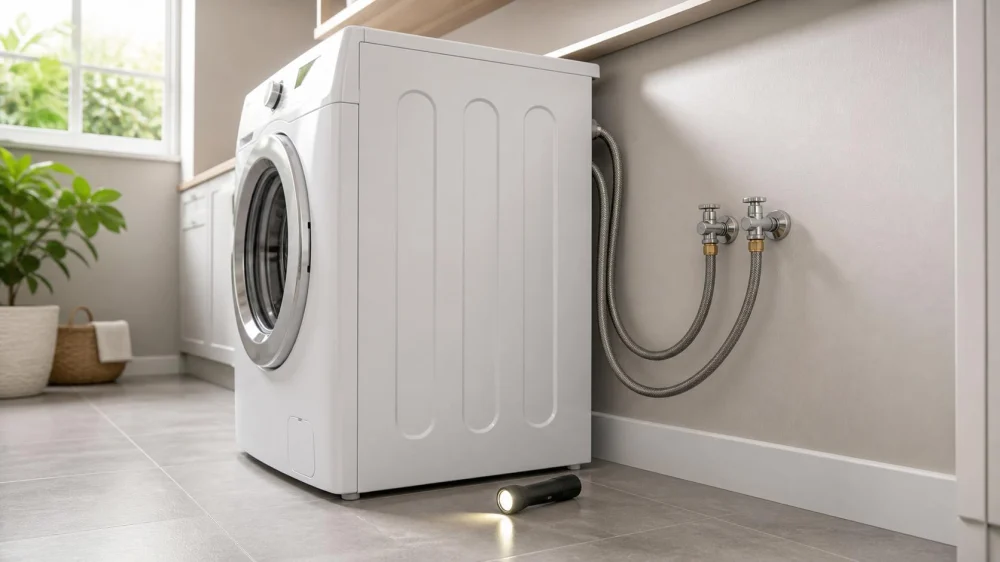
Washing Machine Supply Hoses: Inspect, Route, and Replace
On this page
Quick answer
Know which shutoff valves serve the washing machine and keep them accessible. With the appliance idle, inspect visible hose jackets, fittings, routing, wall connections, and the floor for bulges, cracks, corrosion, abrasion, tight bends, dampness, or movement. Do not disturb a questionable connection casually; record the hose type and age, follow appliance and hose instructions, and use a qualified plumber when valves, fittings, access, or damage are uncertain.

Plumbing Solution Specialist
AnaheimOrange CountyCalifornia
1325 N Red Gum St Suite 3, Anaheim, CA 92806, USA
Why washer supply hoses deserve routine checks
Washing machine supply hoses remain pressurized whenever their valves are open, even when the appliance is not filling. Age, incompatible fittings, corrosion, rubbing, crushing, heat, tight bends, movement, and installation errors can increase risk. A useful check connects the hoses to accessible shutoffs, appliance clearance, drainage, and a tested response plan rather than judging the jacket alone.
This guide supports visual household checks in the United States. It does not specify a universal replacement interval, certify a hose, approve a valve, or replace manufacturer instructions, plumbing codes, insurance requirements, or a licensed plumber's assessment. Appliance connections, water pressure, materials, local rules, and access vary.
What to inspect without disturbing connections
- Hot and cold shutoff locations, labels, accessibility, handle condition, wall box, main shutoff, household response plan, and who may operate them.
- Hose manufacturer and model if visible, material, certification markings, installation date, service history, warranty, and appliance requirements.
- Bulges, blisters, cuts, cracks, brittleness, rust, mineral deposits, discoloration, dampness, drops, staining, odor, or floor damage.
- Kinks, twists, tight bends, rubbing against the washer or wall, pinching, heat exposure, unsupported weight, and clearance during vibration.
- Fittings and adapters at valves and appliance, mixed materials, corrosion, cross-threading clues, movement, stress, and evidence of prior sealant or repair.
- Washer leveling, movement, drain hose placement, standpipe, pan, floor drain, leak alarm, automatic shutoff, and nearby electrical connections.
- Valve and hose instructions, local code or permit needs, plumber access, appliance movement plan, water containment, and post-work testing.
Plan inspection and replacement step by step
- Find the washer valves and main shutoff, confirm the household knows the emergency plan, and keep the access area clear.
- Turn the appliance off without moving it and inspect visible hoses, connections, routing, floor, wall, and nearby drain area under good light.
- Photograph both ends and any concern, record dates and markings, and compare the setup with the appliance and hose manufacturer instructions.
- If replacement is due or condition is uncertain, select compatible listed components and scope valve, fitting, access, and appliance movement with a plumber.
- Before work, protect flooring, control electricity and water as applicable, relieve pressure safely, and follow professional and manufacturer procedures.
- Route new hoses without twisting, pinching, abrasion, or tight bending, preserve appliance clearance, and avoid improvised adapters or over-tightening.
- Restore water gradually, inspect under pressure and through a supervised appliance cycle, check again after movement, and document the completed work.
Save hose product details, receipts, installation date, installer, valve and fitting condition, before-and-after photos, appliance requirements, permits if applicable, water-pressure findings, test results, leak alarm or shutoff information, warranty, and the next inspection reminder. Keep emergency shutoff instructions accessible to occupants.
Valve, fitting, appliance, and water limits
A braided exterior does not guarantee that an internal hose is sound, and an undamaged-looking hose can still be incompatible or poorly installed. Do not force a stuck valve, tighten a corroded fitting under pressure, pull the appliance against connected hoses, use tape or sealant contrary to fitting instructions, or energize wet equipment. Turning valves routinely may be useful only when they operate correctly and the manufacturer or plumber approves the practice.
Shut off water at a safe accessible valve and electricity only when safe if active leakage occurs, then call a plumber and follow building or insurer procedures. Use emergency services for flooding near energized equipment, electrical arcing, structural collapse, inability to control major water flow, or another immediate danger. Arrange professional replacement for seized valves, corrosion, damaged fittings, hidden leaks, uncertain materials, or access requiring appliance disconnection.
Frequently asked questions
How often should washer hoses be replaced?
Use the hose and appliance manufacturer instructions, visible condition, installation history, water and site factors, insurer requirements, and a plumber's assessment rather than one universal interval.
Are braided hoses always safer?
Construction is only one factor. Compatibility, certification, age, fittings, routing, pressure, installation, and condition all matter.
Should I turn washer valves off after every use?
Ask the valve, appliance, and hose manufacturers or a plumber. A difficult, leaking, or unsuitable valve should not be forced.
Can I tighten a damp fitting myself?
Do not disturb a pressurized, corroded, cross-threaded, or uncertain connection casually. Control water and obtain qualified help when needed.
Does a drain pan prevent water damage?
A properly installed pan and drain may reduce some damage but cannot replace sound hoses, working valves, correct drainage, alarms, and a response plan.
Sources and evidence
Use the washing machine, hose, valve, leak-control device, and drain-pan manufacturers for compatibility, installation, testing, maintenance, and replacement instructions. Use the local plumbing authority for code and permit questions, a licensed plumber for system assessment, and the property insurer or manager for reporting and mitigation requirements.
Conclusion and next steps
Locate the shutoffs, inspect visible hose and fitting conditions without casually disturbing them, and record what is installed. Plan replacement from manufacturer requirements and the full connection, not appearance alone. Test completed work under controlled pressure and a supervised cycle. The best time to resolve a routing, valve, or age concern is before water on the floor makes the decision urgent.
 Jason Napier Plumbing Ltd4.0 (33 reviews)
 Valley Plumbing & Heating4.0 (8 reviews)
 Pro Plumbers Inc Long Beach, CA4.0 (144 reviews)
 A & J Plumbing & Water Heater Repair LLC0.0 (0 reviews)
 Ali's Plumbing0.0 (0 reviews)
 Pine Creek Plumbing4.0 (344 reviews)
 How to Install a New Pipe System for Your Home
 How to Test Your Plumbing for Hidden Leaks and Save Money
 How to Prevent Settling Damage to Plumbing Joints
 How to Repair a Toilet That Runs Intermittently: Step-by-Step Guide
 How to Route Plumbing for an Outdoor Grill Station
 How to Repair a Junction That Is Leaking Under Slab