
Understanding Why Toilet Tanks Leak
A leaking toilet tank is not just an annoying issue; it can also waste a significant amount of water, leading to higher water bills and potential damage to your bathroom floor. When the toilet tank leaks, it typically indicates a problem with one or more of its components. Understanding why your toilet tank leaks and how to fix it can help prevent water waste and save you money.

Mr. Rooter Plumbing of Richmond KY
RichmondMadison CountyKentucky
101 Bradbury Pointe Dr, Richmond, KY 40475, USA
Tools You’ll Need to Fix a Leaky Toilet Tank
Before you begin fixing a leaky toilet tank, gather the following tools to ensure a smooth repair process:
- Adjustable wrench: Used for loosening and tightening nuts and bolts on the toilet tank components.
- Screwdriver: Required for removing screws from the toilet tank and lid.
- Rubber gloves: Protect your hands while handling toilet parts that may be dirty or grimy.
- Bucket or towels: For catching any excess water or cleaning up spills during the repair process.
- Replacement parts: Depending on the source of the leak, you may need to replace the flapper, fill valve, flush valve, or tank bolts.
Step-by-Step Guide to Fixing a Leaky Toilet Tank
Follow this step-by-step guide to fix your leaky toilet tank and stop water waste:
- Step 1: Turn off the water supply – Start by turning off the water supply to the toilet by locating the shut-off valve behind or beside the toilet. Turn it clockwise to stop the water flow.
- Step 2: Empty the toilet tank – Flush the toilet to drain the water from the tank. Use a towel to absorb any remaining water in the tank.
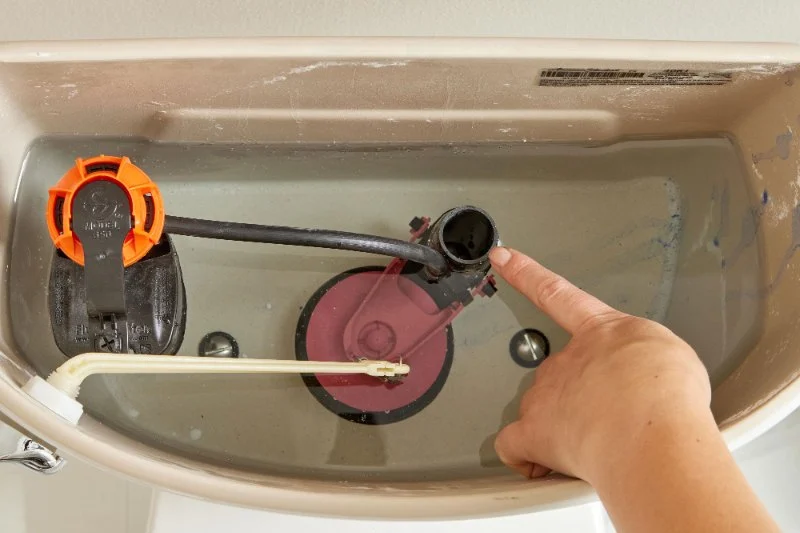
- Step 3: Inspect the toilet components – Look for any visible cracks or signs of wear on the flapper, fill valve, or flush valve. These are the most common sources of leaks.
- Step 4: Replace the faulty parts – If the flapper is worn out or cracked, it needs to be replaced. If the fill valve or flush valve is damaged, replace those components as well. To replace these parts, simply unscrew the old ones and install the new ones by following the manufacturer’s instructions.
- Step 5: Reassemble the tank – Once the faulty parts have been replaced, reassemble the toilet tank. Tighten all nuts and screws carefully to avoid over-tightening.
- Step 6: Test for leaks – Turn the water supply back on and allow the tank to fill. Flush the toilet to ensure the repair was successful and that no leaks are present.
Common Causes of Leaky Toilet Tanks
To prevent future leaks, it’s important to understand the common causes of toilet tank leaks:
- Worn-out flapper: The flapper is a rubber valve that seals the tank’s drain hole. Over time, it can become worn or damaged, leading to water leaking into the bowl.
- Faulty fill valve: The fill valve controls the flow of water into the tank. If it’s malfunctioning, it can cause water to continually run into the tank, leading to a leak.
- Cracked tank: A crack in the toilet tank itself can cause water to leak out. This is a less common issue but can happen if the tank is damaged or old.
- Loose or corroded bolts: The bolts that hold the tank to the toilet bowl can become loose or corroded over time, causing water to seep out.
Real-Life Example: Fixing a Leaky Toilet Tank
Sarah, a homeowner from Orlando, noticed that her toilet was constantly running and the tank was making strange noises. She decided to investigate and found that the flapper had become worn and no longer sealed properly, allowing water to leak from the tank into the bowl. After purchasing a replacement flapper and following the steps above, Sarah was able to fix the leak herself in under 30 minutes. Not only did this save her money on a plumber, but she also stopped the waste of water and the annoying sound of a running toilet.

Additional Tips to Prevent Future Leaks
Here are a few additional tips to ensure your toilet tank remains leak-free:
- Regular maintenance: Inspect your toilet’s components periodically for wear and tear, and replace any parts that show signs of damage.
- Use high-quality parts: Invest in durable, high-quality replacement parts to ensure longevity and prevent future leaks.
- Don’t overtighten bolts: When reassembling the toilet, be careful not to overtighten the bolts as this can cause cracks or damage to the tank.
- Check the flush valve: If the toilet tank is leaking, it’s also worth checking the flush valve. If it’s faulty, it could lead to water continuously running into the bowl.


 Southern Minnesota Mechanical5.0 (4 reviews)
 Heim Plumbing4.0 (12 reviews)
 Guzman Plumbing5.0 (1 reviews)
 Test Business Profile0.0 (0 reviews)
 Danks Hydro-Jetting Llc5.0 (6 reviews)
 Figueroa Plumbing4.0 (20 reviews)
 How to Route a New Plumbing Run in a Finished Basement – Step-by-Step Guide
 How to Fix a Sink That Rattles When Water Runs: Troubleshooting Guide
 How to Test a Backwater Valve in Your Sewer Line: A Step-by-Step Guide
 How to Replace a Shower Pan or Base | Plumbers Supply Hub
 How to Troubleshoot a Noisy Toilet: Common Causes and Solutions
 How to Replace a Tub Drain With Hair Trap Feature