
- 1 - Understanding the Need to Reroute Plumbing Over a Crawlspace
- 2 - Planning Your Plumbing Run Over a Crawlspace
- 3 - Gathering the Right Tools and Materials
- 4 - Step-by-Step Guide to Rerouting Plumbing Over a Crawlspace
- 5 - Common Mistakes to Avoid When Rerouting Plumbing
1. Understanding the Need to Reroute Plumbing Over a Crawlspace
There are several reasons why homeowners or contractors might need to reroute plumbing over a crawlspace. Some common scenarios include remodeling projects, issues with water supply or drainage lines, or the need to avoid obstacles in the foundation. In some cases, rerouting plumbing over a crawlspace may be necessary for easier maintenance or to comply with updated building codes.
A crawlspace provides an accessible location for plumbing runs, making it a convenient area to work with. However, it also comes with challenges, such as limited headroom and potential access issues. Understanding when and why to reroute your plumbing will help ensure that the project is done efficiently and safely.

Morrow Plumbing Service, Inc
Laguna HillsOrange CountyCalifornia
25472 La Habra Ct, Laguna Hills, CA 92653, USA
2. Planning Your Plumbing Run Over a Crawlspace
Before you begin rerouting your plumbing, proper planning is key to a successful installation. Here’s how to approach the planning process:
- 1. Evaluate the Layout: Assess the current plumbing setup in your home. Identify the pipes you need to reroute and the new path they should take. Consider any obstacles or limitations in the crawlspace, such as beams, insulation, or other utilities.
- 2. Determine Pipe Size: Ensure that the new route can accommodate the correct pipe sizes for your plumbing needs. For example, water supply lines typically require a minimum pipe size of ¾ inch, while drain lines may require larger pipes.
- 3. Plan for Access: When rerouting plumbing, ensure there is adequate space for future maintenance. You’ll want to be able to access the pipes easily in case of leaks, clogs, or other plumbing issues.
- 4. Consider Ventilation: Proper ventilation is crucial in crawlspaces to prevent issues with moisture and mold. Ensure your rerouted pipes don’t obstruct airflow and that there’s adequate ventilation in the crawlspace.
3. Gathering the Right Tools and Materials
To ensure the success of your plumbing rerouting project, having the right tools and materials is essential. Here’s what you’ll need:
- 1. Pipe Cutter or Saw: A pipe cutter or saw is necessary for cutting PVC or copper pipes to the desired length. A pipe cutter offers a clean, straight cut for easier fitting.
- 2. Pipe Fittings: Depending on the route, you’ll need various fittings such as elbows, couplings, tees, and adapters to connect the new pipe layout.
- 3. Pipe Insulation: If your plumbing will be exposed to temperature extremes, consider using pipe insulation to prevent freezing or condensation buildup.
- 4. PVC or Copper Pipe: The material choice for your pipes depends on your plumbing system. PVC is commonly used for drain lines, while copper or PEX tubing is used for water supply lines.
- 5. Pipe Supports and Hangers: Proper pipe supports and hangers will ensure that your plumbing is securely fastened and won’t sag or shift over time.
- 6. Plumber’s Tape or Thread Sealant: These are used to create a watertight seal at threaded pipe connections, preventing leaks in your system.
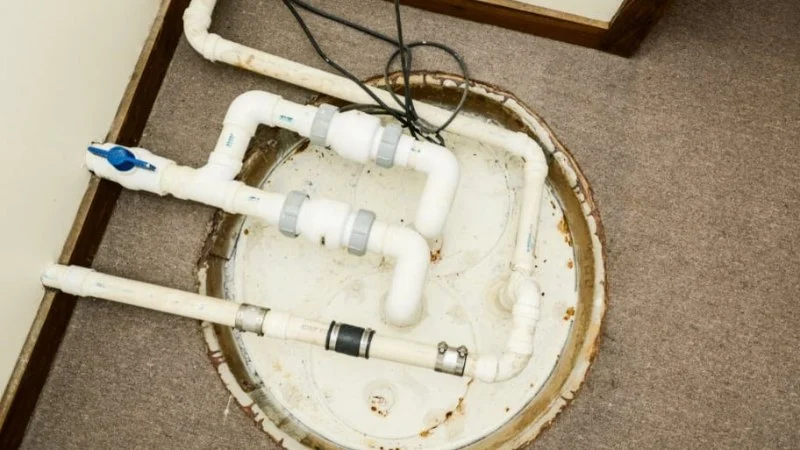
4. Step-by-Step Guide to Rerouting Plumbing Over a Crawlspace
Once you’ve planned and gathered your materials, follow this step-by-step guide to reroute your plumbing over a crawlspace:
- Step 1: Shut Off Water Supply: Before starting the rerouting process, ensure that you shut off the main water supply to prevent any accidents.
- Step 2: Remove Existing Pipes: Use your pipe cutter or saw to carefully remove the existing pipes that you need to reroute. Make sure to remove all necessary connections, but leave intact any sections that are still functional.
- Step 3: Lay Out New Pipes: Plan the new pipe route in the crawlspace, ensuring there’s enough clearance for installation. Use pipe supports and hangers to secure the new pipes along the route, keeping them level and properly spaced.
- Step 4: Connect Pipes: Use the appropriate fittings to connect the new pipes. For PVC pipes, apply PVC primer and cement to each joint before connecting the pieces. For copper pipes, solder the joints or use compression fittings as needed.
- Step 5: Test for Leaks: Once the plumbing is connected, turn on the water supply and check for any leaks. Pay close attention to the joints and connections where new pipes meet existing ones.
- Step 6: Insulate and Seal: If needed, insulate the pipes to protect them from extreme temperatures. Use pipe insulation or foam sealant around any exposed sections to improve energy efficiency and prevent freezing.
- Step 7: Secure and Finalize: Once you’re confident that the plumbing is correctly installed and secure, finish the job by adding any necessary supports or hangers to prevent movement. Ensure the crawlspace is clean and safe before closing up access points.
5. Common Mistakes to Avoid When Rerouting Plumbing
While rerouting plumbing can be a manageable task, there are common mistakes that you should avoid to ensure a successful project:
- 1. Incorrect Pipe Sizing: Using the wrong pipe size can lead to clogs, low water pressure, and inefficient drainage. Always check the recommended pipe sizes for your plumbing needs.
- 2. Not Properly Supporting Pipes: Failing to properly support pipes can lead to sagging or shifting over time, which could cause leaks or damage.
- 3. Skipping Leak Tests: After rerouting the plumbing, always perform leak tests before finalizing the installation. Small leaks can easily go unnoticed but can lead to significant water damage over time.
- 4. Ignoring Crawlspace Conditions: Crawlspaces are often damp environments, and it’s crucial to account for moisture when installing plumbing. Ensure adequate ventilation and insulation to prevent future issues like mold or pipe freezing.
Rerouting plumbing over a crawlspace can be a rewarding and practical solution for improving your home’s plumbing system. With the right planning, tools, and techniques, you can ensure the project is completed successfully. If you’re looking for quality plumbing materials or need expert guidance, visit Plumbers Supply Hub for all your plumbing needs.


 Mullins Plumbing Company5.0 (9 reviews)
 J & M Plumbers4.0 (47 reviews)
 O'Sullivan Inc1.0 (1 reviews)
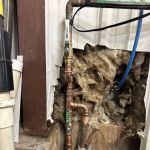 Thornton Plumbing & Drain5.0 (21 reviews)
 Royal Flush Plumbing4.0 (8 reviews)
 Edwins Plumbing Services5.0 (16 reviews)
 Why Your Sink is Draining Slowly and How to Fix It
 How to Reset a Tripped Pressure Switch in a Well Pump
 Why Your Sump Pump Runs Excessively and How to Limit It
 How to Use a Hydro Jet to Clear Tough Blockages
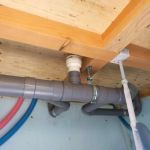 How to Repair a Leaking Air Admittance Valve
 How to Test Backflow Preventers Annually: A Step-by-Step Guide