

Why Installing a New Faucet is Important
Replacing an old or faulty faucet with a new one can not only improve the look of your kitchen or bathroom but also enhance the functionality of your sink. Over time, faucets wear out, become difficult to turn, or develop leaks that can waste water and increase your utility bills. By installing a new faucet, you can restore your sink’s efficiency, save money on repairs, and improve your overall plumbing system.

American Leak Detection of Chattanooga
EnglewoodMcMinn CountyTennessee
112 Co Rd 545, Englewood, TN 37329, USA
The Benefits of a New Sink Faucet
Installing a new faucet gives your sink a fresh, modern look and may come with updated features like water-saving technology, adjustable spray options, or touchless operation. It's also a great way to fix leaks and drips, which not only waste water but can also lead to costly damage to your sink and countertops. Additionally, a new faucet is a relatively easy and affordable DIY project that can save you money on professional plumber fees.
Drip N' Drain Plumbing and Well Services
3011 National Rd SW, Hebron, OH 43025, USA
Tools and Materials You Need
Before you begin installing your new sink faucet, it's essential to gather the right tools and materials. Here's a list of what you'll need to get started:
1. Wrench or Adjustable Pliers
You’ll need a wrench or adjustable pliers to remove the old faucet and tighten the new one. An adjustable wrench is versatile and works for most plumbing tasks.
2. Plumber’s Tape
Plumber’s tape, also known as Teflon tape, helps ensure a tight seal around the threaded connections, preventing leaks.
3. Basin Wrench
A basin wrench is specifically designed to reach tight spaces under the sink and is ideal for loosening or tightening faucet nuts.
4. Bucket or Towels
Water can still be present in the pipes, so it’s a good idea to have a bucket or towels on hand to catch any drips or spills.
5. New Faucet and Installation Kit
Ensure you have the new faucet, as well as any necessary installation hardware that typically comes with the faucet (e.g., mounting nuts, washers, etc.).
Preparing for the Installation
Before beginning the installation, follow these preparatory steps to ensure a smooth process:
1. Shut Off the Water Supply
Locate the water supply valves under the sink and turn them off to prevent any water from flowing while you work. Open the faucet to drain any remaining water from the pipes.
2. Disconnect the Old Faucet
Use a wrench to disconnect the water supply lines from the old faucet. Place a bucket or towels underneath to catch any residual water that might spill out. Once the water lines are disconnected, use your basin wrench to remove the faucet from the sink.
3. Clean the Sink Area
Before installing the new faucet, clean the area around the sink to remove any debris, old plumber’s tape, or buildup. A clean surface ensures a proper seal for the new faucet and helps prevent leaks.
Step-by-Step Guide to Installing a New Sink Faucet
Now that you’ve prepared your sink, follow these steps to install the new faucet:
1. Position the Faucet
Place the new faucet into the mounting holes on your sink. Make sure it is aligned properly before proceeding.
2. Secure the Faucet
From underneath the sink, attach the mounting nuts to the faucet to secure it in place. Tighten the nuts using a basin wrench, but be careful not to overtighten them, as this can cause damage.
3. Connect the Water Supply Lines
Attach the water supply lines to the faucet and tighten them using an adjustable wrench. Be sure to use plumber’s tape on the threads to prevent leaks. Again, don’t overtighten the connections.
4. Turn On the Water Supply
Turn on the water supply valves and check for any leaks. If you notice any, turn off the water supply and tighten the connections further. Once the water flows freely without leaks, your new faucet is ready to use.
Common Mistakes to Avoid During Installation
While installing a faucet is a straightforward task, there are a few common mistakes to be aware of:
1. Not Turning Off the Water Supply
Forget to turn off the water supply, and you may find yourself with a flooded sink. Always double-check that the water supply is off before starting the installation.
2. Over-Tightening the Connections
Over-tightening can crack the faucet or damage the pipes. Tighten the connections just enough to prevent leaks, but not so much that they become too tight to loosen later.
3. Forgetting to Apply Plumber’s Tape
Plumber’s tape helps prevent leaks around the threaded connections. Skipping this step could lead to slow leaks that are hard to detect.
Finishing Up and Testing Your New Faucet
After completing the installation, it’s important to test your new faucet to ensure everything is working correctly:
1. Test the Water Flow
Turn on both the hot and cold water and check the flow. Make sure the water flows freely and there are no strange sounds or leaks.
2. Check for Leaks
Check all of the connections for any water drips or signs of leaks. If you notice any, turn off the water supply and adjust the connections until they are properly sealed.
3. Clean Up
Wipe down the faucet and surrounding area to remove any water or debris. Dispose of any old parts or materials safely.


 R & T Yoder Plumbing, Inc - Springfield5.0 (2 reviews)
 ACR Trenchless & Plumbing5.0 (18 reviews)
 Smith Plumbing & Heating5.0 (4 reviews)
 Corsillo Plumbing & Sewer Cleaning Co.4.0 (63 reviews)
 Royal Plumber Signal Hill5.0 (25 reviews)
 Leuthmers Plumbing LLC0.0 (0 reviews)
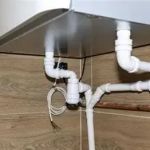 How to Repair a Condensation Issue on Cold Pipes
 How to Clean Sediment Build-Up in Household Pipes: Effective Solutions for Clear Water Flow
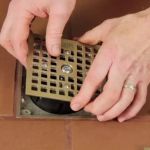 How to Replace a Damaged Floor Drain Cover Easily
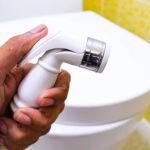 How to Install a Bidet Attachment Safely | Expert Plumbing Tips
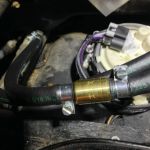 How to Replace an In-Line Check Valve
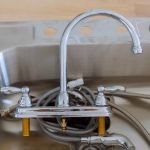 How to Install a New Kitchen Sink Faucet: A Beginner’s Guide