

- Tools and Materials Needed
- Preparing for Installation
- Removing the Old Garbage Disposal
- Installing the New Garbage Disposal
- Testing and Final Steps
Tools and Materials Needed
Before starting the installation process, make sure you have all the necessary tools and materials. Having everything prepared ahead of time will make the process smoother and quicker. Here's what you'll need:

North Metro Home Services LLC
StanchfieldIsanti CountyMinnesota
38398 Lever St NE, Stanchfield, MN 55080, USA
1. Tools
- Adjustable wrench
- Plumber’s tape
- Screwdriver (Phillips and flathead)
- Pipe wrench
- Plumbing sealant or putty
- Bucket or bowl (for catching water)
2. Materials
- New garbage disposal unit
- Mounting bracket (if not included with the unit)
- Plumbing fittings and drain lines
- Power cord (if your new disposal doesn’t come with one)
Preparing for Installation
Before you begin, it's essential to prepare your work area and ensure that the power and water supply are safely turned off. Here’s how to prepare for the installation:
1. Turn Off the Power
Start by turning off the power to the garbage disposal at the circuit breaker to avoid any electrical accidents during the installation. Double-check that the power is off by flipping the switch in your kitchen to ensure no electricity is flowing to the disposal unit.
2. Turn Off the Water Supply
Shut off the water supply under your sink to prevent any water leakage while you’re working. You don’t want to deal with any spills during the installation process, so be sure to fully close the shutoff valves.
3. Clear the Area Under the Sink
Clear out any items from the area beneath your sink. This will give you enough space to work and avoid any potential mess while installing the garbage disposal. Place a bucket or bowl under the drain to catch any residual water left behind when you disconnect the pipes.
Removing the Old Garbage Disposal
If you are replacing an old garbage disposal unit, you’ll need to remove the existing one before installing the new one. Follow these steps:
1. Disconnect the Power
Before you start, make sure the power is off to the existing garbage disposal. Disconnect the power cord from the electrical junction box. You may need to use a screwdriver to loosen the screws securing the wires, then carefully disconnect the wiring.
2. Disconnect the Drain Pipes
Use a pipe wrench to loosen the drain pipe connections. Be careful as water may still be in the pipes, so have a bucket ready to catch any drips. Once the drain pipe is removed, also detach any dishwasher lines if applicable.
3. Remove the Mounting Bracket
The garbage disposal is usually secured with a mounting bracket. Use an adjustable wrench or screwdriver to loosen the mounting bracket and detach the old disposal unit. Be mindful of any remaining water or debris that could fall from the unit as you remove it.
Installing the New Garbage Disposal
Now that the old disposal is out, you can install the new one. Follow these steps to ensure the installation goes smoothly:
1. Attach the Mounting Bracket
Start by attaching the new mounting bracket to the sink drain. Most new disposals come with a mounting kit, including the bracket. Follow the manufacturer's instructions to secure the bracket properly. It’s important to ensure that the bracket is aligned correctly so the disposal unit will sit flush against the sink.
2. Install the New Garbage Disposal
Next, carefully lift the new garbage disposal and align it with the mounting bracket. Turn the disposal unit clockwise until it clicks into place. Ensure the unit is securely attached before moving forward with the next steps.
3. Connect the Drain and Dishwasher Lines
Reconnect the drain lines to the new disposal unit. Use plumber’s tape or a sealant to ensure a tight seal to prevent leaks. If you have a dishwasher, connect the dishwasher drain hose to the disposal as well. Double-check all connections to make sure everything is tightly secured.
4. Reconnect the Power
Now, reconnect the electrical wires. Attach the power cord to the junction box inside the disposal unit, securing the wires with a screwdriver. If your new disposal doesn’t come with a power cord, you’ll need to install one before reconnecting the wires.
Testing and Final Steps
Once everything is installed, it’s time to test your new garbage disposal and make sure it’s working correctly. Here’s how:
1. Turn on the Power and Water
Turn the power back on at the circuit breaker and ensure the water supply is on. Check for any leaks around the drain or dishwasher connections. If there are any leaks, tighten the connections as needed.
2. Test the Garbage Disposal
Turn on the garbage disposal and run some cold water through it. Listen for any unusual sounds and ensure it’s running smoothly. If the unit is functioning well, you’re good to go! If there are issues, turn off the power immediately and double-check the wiring and connections.
3. Final Cleanup
Once everything is in working order, clean up the area beneath the sink. Dispose of any old parts or packaging from the new unit, and store your tools safely for future use.
By following these steps, you can successfully install a garbage disposal in your kitchen. For more tips, tools, and plumbing supplies, visit Plumbers Supply Hub for everything you need to complete your project.


 Hometown Plumbing, LLC4.0 (55 reviews)
 Jeff Caudill Plumbing3.0 (12 reviews)
 Alert Plumbing & Sewer Cleaning4.0 (3 reviews)
 Plumbing Boys4.0 (42 reviews)
 Cova Plumbing& Rooter4.0 (19 reviews)
 5 Star Plumbing, Heating, & Air5.0 (32 reviews)
 How to Detect and Repair Hidden Leaks in Your Home’s Plumbing System
 How to Prevent Tree Roots from Damaging Sewer Lines
 How to Clear a Clogged Sewer Line: What Every Homeowner Should Know
 Why Your Water Heater Is Making Noise and How to Fix It
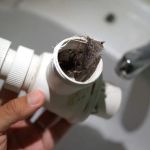 How to Repair a Swollen P-Trap After a Clog
 How to Repair a Hairball Clog Without Harsh Chemicals