

- 1- Understanding the Shower Diverter Cartridge
- 2- Signs Your Shower Diverter Cartridge Needs Replacing
- 3- Tools and Materials Needed for This Task
- 4- Step-by-Step Guide to Replacing a Shower Diverter Cartridge
- 5- Common Mistakes to Avoid During the Replacement
- 6- Tips for Maintaining Your Shower Diverter
1. Understanding the Shower Diverter Cartridge
The shower diverter cartridge is a crucial component in your shower system, responsible for directing the water flow between the bathtub spout and the showerhead. When you pull or push the diverter lever, it shifts the flow of water, allowing you to choose between taking a bath or a shower.
The diverter cartridge works by controlling the water flow based on the position of the diverter. Over time, this part can wear out due to constant use, mineral buildup, or age, causing issues like low water pressure, leakage, or difficulty switching between the tub and the shower. Replacing the diverter cartridge is a simple yet effective way to restore your shower’s functionality.

2. Signs Your Shower Diverter Cartridge Needs Replacing
How do you know when it’s time to replace the diverter cartridge? Here are some common signs that indicate a malfunctioning or worn-out cartridge:
- Water Not Switching Properly: If you’re having trouble switching between the bathtub and the showerhead, or if water keeps coming out of both at the same time, your diverter may need replacement.
- Low Water Pressure: A decrease in water pressure in the shower could be caused by a clogged or malfunctioning diverter cartridge that’s restricting water flow.
- Leaking Water: Leaks from the faucet or spout, especially when the diverter is engaged, are often a clear sign that the cartridge is no longer functioning as it should.
- Noisy or Dripping Faucet: If your faucet is making odd noises or dripping even after the diverter is engaged, the diverter cartridge may be worn out and in need of replacement.
3. Tools and Materials Needed for This Task
Replacing a shower diverter cartridge is a manageable DIY project that requires just a few tools and materials. Here’s what you’ll need:
- Adjustable Wrench: To remove the old diverter cartridge and replace it with a new one.
- Cartridge Puller: If the cartridge is stuck, a cartridge puller will help you safely remove it without damaging the surrounding pipes.
- Replacement Diverter Cartridge: Make sure you purchase the correct replacement that fits your shower model and brand. Take the old cartridge to the hardware store to ensure compatibility.
- Plumber’s Tape: This helps seal any joints to prevent leaks during reassembly.
- Flathead and Phillips Screwdrivers: For removing any screws and covers that may be blocking access to the diverter cartridge.
- Rubber Gloves: To protect your hands from grime and any sharp edges around the faucet area.
4. Step-by-Step Guide to Replacing a Shower Diverter Cartridge
Follow these easy steps to replace your shower diverter cartridge:

Step 1: Turn off the Water Supply
Before beginning any plumbing work, make sure to turn off the water supply to the shower. You can usually do this by closing the main water shutoff valve or the valve for the specific bathroom.
Step 2: Remove the Handle and Cover Plate
Use a screwdriver to remove the handle of the diverter and the cover plate. Some models may have screws visible on the surface, while others may require you to pry off a decorative cover first.
Step 3: Disconnect the Diverter Cartridge
Once the handle and cover plate are removed, use an adjustable wrench to loosen and remove the nut holding the diverter cartridge in place. If the cartridge is stuck, you can use a cartridge puller to gently remove it without damaging the pipes or the fixture.
Step 4: Install the New Diverter Cartridge
Place the new diverter cartridge into the housing and align it properly. Once it’s in place, tighten the nut or bolts to secure it. Be sure not to overtighten, as this could damage the cartridge or surrounding parts.
Step 5: Reassemble and Test
Once the new diverter cartridge is installed, reattach the handle and cover plate. Turn the water supply back on and test the diverter by switching between the tub and the showerhead. Check for any leaks or water flow issues.
5. Common Mistakes to Avoid During the Replacement
While replacing a shower diverter cartridge is a relatively simple task, there are a few common mistakes to watch out for:
- Not Turning Off the Water Supply: Always remember to turn off the water before starting any plumbing work to avoid water damage.
- Using the Wrong Cartridge: Ensure you buy the correct replacement part by either matching the model number or taking the old cartridge to the store.
- Forgetting to Test for Leaks: After reassembly, always test the diverter by running the shower and bathtub to ensure the replacement is working properly.
- Overtightening Parts: Tighten connections enough to prevent leaks but avoid overtightening, which can damage the threads or parts.
6. Tips for Maintaining Your Shower Diverter
To extend the lifespan of your shower diverter and prevent future issues, consider these maintenance tips:
- Clean Regularly: Clean the diverter area regularly to remove mineral deposits and debris that can cause blockages and wear down the parts.
- Check for Leaks: Periodically inspect the diverter to ensure there are no signs of leakage or issues with the water flow.
- Replace Rubber Seals: If you notice leaks around the diverter, the rubber seals might need replacement. These seals can wear out over time.
- Avoid Overuse: While showering, avoid putting excessive pressure on the diverter, as it can weaken over time with constant use.
Replacing your shower diverter cartridge is a simple and rewarding DIY task that can save you money and restore the functionality of your shower. If you need more plumbing supplies or expert advice, check out [Plumbers Supply Hub] for the best products and services available.


 Chattanooga and Battlefield Plumbing4.0 (139 reviews)
 Benjamin's Plumbing & Drain Cleaning5.0 (60 reviews)
 Z & H Plumbing and Water Heaters5.0 (22 reviews)
 Brad Purdy Plumbing and Heating5.0 (4 reviews)
 Local Plumbing & Drain Cleaning4.0 (28 reviews)
 M&P Mechanical HVAC And Plumbing5.0 (8 reviews)
 How to Repair a Crack Around a Bathtub Rim: A Step-by-Step Guide
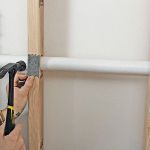 How to Reroute Plumbing for a Kitchen Island: A Step-by-Step Guide
 How to Detect and Repair Water Leaks in Your Home’s Walls
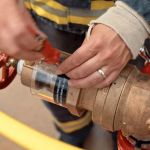 How to Replace a Malfunctioning Pressure Reducing Valve
 How to Fix a Slow Drain: DIY Solutions for Common Drainage Issues
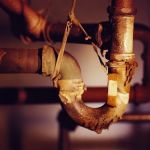 The Risks of Ignoring a Small Pipe Leak Early On