
- 1- Why You Should Replace Your Floor Drain Strainer
- 2- How to Identify a Damaged Floor Drain Strainer
- 3- Tools Needed to Replace a Floor Drain Strainer
- 4- Step-by-Step Guide to Replacing a Floor Drain Strainer
- 5- Common Mistakes to Avoid During Replacement
1. Why You Should Replace Your Floor Drain Strainer
Floor drain strainers play an essential role in maintaining your home’s plumbing system by preventing debris and foreign objects from entering the drain and causing clogs. Over time, these strainers can become clogged, corroded, or damaged, which reduces their effectiveness. Regularly replacing your floor drain strainer is crucial for ensuring proper drainage and avoiding costly plumbing repairs.
If your floor drain is experiencing slow drainage or if you notice an unpleasant odor, it might be time to replace the strainer. A new strainer will help improve water flow, reduce the risk of clogs, and maintain a cleaner, healthier environment in your home.
2. How to Identify a Damaged Floor Drain Strainer
Before replacing your floor drain strainer, it’s important to identify signs of damage. Here are some common indicators that your strainer may need to be replaced:
- Clogs and Slow Drainage: If water is draining slowly or not draining at all, the strainer could be clogged with debris or rusted over time, blocking proper flow.
- Visible Rust or Corrosion: Over time, metal strainers can corrode due to exposure to water and other elements. If you notice rust or deterioration, it’s time for a replacement.
- Loose or Broken Strainer: If the strainer is loose or has cracks, it may not stay in place properly, leading to water leakage or debris entering the drain.
- Unpleasant Odor: A damaged strainer may not be able to filter out all waste and debris, which can lead to unpleasant odors coming from the drain.
By regularly checking your floor drain strainer for these signs, you can ensure that it’s functioning properly and avoid larger plumbing issues down the road.

3. Tools Needed to Replace a Floor Drain Strainer
Replacing a floor drain strainer is a relatively simple task, but having the right tools will make the job much easier. Here’s what you’ll need:
- Replacement Floor Drain Strainer: Make sure you purchase a new strainer that matches the size and type of your drain.
- Flathead Screwdriver: A flathead screwdriver will help you remove any screws holding the old strainer in place.
- Pipe Wrench: If the old strainer is difficult to remove, a pipe wrench can help loosen it.
- Plumbing Sealant (optional): To ensure a tight fit and prevent leaks, you may need plumbing sealant to seal the edges of the new strainer.
- Cleaning Supplies: It’s a good idea to clean the drain and surrounding area before installing the new strainer to ensure a smooth installation process.
Once you have these tools on hand, you’re ready to proceed with the replacement process.
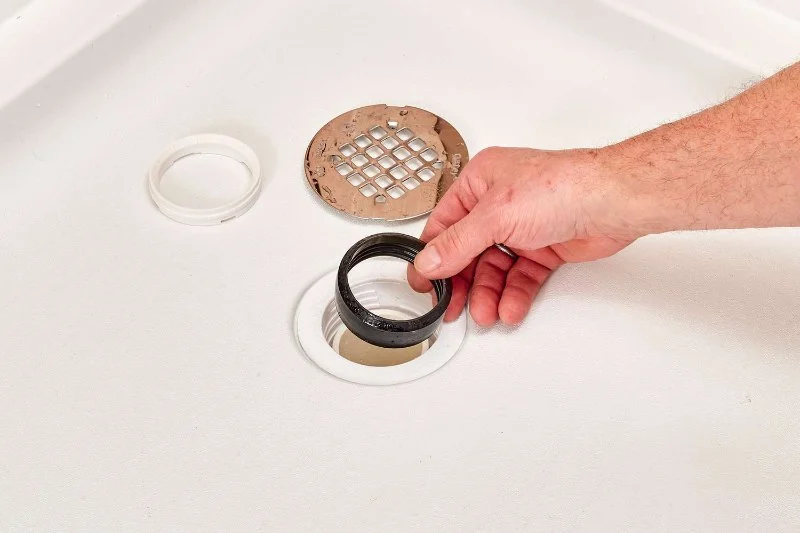
4. Step-by-Step Guide to Replacing a Floor Drain Strainer
Replacing a floor drain strainer is a straightforward task. Follow these simple steps to get the job done:
- Remove the Old Strainer: Use your screwdriver to remove any screws that are holding the old strainer in place. If it’s stuck, use a pipe wrench to gently loosen it.
- Clean the Drain: Once the old strainer is removed, clean out the drain to remove any debris or buildup. This will ensure that the new strainer fits properly and functions well.
- Install the New Strainer: Place the new strainer over the drain and align it properly. If necessary, apply a small amount of plumbing sealant to the edges to prevent leaks.
- Secure the Strainer: Use your screwdriver to secure the new strainer with screws. Make sure it’s tight and firmly in place.
- Test the Drain: Run water through the drain to ensure that the new strainer is functioning properly and that there are no leaks.
With these steps, you should be able to replace your floor drain strainer easily and quickly, restoring proper drainage and preventing future issues.
5. Common Mistakes to Avoid During Replacement
While replacing a floor drain strainer is a relatively simple task, there are a few common mistakes that homeowners should avoid:
- Choosing the Wrong Size Strainer: Make sure the new strainer fits the size of your drain. Measure the drain opening to ensure a proper fit before purchasing a replacement.
- Forgetting to Clean the Drain: Skipping the cleaning step can lead to improper installation and may cause clogs or poor drainage later on.
- Over-tightening the Strainer: Tightening the strainer too much can cause damage to the drain or strainer, leading to leaks.
- Not Using Sealant: If you don’t use plumbing sealant when necessary, you may risk leaks around the edges of the strainer, which could cause water damage.
By avoiding these common mistakes, you can ensure a smooth and successful replacement of your floor drain strainer, helping to maintain your home’s plumbing system in top condition.


 TJ's Plumbing & Heating Inc.4.0 (124 reviews)
 Lipson Plumbing & Heating Inc5.0 (9 reviews)
 Duty Calls Plumbing4.0 (318 reviews)
 Drain Doctor LLC4.0 (72 reviews)
 Lyle's Plumbing & Heating4.0 (2 reviews)
 Farr Plumbing and Heating4.0 (48 reviews)
 The Best Ways to Keep Your Plumbing System Efficient and Leak-Free
 How to Replace a Toilet Tank Gasket | Plumbers Supply Hub
 How to Test Backflow Preventers Annually
 How to Fix a Sink That Drains Slowly Over Time: Expert Tips for a Faster Drain
 How to Eliminate Odors Coming from Your Drains
 How to Test Backflow Preventers Annually: A Step-by-Step Guide