
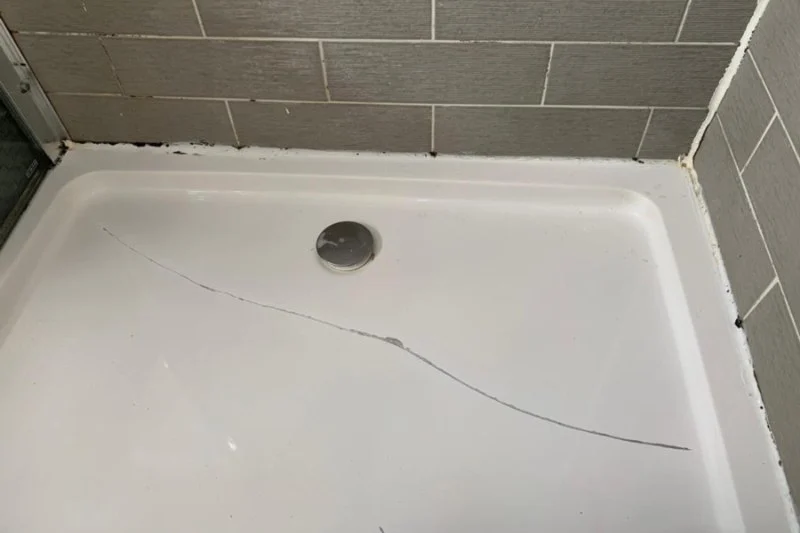
- Why Repairing Cracks Around the Bathtub Rim is Important
- Materials You Need to Repair a Crack Around the Bathtub Rim
- Step-by-Step Guide to Repair a Crack Around the Bathtub Rim
- Common Mistakes to Avoid When Repairing Bathtub Cracks
- Why Choose Gibby Plumbing Supply for Your Bathtub Repair Needs
Why Repairing Cracks Around the Bathtub Rim is Important
Cracks around the bathtub rim may seem like a minor issue, but they can quickly become a bigger problem if not addressed. These cracks allow water to seep into the underlying materials, which can cause damage to the structure of your bathroom and lead to mold or mildew growth. Over time, if left untreated, these cracks can worsen, causing more costly repairs in the future.
Additionally, cracks around the bathtub rim can create unsightly gaps and affect the overall appearance of your bathroom. Fixing these cracks promptly helps to maintain the integrity of your bathtub and keeps your bathroom looking clean and well-maintained. Moreover, repairing cracks in a bathtub is often a simple DIY task that can save you both time and money compared to calling in a professional plumber.

Materials You Need to Repair a Crack Around the Bathtub Rim
To successfully repair a crack around the bathtub rim, you’ll need a few materials and tools. These can typically be found at your local hardware store or purchased online. Here’s a list of what you’ll need:
- Bathtub Repair Kit: A good-quality bathtub repair kit typically includes resin, fiberglass mesh, and a hardener that you’ll need to patch the crack.
- Epoxy or Caulk: For smaller cracks, an epoxy or waterproof caulk can be a quick and easy solution.
- Putty Knife: This tool will help you smooth out the repair material and make the surface even.
- Fine Sandpaper: Sandpaper will be needed to smooth the repaired area after it has dried.
- Cleaning Supplies: A cleaning solution or degreaser to thoroughly clean the cracked area before repairing it.
- Protective Gloves: Wear gloves to protect your hands from the epoxy or any cleaning chemicals.
Having all these materials on hand before starting the repair ensures that the process will go smoothly and effectively.
Trusty Plumber North Hollywood
Los AngelesLos Angeles CountyCalifornia
6310 Colfax Ave, North Hollywood, CA 91606, USA
Step-by-Step Guide to Repair a Crack Around the Bathtub Rim
Repairing a crack around your bathtub rim is a straightforward process if you follow these steps. By the end of it, your bathtub will be back to looking and functioning like new.
- Step 1: Clean the Cracked Area: Begin by cleaning the cracked area thoroughly. Use a cleaning solution or degreaser to remove any soap scum, dirt, or oils from the surface. Dry the area completely before proceeding to the next step.
- Step 2: Sand the Area: Use fine sandpaper to lightly sand the cracked area. This helps create a rough surface for the repair material to adhere to, ensuring a stronger bond.
- Step 3: Mix the Repair Compound: If you’re using a bathtub repair kit, follow the instructions to mix the resin and hardener. If you’re using epoxy or caulk, make sure to squeeze out enough product to cover the crack.
- Step 4: Apply the Repair Material: Use a putty knife to apply the repair compound to the crack. Ensure that the material is applied evenly and fills the crack completely. If you’re using fiberglass mesh, place it over the crack before applying the resin to reinforce the repair.
- Step 5: Smooth the Surface: Smooth out the surface with the putty knife to make the repair as flush with the surrounding area as possible. Wipe off any excess compound with a clean cloth.
- Step 6: Let It Dry: Allow the repair compound to dry according to the manufacturer’s instructions. This typically takes a few hours, but it’s important to let it cure completely before using the bathtub.
- Step 7: Sand Again: After the repair has dried, lightly sand the area to smooth out any imperfections. This step is crucial to ensure that the repaired area blends in with the rest of the bathtub.
- Step 8: Clean and Seal: Once the repair is complete and smooth, clean the area once more to remove any dust from sanding. If necessary, apply a final coat of caulk around the rim to create a waterproof seal.
With these steps, you can successfully repair a crack around your bathtub rim and restore its functionality and appearance. The repair should last for a long time if done correctly, and your bathtub will be free of cracks and leaks.
Common Mistakes to Avoid When Repairing Bathtub Cracks
While repairing a bathtub crack is a relatively simple process, there are a few common mistakes to watch out for that can compromise the quality of your repair:
- Not Cleaning Properly: Failing to thoroughly clean the cracked area before applying the repair material can lead to poor adhesion, causing the repair to fail prematurely.
- Using the Wrong Repair Material: Always use the appropriate material for the type of crack and your bathtub’s surface. Some materials, like regular caulk, might not be suitable for larger or deeper cracks.
- Rushing the Drying Time: It’s crucial to let the repair material cure fully before using the bathtub. Rushing the drying process can result in a weak repair that doesn’t hold up to water exposure.
Avoiding these mistakes ensures that your bathtub repair is both effective and long-lasting.
Why Choose Gibby Plumbing Supply for Your Bathtub Repair Needs
At Gibby Plumbing Supply, we offer a range of high-quality products that make bathtub repair easy and efficient. From top-rated repair kits to waterproof sealants, we provide everything you need to fix cracks around your bathtub rim and other plumbing issues. Our expert team is also available to offer guidance and advice on how to get the best results with your repair project.
Visit Gibby Plumbing Supply today for all your bathtub repair needs and ensure that your bathroom remains in excellent condition for years to come!


 Mongo Plumbers4.0 (42 reviews)
 Bowers Plumbing2.0 (3 reviews)
 H&R Plumbing Services, LLC5.0 (3 reviews)
 A & J Plumbing & Water Heater Repair LLC0.0 (0 reviews)
 Bob Raeker Plumbing Co3.0 (23 reviews)
 BHS Plumbing LLC4.0 (13 reviews)
 How to Reroute a Plumbing Run Over a Crawlspace: A Step-by-Step Guide
 How to Replace a Spigot That Leaks Only When Turned On – A Step-by-Step Guide
 How to Replace a Shower Drain: A DIY Plumbing Project
 Plumbing Safety Tips for Homeowners Tackling DIY Projects | Safe Plumbing Solutions
 How to Handle a Burst Pipe: Immediate Actions You Should Take
 How to Repair a Hairball Clog Without Harsh Chemicals