
- 1- Why Insulate Exposed Pipes?
- 2- Challenges of Insulating Exposed Pipes Without Blocking Access
- 3- Materials for Insulating Exposed Pipes
- 4- Step-by-Step Guide to Insulating Exposed Pipes
- 5- Common Mistakes to Avoid When Insulating Pipes
- 6- Where to Buy Pipe Insulation Materials
Why Insulate Exposed Pipes?
Exposed pipes, especially those in unheated areas such as basements, crawl spaces, or garages, are vulnerable to temperature changes. In cold climates, these pipes are at risk of freezing, which can lead to burst pipes and costly repairs. Insulating these pipes helps maintain a steady temperature and prevent freezing, making it essential for protecting your home and your wallet.
In addition to preventing freezing, insulating exposed pipes can also improve energy efficiency. When pipes are insulated, less heat is lost through the walls or ceilings, allowing your heating system to work more efficiently. This can result in lower energy bills and a more comfortable home.

Roto-Rooter Plumbing & Water Cleanup
26 W Central Ave #201, Delaware, OH 43015, USA
Challenges of Insulating Exposed Pipes Without Blocking Access
While insulating exposed pipes is crucial, it’s important to ensure that the insulation doesn’t block access to the pipes. You may need to access the pipes for maintenance, repairs, or inspections. The challenge lies in finding the right balance between providing adequate insulation and leaving the pipes accessible for future work.
Some insulation materials may create a bulky layer around the pipes, making it difficult to reach them later. Additionally, if the insulation is not properly installed or secured, it can shift over time and affect the accessibility and effectiveness of the insulation. Therefore, choosing the right materials and methods for insulating exposed pipes is key to ensuring long-term protection without hindering access.
Materials for Insulating Exposed Pipes
When choosing insulation materials for exposed pipes, you’ll want to select options that are easy to install, effective, and allow for easy access if needed. Below are some of the most popular materials used for pipe insulation:
1. Foam Pipe Insulation
Foam pipe insulation is one of the most common and cost-effective options. It comes in pre-slit tubes that can be easily slipped over the pipes. The foam provides excellent thermal protection and is easy to install, making it a great choice for homeowners who need to insulate their pipes quickly without obstructing access. However, foam insulation should be secured properly to ensure it doesn’t shift over time.
2. Fiberglass Pipe Wrap
Fiberglass pipe wrap is another popular choice, especially for pipes in high-temperature environments. It offers good insulation and can be wrapped around pipes without creating a bulky layer. Fiberglass is also flexible, making it easier to wrap around pipes of varying shapes and sizes. This material is typically used in industrial or commercial settings but is also suitable for residential use when high heat resistance is needed.
3. Reflective Insulation
Reflective insulation is a newer option that works by reflecting heat back into the pipe. It consists of a layer of reflective foil and a layer of foam or bubble wrap. This material is lightweight and easy to apply, and it can be particularly effective in areas with fluctuating temperatures. Reflective insulation is a great choice for areas where access is important, as it is usually thinner and easier to work with than other insulation options.
4. Heat Tape
For areas prone to freezing, heat tape can be an excellent choice. Heat tape is an electrical heating cable that wraps around pipes and provides a consistent temperature. While it may not provide the same level of insulation as foam or fiberglass, it can be used in conjunction with other materials to prevent freezing in critical areas. Heat tape is especially useful for pipes that are difficult to insulate with traditional materials.
Step-by-Step Guide to Insulating Exposed Pipes
Here’s a simple guide to insulating your exposed pipes effectively without blocking access:
Step 1: Clean the Pipes
Before applying any insulation, ensure the pipes are clean and dry. Dirt and moisture can affect the effectiveness of the insulation and may lead to mold or mildew growth. Use a cloth to wipe down the pipes and remove any dust or debris.
Step 2: Choose the Right Insulation Material
Based on the location of the pipes and your specific needs, choose the appropriate insulation material. For most residential pipes, foam or fiberglass insulation will work well. For high-heat areas or pipes prone to freezing, consider using heat tape or reflective insulation.
Step 3: Measure and Cut the Insulation
Measure the length of the exposed pipes that need insulation. Cut the insulation material to fit the pipes, leaving extra room at the ends for overlap. This will ensure the insulation stays secure and provides continuous coverage along the pipes.
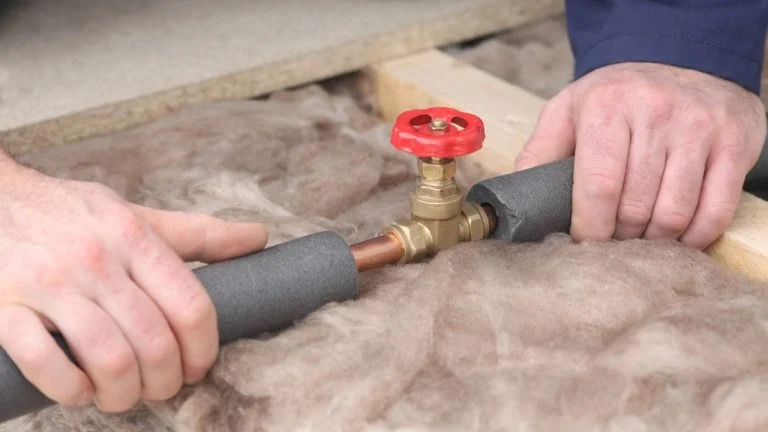
Step 4: Install the Insulation
For foam insulation, simply slide the foam tubes over the pipes and secure them with tape or zip ties. For fiberglass or reflective insulation, wrap it around the pipes and secure the ends with tape or wire. Be careful not to make the insulation too tight, as this can restrict airflow and affect its effectiveness.
Step 5: Check Accessibility
Ensure that the insulation doesn’t block any access points, such as valves, faucets, or joints that may need to be repaired or maintained. Leave enough space around the pipe fittings to allow for future work if necessary.
Common Mistakes to Avoid When Insulating Pipes
While insulating exposed pipes is relatively straightforward, it’s easy to make mistakes that can affect the effectiveness of the insulation. Here are some common pitfalls to watch out for:
1. Overlapping Insulation Too Much
Excessively overlapping insulation can reduce airflow and cause heat to build up, which may lead to condensation or moisture problems. Ensure that the insulation is snug but not too tight around the pipes.
2. Using Inappropriate Materials
Not all insulation materials are suitable for all pipe types or environments. Be sure to choose the right insulation based on the pipe location and the temperature variations in your area.
3. Forgetting About Future Access
One of the most common mistakes is not leaving enough room for future access to the pipes. Always check that you can easily reach valves and fittings after the insulation is in place.
Where to Buy Pipe Insulation Materials
If you’re ready to start insulating your exposed pipes, visit Plumbers Supply Hub for a wide selection of pipe insulation materials. Whether you need foam tubes, fiberglass wrap, or reflective insulation, you’ll find everything you need to protect your pipes and improve energy efficiency in your home.


 Roto-Rooter Sewer & Drain Service4.0 (108 reviews)
 Affordable Plumbing, Sewer & Drain Cleaning5.0 (1 reviews)
 Elite Performance Plumbing, Drain Cleaning, and Water Heaters5.0 (27 reviews)
 Louisville Cooler Manufacturing Co4.0 (7 reviews)
 Unique Plumbing & Drain, Inc.4.0 (87 reviews)
 Rescue Plumbing4.0 (1433 reviews)
 Why Your Garbage Disposal Is Jamming and How to Fix It
 How to Replace a Toilet Fill Valve Quietly
 How to Replace an Outdated Plumbing Fixture Safely: A Step-by-Step Guide
 Why Hard Water Is Harmful to Plumbing Fixtures
 When to Use Chemical Drain Cleaners with Caution: Risks and Safe Alternatives
 How to Fix a Leaky Faucet Under the Sink - Plumbers Supply Hub