
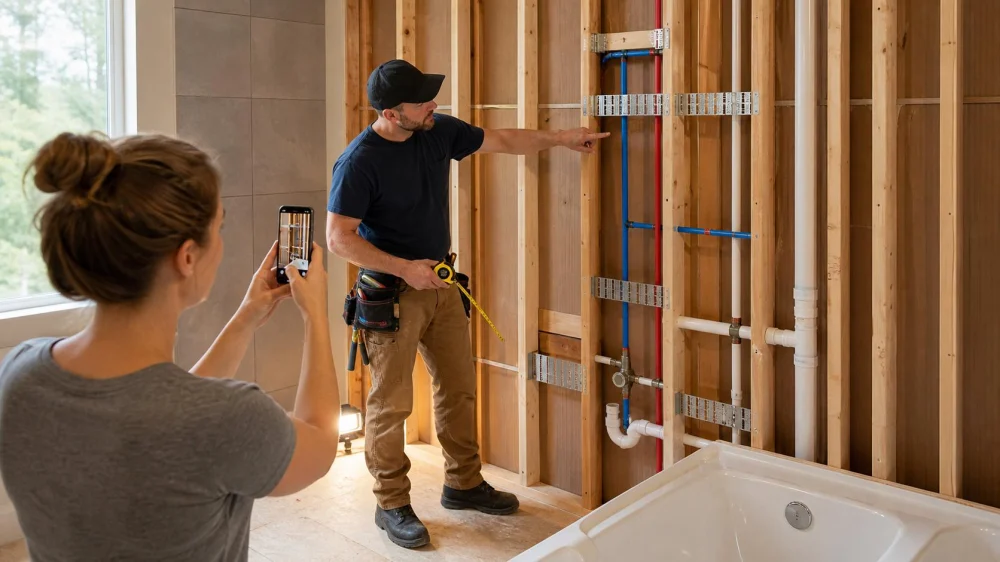
How to Document Hidden Plumbing Before Closing a Wall
On this page
- Quick answer
- Choose the right inspection moment
- Create useful photo coverage
- Add measurements and orientation
- Record components without guessing
- Verify tests, permits, and access
- Build a durable home record
- Pre-close checklist
- Limitations and safety notes
- Frequently asked questions
- Official guidance notes
- Take one reference-wide photo
Quick answer
Photograph and measure concealed plumbing after rough-in work and required testing or inspection, but before insulation, drywall, tile backer, cabinets, or other finishes block the view. Capture each wall from wide, medium, and close distances; include fixed reference points; record pipe, valve, cleanout, vent, drain, fixture, and access-panel locations; and save the approved plan, permit, inspection, test, and product records with the images.
Documentation helps future repairs, but it does not replace code compliance, locating tools, or careful exploratory work.
Choose the right inspection moment
Coordinate with the plumber, general contractor, and inspector so photography does not interrupt testing or conceal work prematurely. Ask which inspections must be completed before enclosure and who authorizes the wall to close. Requirements vary by jurisdiction and project type.
Make sure the rough work is in its final location. Images taken before corrections or change orders can mislead later. If work changes after the photo session, repeat the relevant views and mark the old record superseded rather than mixing versions.
Create useful photo coverage
Start each room with a wide photo showing the whole wall and adjacent corners. Then take overlapping medium views of every stud bay, followed by close-ups of joints, penetrations, valves, supports, transitions, cleanouts, and equipment connections. Keep the camera square to the wall when possible to reduce perspective distortion.
Use consistent lighting and high resolution. Avoid flash glare on shiny pipe. Include ceiling and floor transitions so the route does not disappear at the frame edge. Never move supports, caps, protective plates, test equipment, or tools just to make a cleaner image.
Add measurements and orientation
Reference stable features that will remain after finishing: subfloor, top plate, window edge, doorway rough opening, or an established room corner. Photograph a tape measure in a separate view when it can be placed safely without touching the work. Record horizontal and vertical offsets to valves, cleanouts, and pipe centerlines.
Do not rely on stud spacing alone; framing can be irregular. Create a simple room sketch with wall names and photo numbers. Note camera direction so “left” cannot be confused after the wall is closed.
Record components without guessing
Ask the plumber to identify pipe material, nominal size, service, flow direction where relevant, shutoffs, drains, vents, cleanouts, sleeves, firestopping, and future connection points. Photograph manufacturer labels on valves, pumps, fixtures, and specialty fittings when they are accessible.
Do not add a confident label based only on color or appearance. Hot and cold lines, recirculation, gas, hydronic piping, fire suppression, and nonpotable systems can coexist. Keep electrical and HVAC routes visible too because later drilling risk involves every concealed system.
Verify tests, permits, and access
Record which pressure, leak, flow, or drainage tests were performed, by whom, on what date, and with what result. Save required inspection approval. Confirm that mandated access remains for valves, cleanouts, traps, pumps, arrestors, or serviceable connections and that finish plans do not cover them.
Before enclosure, visually check for unexpected moisture and ask the responsible professional to resolve it. EPA WaterSense recommends prompt attention to leaks and regular inspection of visible connections and valves once the home is in service.
Build a durable home record
Name files by date, floor, room, wall, and sequence. Store original images, a reduced viewing set, plan, marked sketch, permit, inspection, test record, invoice, product data, and warranty in one project folder. Keep one backup separate from the primary device.
Protect addresses, access details, and building-system information when sharing. Give future owners or authorized contractors the relevant record through a secure method rather than posting it publicly.
Pre-close checklist
- Confirm rough work is final and ready for documentation.
- Complete required tests and inspections.
- Photograph every wall wide, medium, and close.
- Include stable references and measurements.
- Identify pipes and components with the plumber.
- Show crossings with electrical and HVAC work.
- Verify service access will remain.
- Archive images with approvals and product records.
Limitations and safety notes
- Do not enter an active work zone without permission and required protective equipment.
- Never touch energized wiring, pressurized test systems, unsupported pipe, or open penetrations.
- Photos can be outdated, distorted, incomplete, or missing hidden depth.
- Use appropriate detection and careful methods before future drilling or cutting.
- Permit, inspection, firestopping, and plumbing-code rules vary locally.
Frequently asked questions
Should I photograph every stud bay?
Overlapping coverage of the full wall makes later orientation easier than isolated close-ups.
Can video replace still photos?
Use video as a supplement. Sharp still images are easier to label, compare, print, and inspect closely.
What if the plumber changes a route later?
Retake that area, date the new set, and mark the earlier version as superseded.
Do photos prove the work passed inspection?
No. Keep the official inspection or approval record separately.
Should measurements be written on the wall?
A marked sketch and photo references are usually clearer; obtain contractor approval before marking materials.
Official guidance notes
EPA WaterSense home-maintenance guidance recommends regular inspection of plumbing connections and prompt leak repair. Local building departments determine required rough-in inspections and when work may be concealed, so confirm the applicable sequence with the authority having jurisdiction.
Take one reference-wide photo
Before the wall closes, stand square to it and take one high-resolution image that includes both corners, floor, and top plate. Then use that orientation shot as the index for every measured close-up.
 ABC Drain & Plumbing4.0 (316 reviews)
 FastFlow Sewer & Drains5.0 (27 reviews)
 R&P Drain Cleaning4.0 (49 reviews)
 Roto-Rooter Plumbing & Water Cleanup4.0 (681 reviews)
 Service Sewer5.0 (492 reviews)
 Woods Plumbing and Electric5.0 (157 reviews)
 The Differences Between PVC, CPVC, and PEX Pipes: A Complete Comparison
 Why Your Toilet Tank Is Leaking and How to Fix It
 How to Inspect Plumbing Connections in an Addition: A Step-by-Step Guide
 How to Fix a Leaky Water Heater: Step-by-Step Instructions
 How to Replace a Galvanized Pipe in Your Home
 How to Replace an Outdated Plumbing Fixture Safely