
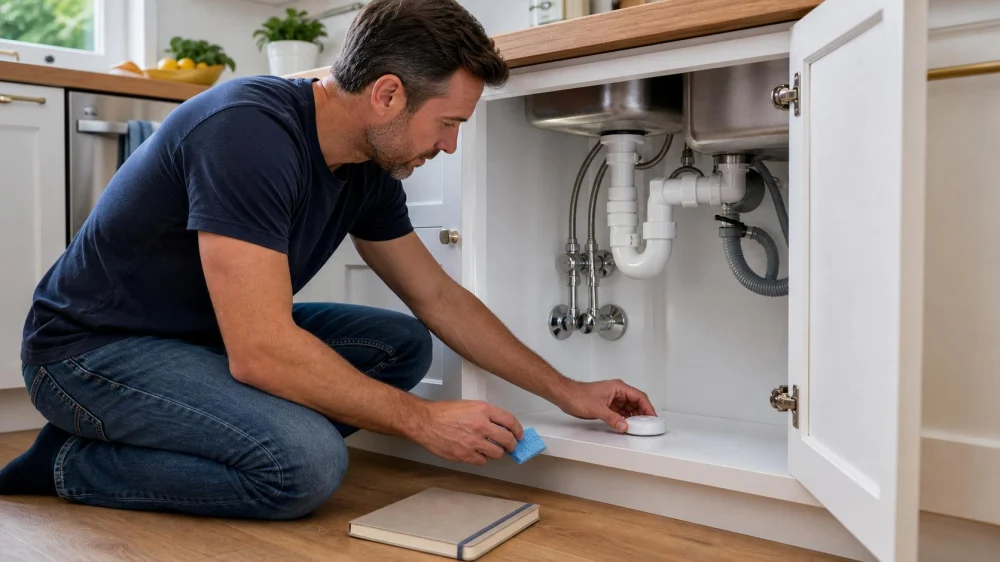
Under-Sink Leak Sensor Placement and Test Checklist
On this page
Quick answer
Place a water-leak sensor on a clean, dry, flat low point beneath the sink where water from supply valves, connectors, faucet lines, drain joints, dishwasher hose connections, a filter, disposal, or cabinet penetrations is likely to travel. Keep its contacts against the surface as designed and its radio or alarm unobstructed.
Test the device using the manufacturer's approved method, verify local sound and every phone or monitoring alert, record the date, and repeat at the specified interval. A spot sensor only detects water that reaches it. It does not prevent a leak, diagnose the source, monitor every cabinet corner, or replace prompt plumbing repair.
Bestline Plumbing Inc. and Heating
LakewoodLos Angeles CountyCalifornia
5570 Woodruff Ave, Lakewood, CA 90713, USA
Inspect the cabinet before placement
Empty the cabinet and use good light. Look for active drips, mineral deposits, corrosion, swollen particleboard, staining, dampness, mold-like growth, loose fittings, damaged hoses, and stored products that hide the plumbing.
Do not install a sensor as a substitute for fixing an existing leak. If water is near electrical equipment, a disposal, wiring, or outlet, avoid contact and obtain qualified help. Treat sewage or contaminated drain water differently from a clean supply drip.
Dry and clean the intended area according to cabinet and sensor instructions. Crumbs, detergent residue, metal objects, and pooled cleaning liquid can interfere with contacts or cause false alarms.
Azaryan Brother’s Plumbing Inc.
BurbankLos Angeles CountyCalifornia
1224 N Griffith Park Dr, Burbank, CA 91506, USA
Identify likely leak points and low spots
Trace visible water paths from:
- hot and cold shutoff valves and supply connectors;
- faucet body, pullout hose, sprayer hose, and counter penetrations;
- trap, drain joints, disposal flange, and dishwasher drain connection;
- filter housings, instant-hot units, chillers, soap dispensers, and other accessories;
- back and side walls where pipes enter;
- neighboring appliances or countertop seams.
Use a small level or a dry controlled drop test only when the cabinet material and manufacturer allow it. Do not pour water around electrical equipment. Cabinet liners and shelves can redirect water away from the apparent low spot.
Choose sensor location and connectivity
Place the sensor where it will not be crushed by cleaning supplies, kicked by stored bins, soaked during routine cabinet cleaning, or blocked by metal cookware. Keep it accessible for battery replacement and testing.
Some devices use a puck, others a cable or remote probe. A sensing cable can cover a longer path when installed exactly as directed, while several spot sensors may protect separate low areas. Do not cut, extend, tape over, or immerse contacts unless the instructions permit it.
Test wireless signal with the cabinet door closed. Metal sinks, disposals, foil insulation, thick walls, and distance can weaken connectivity. A loud local alarm matters when the internet, hub, phone, subscription, or cloud service is unavailable.
Test without creating a leak
Use the built-in button, damp cloth, small wetted test pad, or other method stated by the manufacturer. Keep test water controlled and away from outlets, disposals, wiring, and cabinetry that can swell.
- Confirm the device shows normal power and connection.
- Trigger the sensing contacts with the approved method.
- Verify the local alarm can be heard with doors closed.
- Confirm alerts reach every intended user and monitoring service.
- Check that the alert identifies the correct location.
- Dry and reset the sensor as instructed.
- Confirm it returns to normal monitoring.
If it fails any step, troubleshoot the battery, contacts, network, permissions, hub, or subscription before relying on it.
Maintain batteries, contacts, and alerts
Add the sensor to a home maintenance log with model, installation date, battery type, expected replacement interval, test date, app account owner, alert recipients, and support information.
Inspect after cabinet cleaning, plumbing work, filter changes, a disposal repair, stored-item rearrangement, phone replacement, router change, app update, or extended outage. A sensor moved a few inches may no longer sit in the water path.
Replace batteries and devices according to instructions. Clean contacts only with approved materials. Do not disable repeated alarms without finding the moisture source; small intermittent drips can dry before inspection.
Respond to an alarm
Go to the correct location safely. Stop using the sink and nearby appliances. If you can identify an active clean-water leak and the fixture shutoff is known, accessible, sound, and safe to operate, follow your household emergency plan; otherwise contact a plumber or building manager.
Do not touch standing water near electricity. For rapid flooding, a failed supply line, ceiling damage, sewage, or water affecting electrical or structural systems, escalate urgently and follow emergency guidance.
Photograph the sensor position, wet path, damage, and plumbing before moving items when safe. Dry the cabinet and sensor according to instructions, repair the source, then retest. Silencing the alarm is not a completed response.
Frequently asked questions
Should the sensor sit directly below the trap?
Only if that is a likely collection point. Water may run along a pipe or cabinet slope. Evaluate the entire cabinet.
Can one sensor cover a double sink?
Possibly, but separate low points or dividers may prevent water from reaching it. Use multiple probes or sensors when needed.
Will it detect a leak inside the wall?
Only if water reaches the sensing element. Hidden moisture may not appear in the cabinet.
Do smart sensors work during a power or internet outage?
Capabilities vary. Confirm battery operation, local alarm, hub behavior, and offline notifications for the exact system.
Should I place the sensor in a tray?
A tray can collect water but may also redirect it or conceal leaks. Use a compatible design and ensure the sensor sits where collected water reaches it.
Official source and system limits
EPA WaterSense describes leak detection and flow monitoring devices that use moisture sensing or flow monitoring to identify irregular use and reduce water waste and damage. It recommends selecting and maintaining devices for the home and checking installed systems regularly.
A sensor is one layer of protection. It does not certify plumbing, guarantee an alert, automatically shut water unless designed and installed to do so, or replace code-compliant valves and professional inspection. Follow manufacturer instructions and local electrical and plumbing requirements.
Next steps
Empty one sink cabinet, photograph every connection, find the true low paths, and choose sensor coverage for each separate area. Install without blocking access, test local and remote alarms with the door closed, record the result, and schedule the next battery and function check.


 Warwick Plumbing & Heating5.0 (175 reviews)
 The Amazing Plumber4.0 (259 reviews)
 Hinton Plumbing & Repair LLC4.0 (6 reviews)
 Matador Plumbing4.0 (7 reviews)
 Petro Plumbing & Mechanical Inc.4.0 (103 reviews)
 Shane Gibson Plumbing5.0 (31 reviews)
 How to Repair a Clogged Shower Drain Without Calling a Plumber
 The Most Common Plumbing Problems in Older Homes and How to Solve Them
 The Best Ways to Install Plumbing in Your New Construction Project
 How to Maintain Your Plumbing to Avoid Future Leaks and Clogs
 Top 10 Signs You Need a Plumber for Your Home’s Plumbing Problems: Essential Home Guide
 How to Repair a Broken Pipe Without Calling a Plumber Fast Fix Guide