
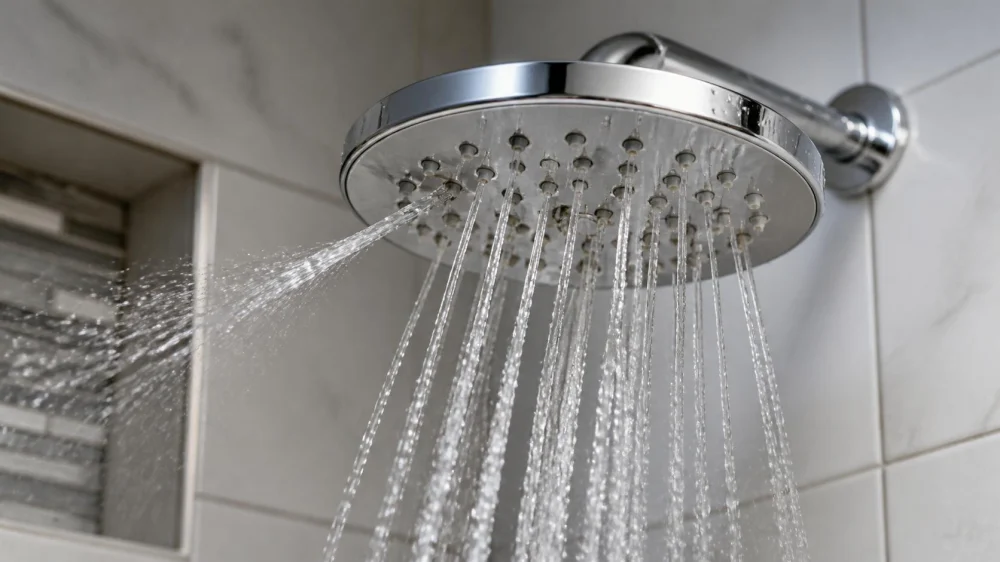
Showerhead Sprays Sideways: Check Buildup, Seals, and Fit
Table of contents
Quick answer
First determine whether stray water comes from clogged spray nozzles, a leaking swivel, the threaded connection, a cracked housing, or the wall. Turn water off, photograph the pattern, and clean accessible mineral buildup using the manufacturer's approved method. Tighten or reseal only the correct connection with protected tools. Stop and call a plumber if the shower arm moves, water enters the wall, or parts are corroded.
Mr Rooter Plumbing of Murfreesboro
MurfreesboroRutherford CountyTennessee
925 S Church St, Murfreesboro, TN 37130, USA
Identify the source
A sideways jet from one face nozzle is different from water escaping behind the showerhead. Nozzle buildup redirects the spray before it leaves the face. A worn swivel seal can leak where an adjustable head pivots. A poor threaded connection leaks where the head meets the shower arm. A crack may spray from the housing itself.
Dry the fixture and surrounding wall. Turn on water at a comfortable temperature and observe from outside the shower when possible. Use a flashlight and video so you can review the source after shutting water off. Do not stand where a sudden hot jet could strike your face.
Record:
- Exact point where stray water begins
- Whether it occurs at low and normal flow
- Any recent cleaning or replacement
- Changes in overall pressure or coverage
- Visible scale, rust, cracks, or loose trim
- Moisture at the wall escutcheon or ceiling below
- Brand and model information
If water appears at the wall opening, shut the shower off. A leak inside the wall can damage finishes and framing. Do not pull or rotate the arm to “see if it is loose,” because the connection may break behind the wall.
Clean the nozzles
Read the showerhead care instructions. Some flexible nozzles can be rubbed gently to release scale. Other products permit soaking removable parts in a stated solution for a limited time. Plated, painted, stone, electronic, and specialty finishes may be damaged by acids, abrasives, bleach, or prolonged soaking.
Turn off water and let the fixture cool. Protect eyes and skin according to the cleaner label, ventilate the room, and never mix cleaning products. If the showerhead contains a filter, speaker, light, or electronic control, follow its specific maintenance instructions.
Work on one small area and rinse thoroughly. Avoid needles, drills, or metal picks that enlarge or deform spray openings. Altering the nozzles or removing an internal flow-control component can disrupt performance, void a warranty, and conflict with water-efficiency requirements.
Run the shower briefly after cleaning. If the pattern returns to normal, record the date and create a maintenance interval based on local water conditions and manufacturer guidance. Rapid recurrence may justify a water-quality discussion or a different fixture design, not increasingly harsh chemicals.
Check the connection
When water leaks at the threaded joint, the showerhead may be loose, cross-threaded, or missing the appropriate thread seal. EPA WaterSense maintenance guidance describes checking for a tight connection and using pipe tape when necessary. The product instructions determine whether tape, a gasket, or another seal is correct.
Before removal, shut water off at the control and confirm it stops. Protect finishes with a strap wrench or padded tool as appropriate. Hold the shower arm securely only if the manufacturer and plumbing method support it. Excess torque can twist the arm inside the wall.
Inspect accessible threads for damage and remove old sealing material without scratching. Apply the specified tape in the direction and amount the instructions require so it does not unravel during assembly. Hand-tighten first and use minimal additional force if directed.
A leak at a swivel or hose connection may rely on a washer rather than thread tape. Replacing a flattened washer with the correct part can restore the seal. Do not stack random washers, use plumbing putty on an unsuitable joint, or coat threads with adhesive.
Decide on replacement
Replace a showerhead when the body is cracked, the swivel will not hold, corrosion has damaged connections, cleaning cannot restore spray, or repair parts are unavailable. Match the connection and verify that the fixture is compatible with household pressure and the existing shower arm.
EPA WaterSense-labeled showerheads are independently certified for water efficiency and performance factors including spray force and coverage. The label can help compare replacements, but it does not guarantee compatibility with every plumbing system or personal spray preference.
For handheld units, check hose length, wall bracket, vacuum breaker or backflow requirements, and whether the controls are reachable. Do not create a hose arrangement that can be submerged or violate local plumbing rules.
Hire a plumber if the arm is loose, concealed connection condition is unknown, threads are damaged, the new head causes temperature or pressure problems, or local code requires work beyond a simple fixture swap.
Test without causing damage
After cleaning or authorized replacement, dry every joint. Run cold or lukewarm water at low flow first, then increase to normal. Check the face, swivel, hose, threaded joint, escutcheon, wall, and floor. Use a dry tissue near accessible joints to reveal small leaks without putting fingers into a hot spray.
Do not overtighten a persistent leak. Shut water off, disassemble once if the instructions and your competence support it, and verify gasket position and threads. Repeated force can crack plastic or damage the shower arm.
Observe the fixture over several showers. Check adjacent walls and the ceiling below for moisture. Keep the receipt, model, care guide, and before-and-after photos for warranty or plumber discussion.
If spray performance changes after other plumbing work or across multiple fixtures, the cause may be broader than the showerhead. A plumber can assess pressure, debris, valves, and supply conditions.
Limitations
This article cannot identify a concealed leak, approve a cleaner, or specify how tightly to assemble a particular product. Fixture materials, connections, pressures, and local codes vary. Manufacturer instructions take priority.
Stop use for water entering the wall, a loose or cracked arm, scalding temperature changes, electrical exposure, or uncontrolled flow. Use qualified plumbing or electrical help as appropriate.
Sources and evidence
EPA WaterSense home-maintenance guidance recommends inspecting showerheads for stray spray and scale, checking the head-to-pipe connection, and considering WaterSense-labeled replacements. EPA's showerhead program independently certifies labeled models for efficiency and performance.
Frequently asked questions
Can vinegar clean every showerhead?
No. Acid can damage some finishes, coatings, stone, seals, or electronic parts. Follow the manufacturer's cleaning instructions for the exact model.
Should thread tape go on every connection?
No. Some joints seal with washers or gaskets. Use the sealing method specified for the particular threaded or hose connection.
Why did the spray change suddenly?
Debris after water work, a moved nozzle, damaged part, pressure change, or loose connection may be responsible. Document other fixture changes and ask a plumber if the pattern is widespread.
Can I remove the flow restrictor?
Do not alter internal flow controls. It can damage performance, waste water, affect warranty, and conflict with requirements. Choose a properly certified compatible fixture instead.
How do I protect the finish during removal?
Use the manufacturer-recommended tool and padding. Avoid gripping decorative surfaces with bare metal jaws. Stop if the shower arm moves.
When does a sideways spray require a plumber?
Call for water at the wall, loose hidden piping, corroded or damaged threads, repeated leakage after correct assembly, or pressure and temperature changes beyond one fixture.
Conclusion
A stray shower spray is easiest to fix when its source is identified before disassembly. Separate nozzle buildup from joint, swivel, housing, and concealed leaks. Use approved cleaning and sealing methods, protect the shower arm, and test gently. Replace damaged parts with compatible products and bring in a plumber when water or movement reaches the wall.


 McDaniel & Son Plumbing LLC5.0 (31 reviews)
 PinPoint Plumbing5.0 (8 reviews)
 D.A. Nabhan Plumbing Services4.0 (76 reviews)
 Sanford And Son Plumbing5.0 (13 reviews)
 Hope Plumbing, Heating & Cooling4.0 (194 reviews)
 Hydro Jetting Sewer Cleaning5.0 (2 reviews)
 Understanding the Cost of Plumbing Repairs and Budgeting Tips
 How to Install a Bidet Attachment Safely | Expert Plumbing Tips
 Plumbing Myths That Are Costing You Money
 Why Your Pipes Rattle at Night and What to Fix
 How to Choose the Right Pipe Insulation for Your Home
 Water Leak Near Electrical Fixtures: Stop and Get Help