

- detecting-bathroom-leaks - identifying early signs of water damage and hidden leaks
- toilet-shower-sink-checks - systematic troubleshooting across fixtures
- wall-floor-water-damage - understanding structural warning signals
- diy-vs-professional-repair - when to fix and when to call help
- prevention-and-maintenance - long-term protection against leaks
Why Bathroom Plumbing Leaks Often Go Unnoticed Until Damage Spreads
Bathroom plumbing leaks rarely announce themselves clearly at the beginning. Most homeowners in the U.S. first notice them through subtle changes: a faint musty smell, a soft spot in flooring, or an unexplained spike in the water bill. By the time visible water appears, the leak has often been active for weeks.
What makes bathroom leaks especially tricky is that water rarely stays where it starts. A small issue behind a toilet seal or inside a shower wall can slowly travel along pipes, subfloors, or grout lines. Understanding how these systems connect is the first step in learning how to troubleshoot plumbing leaks in your bathroom effectively.
Early Warning Signs That Help You Catch Bathroom Water Leaks Fast
Subtle surface changes you should never ignore
One of the earliest indicators is discoloration on walls or ceilings below a bathroom. Even a light yellow or brown tint can signal that moisture is building up behind the surface. Paint bubbling or peeling is another strong clue that water is trapped inside drywall layers.

Roto-Rooter Plumbers
ClarksvilleMontgomery CountyTennessee
ROTO-ROOTER, 1772 Alpine Dr, Clarksville, TN 37040, USA
Unusual sounds and moisture patterns
If you hear dripping when all fixtures are turned off, there is a high chance water is escaping somewhere in the system. Likewise, tile floors that feel slightly warmer or damp compared to surrounding areas can indicate slow seepage from pipes beneath.
Real-life example: the “invisible shower leak” case
A homeowner in Chicago reported a persistent smell in their guest bathroom. After weeks of guessing, a plumber discovered a cracked shower pan liner that had been leaking beneath the tiles. The repair required partial floor removal—something that could have been minimized with earlier detection.
Step-by-Step Bathroom Leak Troubleshooting Process
Step 1: Isolate the source area
Start by determining whether the leak is coming from the toilet, sink, shower, or hidden piping. Turn off each fixture one at a time and observe changes in water behavior. This helps narrow down the system causing the issue.
Step 2: Inspect toilet connections carefully
Toilets are one of the most common sources of bathroom plumbing leaks. Check the base for water pooling, inspect the wax ring seal, and ensure the tank bolts are not loose. Even a small wobble in the toilet can break the seal and allow slow leakage into the floor.
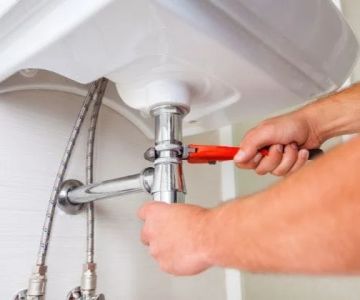
Step 3: Evaluate sink plumbing components
Under-sink pipes often develop leaks at joints or connection points. Run water for a few minutes and watch for drips forming at the P-trap or supply lines. Corrosion or mineral buildup can also indicate slow leakage over time.
Step 4: Examine shower and tub seals
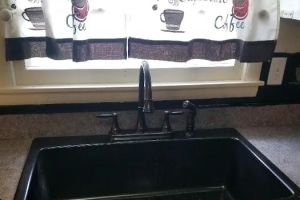
Shower leaks are often hidden behind tiles or caulking. Check grout lines, corners, and faucet fixtures. If water escapes even when the shower is off, internal valve issues may be the cause.
Understanding Hidden Wall and Floor Leak Behavior
One of the most challenging aspects of bathroom plumbing leaks is that water does not always follow a straight path. It can travel along beams, insulation, or even electrical conduits before becoming visible. This makes early diagnosis critical.
In older homes, especially those built before modern waterproofing standards, even a minor leak can lead to structural weakening over time. That is why professionals emphasize checking not just fixtures, but surrounding materials like subfloors and wall cavities.
When DIY Troubleshooting Is Enough—and When It Isn’t
Situations you can safely handle yourself
Minor issues such as loose faucet connections, visible dripping under sinks, or worn toilet flappers can often be fixed without professional help. Basic tools and replacement parts are usually sufficient for these repairs.
Warning signs that require professional intervention
If you notice persistent moisture behind walls, recurring leaks after repair attempts, or water spreading across multiple areas, the problem may involve internal piping or structural damage. In such cases, delaying professional help can significantly increase repair costs.
Practical insight from field experience
A plumber once described a case where a “small sink leak” turned out to be a corroded pipe inside the wall. By the time it was discovered, mold had spread into adjacent rooms. Early diagnosis could have prevented most of the damage.
Tools That Make Bathroom Leak Detection Easier
Modern homeowners have access to several useful tools for identifying plumbing issues. Moisture meters can detect hidden dampness behind walls. Infrared thermometers help identify temperature differences caused by water flow. Even simple dye tests in toilet tanks can reveal silent leaks.
For those looking to upgrade their home maintenance toolkit or find reliable plumbing materials, platforms like Plumbers Supply Hub can help connect users with appropriate solutions and service options tailored for bathroom repair needs.
Preventing Future Bathroom Plumbing Leaks
Routine inspection habits that make a difference
Checking under sinks monthly, inspecting caulking every few months, and observing water pressure changes can prevent many leaks before they start. Small maintenance habits often eliminate the need for expensive repairs later.
Material upgrades that improve long-term reliability
Replacing older rubber seals with modern silicone-based components can significantly reduce leak risks. Similarly, upgrading aging pipes in older homes can prevent recurring bathroom plumbing leaks caused by corrosion.
Environmental factors homeowners overlook
Humidity, temperature fluctuations, and water hardness all affect plumbing durability. Bathrooms with poor ventilation tend to develop leaks faster due to condensation buildup weakening seals over time.
How Real Homeowners Solve Bathroom Leak Problems Efficiently
A common story shared among homeowners involves discovering leaks only after visible damage appears. One family in Texas noticed warped flooring near their bathroom door. After inspection, they found a slow toilet leak that had been running for months. The repair included replacing the seal and restoring subfloor sections.
Cases like this highlight why understanding how to troubleshoot plumbing leaks in your bathroom is not just a maintenance skill but a cost-saving necessity. Early action almost always reduces repair complexity.
Building Confidence in Handling Bathroom Plumbing Issues
Even without professional training, homeowners can learn to recognize patterns in plumbing behavior. Listening for changes in water flow, observing surface materials, and acting quickly when abnormalities appear are all part of effective troubleshooting.
The key is not to wait until damage becomes visible. Water is persistent, and bathroom systems are interconnected enough that small failures can escalate quickly if ignored.


 Clog Busterz Plumbing4.0 (753 reviews)
 Rooter Guy Plumbing3.0 (11 reviews)
 Plumbing And More With JB LLC4.0 (6 reviews)
 All Rooter Hydro Jetting- Sewer & Drain Experts Inc.4.0 (82 reviews)
 TF SULLIVAN Plumbing Inc...5.0 (15 reviews)
 Team Alpha Plumbing & Rooter Inc.4.0 (45 reviews)
 How to Safely Drain a Water Heater Before Moving: Step-by-Step Guide
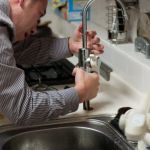 How to Find a Reputable Plumber in Your Area: Tips for Quality Service
 How to Prevent and Fix Plumbing Problems in the Laundry Room – Expert Tips for Homeowners
 How to Test an Expansion Tank on Your Water Heater
 How to Test Pressure Drop in a Long Pipe Run: Effective Methods for Accurate Results
 The Importance of Hiring a Local Plumber vs. a National Chain