

- 1. Introduction to Testing Water Pressure
- 2. Why Should You Test Water Pressure?
- 3. Tools Needed for Testing Water Pressure
- 4. Step-by-Step Guide to Testing Water Pressure at Multiple Fixtures
- 5. What to Do If Water Pressure Is Too High or Low
- 6. When to Call a Professional Plumber
1. Introduction to Testing Water Pressure
Water pressure is crucial for the proper functioning of your plumbing system. From showering to washing dishes, having the right water pressure ensures that you can go about your daily tasks with ease. However, fluctuating or low water pressure can be a sign of underlying issues that need to be addressed.
Testing water pressure at multiple fixtures throughout your home allows you to assess the overall condition of your plumbing system. In this article, we will guide you through the process of measuring water pressure, identifying common problems, and understanding what actions to take if you encounter issues.

Mountaineer Plumbing, Drains, & Water Heater Services
Grand RapidsKent CountyMichigan
4495 Clay Ave SW, Grand Rapids, MI 49548, USA
2. Why Should You Test Water Pressure?
Regularly testing water pressure is essential to maintain the efficiency and longevity of your plumbing system. Here are some reasons why you should perform this test:
- Identify plumbing issues: Low or fluctuating water pressure can signal problems like pipe blockages, leaks, or corrosion.
- Improve water efficiency: Ensuring proper water pressure can help conserve water and reduce utility bills.
- Prevent water damage: If water pressure is too high, it can put undue stress on pipes and fixtures, potentially causing leaks or bursts.
Testing water pressure at multiple fixtures gives you a more comprehensive view of your home's plumbing performance.
Austin Plumbing, Heating, Air & Electric
GermantownWashington CountyWisconsin
W197N10225 Appleton Ave, Germantown, WI 53022, USA
3. Tools Needed for Testing Water Pressure
To test water pressure accurately, you will need a few basic tools:
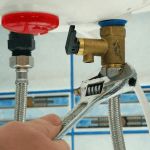
- Water pressure gauge: This is the main tool for measuring water pressure. It attaches to an outdoor spigot or a faucet inside your home.
- Adjustable wrench: You may need this to attach the pressure gauge securely to the faucet.
- Faucet or hose bib: This is typically where you will attach the pressure gauge for testing purposes.
These tools are relatively inexpensive and can be found at most home improvement stores. Make sure the pressure gauge is rated for your home's water system, typically measuring in pounds per square inch (psi).
4. Step-by-Step Guide to Testing Water Pressure at Multiple Fixtures
Follow these simple steps to test water pressure at multiple fixtures in your home:
1. Attach the Pressure Gauge
Start by attaching the water pressure gauge to an outdoor spigot or any faucet that is easy to access. Use an adjustable wrench to secure the gauge, ensuring there are no leaks around the connection.
2. Turn on the Water
Turn on the faucet or spigot fully and allow the water to flow for a few seconds. This will give the gauge enough time to measure the pressure accurately.
3. Record the Water Pressure
Look at the reading on the water pressure gauge. The ideal pressure for most homes falls between 40-60 psi. If the reading is much higher or lower, it could indicate a problem with your plumbing system.
4. Repeat the Test at Multiple Fixtures
After testing one faucet, move the pressure gauge to other fixtures around your home, such as the kitchen sink, bathroom sinks, and showers. This will give you a better understanding of whether the issue is localized or affects the entire system.
5. Analyze the Results
If you notice significant drops in pressure at certain fixtures, this could be due to clogged pipes, mineral buildup, or damaged plumbing. For consistent low pressure across multiple fixtures, you might be dealing with a larger issue, such as a malfunctioning pressure regulator or a problem with your main water line.
5. What to Do If Water Pressure Is Too High or Low
Depending on your test results, you may need to address either high or low water pressure:
Low Water Pressure
Low water pressure can be caused by several issues, such as mineral buildup in pipes, a clogged faucet aerator, or problems with your water supply. If only one fixture is affected, try cleaning the aerator or checking for blockages. For broader issues, you may need to clean the pipes or replace damaged sections.
High Water Pressure
High water pressure can be equally problematic, causing damage to pipes and fixtures. If your pressure is above 80 psi, it’s recommended to install a pressure-reducing valve (PRV) to regulate the flow. This can help prevent leaks and extend the life of your plumbing system.
6. When to Call a Professional Plumber
While testing water pressure is something homeowners can do on their own, there are situations when it’s best to call a professional plumber:
- If you notice significant variations in water pressure across multiple fixtures
- If the water pressure is consistently high or low despite adjustments
- If you are unsure how to fix the problem or lack the tools to address it
A plumber can quickly identify the root cause of the problem and make repairs to restore normal water pressure.
Conclusion: Ensuring Optimal Water Pressure in Your Home
Testing water pressure at multiple fixtures in your home is a simple yet effective way to maintain your plumbing system. By regularly checking the pressure, you can catch potential issues early, saving you time and money on expensive repairs.
If you're in need of plumbing supplies or professional advice, visit Plumbers Supply Hub for expert products and services to help you with all your plumbing needs.


 Sentry Plumbing5.0 (1 reviews)
 La Place Plumbing4.0 (9 reviews)
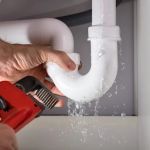 Titan Brother's Plumbing & Rooter Services4.0 (186 reviews)
 plumbing repairman0.0 (0 reviews)
 Limitless Plumbing Services - Lebanon4.0 (44 reviews)
 GoHero Home Services4.0 (1804 reviews)
 How to Troubleshoot a Noisy Toilet: Common Causes and Solutions
 How to Replace a Toilet Tank Gasket - Step-by-Step Guide
 How to Troubleshoot Plumbing Issues in Older Homes
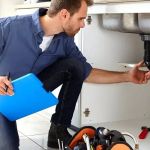 How to Prevent Water Damage with Regular Plumbing Inspections
 How to Use a Drain Snake Without Damaging Pipes | Plumbers Supply Hub
 How to Replace a Toilet Fill Valve Quietly