
Dishwasher Air Gap Overflow: Trace the Drain Path First
On this page
Quick answer
Water leaving a countertop dishwasher air gap usually means pumped drain water cannot move freely through the downstream hose or connection. Stop the dishwasher, dry the area, and check for an obvious loose, kinked, or blocked route. Clean only accessible air-gap parts as the manufacturer permits. Do not cap the opening. If overflow returns, the disposal or drain connection, hose, sink drain, or dishwasher may need professional inspection.
This guide covers common U.S. countertop air-gap installations. Local code, dishwasher instructions, disposal design, sink plumbing, and approved backflow protection vary. Some systems use a different method and should not be converted based on generic advice.

What the air gap does
A dishwasher air gap is a physical separation in the drain route designed to help prevent contaminated sink or drain water from siphoning back into the dishwasher. The visible cap directs any escaped water toward the sink rather than hiding a backup inside the cabinet.
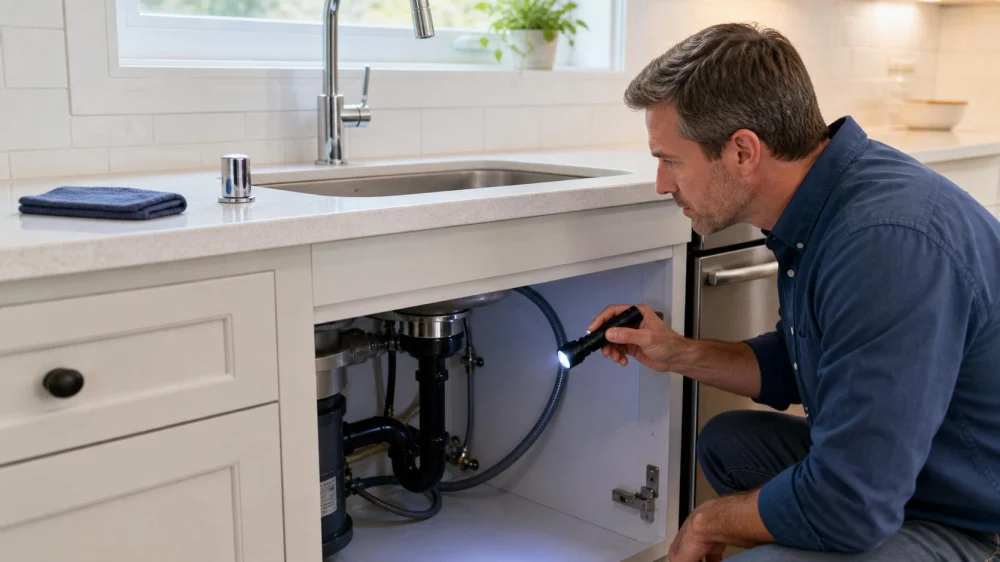
During pump-out, water travels from the dishwasher to the air gap, then through a downstream hose to a garbage disposal inlet, sink tailpiece, or other approved drain connection. If the second part cannot accept flow, water may rise and exit the air-gap opening.
Because the overflow is a warning function, plugging, taping, or sealing it can redirect water into the cabinet or defeat the intended separation.

Empire Plumbing, Heating and Cooling
StantonOrange CountyCalifornia
8349 Katella Ave, Stanton, CA 90680, USA
Why water comes out
- Food residue or debris in the accessible air-gap body
- A kinked, sagging, crushed, or internally restricted downstream hose
- Buildup at the disposal or sink drain connection
- An installation problem after a dishwasher, disposal, sink, or countertop change
- A disposal inlet that was not prepared correctly during installation
- A slow or backed-up sink drain
- Incorrect hose size, routing, or connection
Several causes can look identical from above the counter. The timing matters: a brief splash only during dishwasher drain points to that route, while sink water or broad backup may indicate a shared drain problem.
Safe inspection steps
- Stop the appliance. Use its normal control and keep the wet area away from plugs, cords, outlets, and electrical equipment.
- Dry and document. Place a towel at the sink edge and photograph the cap, cabinet, hoses, and any leak marks.
- Check the sink. Note whether one or both bowls drain normally and whether the disposal, if present, has an unusual sound or backup.
- Look under the sink. Without touching wiring or moving heavy equipment, inspect hoses for kinks, crushing, loose clamps, stains, or unsupported loops.
- Review recent changes. Record whether the dishwasher, disposal, faucet, sink, countertop, or drain was recently installed or serviced.
- Find the manuals. Use the air-gap, dishwasher, and disposal instructions before removing covers or hoses.
Do not reach into a disposal, even when it is off. Do not disconnect a drain hose that may hold dirty water unless you have the skill, protective equipment, containment, and authority to do so safely.
What you may be able to clean
Many air-gap caps lift or twist off, exposing a removable decorative cover and accessible plastic body, but designs vary. Follow the product instructions. Remove visible loose debris with a non-damaging method recommended by the manufacturer, then reinstall every part in the correct orientation.
Do not push a sharp object deep into the fitting, drill through a blockage, pour chemical drain cleaner into the air gap, or blow high-pressure air through connected appliances. These actions can damage components, create chemical exposure, or force wastewater into an unintended location.
If the accessible air gap is clean, the restriction may be downstream. A plumber can inspect the hose and building drain; an appliance technician may be needed when the dishwasher pump or internal drain system is involved.
Observe the next drain cycle
Run a test only if the area is dry, connections look secure, the sink drains normally, and no electrical or sewage hazard is present. Use a small manufacturer-approved cycle and stay beside the sink during pump-out.
Watch the air gap, sink, disposal connection, hose clamps, cabinet floor, and dishwasher toe-kick area. Stop the appliance if water appears anywhere unexpected, the air gap continues to discharge, the sink backs up, or unusual noise or odor develops.
Record the exact stage and duration. A video from a dry, safe position can help a professional see how quickly the water rises.
Air-gap overflow checklist
- Dishwasher stopped and wet area separated from electricity
- Air-gap cap and overflow pattern photographed
- Sink drainage checked separately
- Visible hoses checked for kinks, crushing, and loose clamps
- Recent appliance or plumbing changes recorded
- Model-specific manuals reviewed
- Only accessible, permitted air-gap parts cleaned
- No cap, tape, chemical, or sharp tool used
- Test cycle observed continuously
Limitations and safety notes
- Never cap or seal an overflowing air gap.
- Do not reach into a garbage disposal or work near wet electrical connections.
- Do not mix drain chemicals or expose a technician to undisclosed chemical use.
- Stop use for recurring overflow, sewage backup, hidden cabinet leakage, damaged hoses, or electrical concerns.
- Installation and backflow rules are local; use a qualified professional for compliance decisions.
Frequently asked questions
Can I remove the air gap and connect the hose directly?
Do not change the backflow-protection method without checking the appliance instructions and current local requirements with a qualified professional.
Why did overflow start after replacing the disposal?
The downstream connection or installation may have changed. Stop testing and ask the installer or plumber to verify the disposal inlet, hose, and drain route.
Can a slow sink drain cause air-gap overflow?
It can affect the shared downstream route in some layouts. Observe which fixtures back up and have a plumber identify the restriction.
Is a small amount of water normal?
Air should separate the flow, but visible discharge can indicate restriction or installation issues. Check the product guidance and investigate recurring water.
Should I use drain cleaner?
Not through the air gap. Chemical products may be incompatible, hazardous, or ineffective for the actual location of the restriction.
Sources and evidence notes
This article follows general plumbing and appliance-drain principles: preserve approved backflow protection, trace flow from dishwasher to receiving drain, avoid sealing the warning opening, use product instructions, keep water away from electricity, and assign concealed restrictions to the appropriate professional.
Next steps
Dry the sink area, photograph the air gap and hose route, and confirm whether the sink drains normally. Clean only accessible parts allowed by the instructions. If water returns during one observed test, stop the dishwasher and give the timing, photos, and recent installation history to a plumber or appliance technician.


 Jayco Plumbing Inc4.0 (45 reviews)
 AC Plumbing, Heating & Air Conditioning4.0 (66 reviews)
 Do Right Rooter Drain Specialists , 24/7 Drain & Plumbing Services4.0 (212 reviews)
 All mechanical0.0 (0 reviews)
 Mid-State Sewer Service5.0 (75 reviews)
 Done Right Plumbing Services4.0 (12 reviews)
 Understanding the Cost of Plumbing Repairs and Budgeting Tips
 The Importance of Professional Plumbing Inspections for Homeowners: Protect Your Home
 How to Repair a Pipe Saddle That Leaks: Complete Guide
 How to Test Backflow Preventers Annually
 How to Prevent Water Damage with Regular Plumbing Inspections
 How to Test Pressure Drop in a Long Pipe Run: Effective Methods for Accurate Results