
- 1- Why You Should Replace Your Toilet Flush Lever
- 2- When to Replace the Flush Lever
- 3- Tools Needed for Replacing the Flush Lever
- 4- Step-by-Step Guide to Replacing Your Toilet Flush Lever
- 5- Tips for Maintaining Your Toilet Flush Lever
1- Why You Should Replace Your Toilet Flush Lever
Having a functional toilet flush lever is essential for a smooth bathroom experience. Over time, flush levers can become worn, loose, or even break entirely, leaving you with a toilet that’s hard to use. Replacing the flush lever is a simple DIY project that can save you money on professional repairs while ensuring your toilet operates smoothly. Moreover, it can help improve the overall appearance of your bathroom if you choose a sleek, modern lever design.
Benefits of Replacing Your Toilet Flush Lever
When you replace your toilet flush lever, you not only restore functionality but also prevent future plumbing issues. A properly working lever ensures that the toilet flushes efficiently, which can save water and prevent unnecessary wear on the internal mechanisms of your toilet. Additionally, modern flush levers are often more durable and user-friendly, improving the overall convenience of your bathroom setup.
2- When to Replace the Flush Lever
Knowing when it’s time to replace your toilet flush lever can help you avoid frustration. Here are some signs that indicate it’s time for a replacement:
1. The Lever Is Sticking or Jammed
If the flush lever is difficult to press or feels stuck, it may be a sign that the internal mechanism is damaged or the lever itself is worn out. In such cases, replacing the lever can restore smooth operation.
2. The Lever Is Loose or Broken
A lever that feels loose or is completely detached from the toilet’s internal flushing mechanism is no longer functional. Replacing it will ensure that you can flush the toilet properly without struggling to get it to work.
3. The Toilet Flushes Inefficiently
If the flush lever isn’t engaging properly, your toilet may not flush completely or efficiently, wasting water and leading to potential blockages. A new lever can help restore the toilet’s flushing power.
3- Tools Needed for Replacing the Flush Lever
Replacing a toilet flush lever is a straightforward task, but you’ll need a few basic tools. Here’s what you’ll need to get started:
1. Adjustable Wrench
An adjustable wrench is essential for loosening and tightening the nuts and bolts that secure the flush lever to the toilet.
2. New Flush Lever
Choose a replacement lever that is compatible with your toilet model. You can find flush levers at most hardware stores, or even online. Make sure to select a lever that fits securely in your toilet’s flush mechanism.
3. Screwdriver
A screwdriver may be needed to remove any screws that hold the old flush lever in place, depending on the design of your toilet’s mechanism.
4. Rubber Gloves
Although it’s a small task, wearing rubber gloves will help keep your hands clean, especially if you’re dealing with any water or residual dirt inside the tank.
4- Step-by-Step Guide to Replacing Your Toilet Flush Lever
Replacing your toilet flush lever is a simple task that can be done in just a few steps. Here’s a comprehensive guide to help you through the process:
1. Turn Off the Water Supply
Before you start, turn off the water supply to your toilet. This is usually done by turning the valve located near the base of the toilet. Once the water is turned off, flush the toilet to drain the tank.
2. Remove the Tank Lid
Take off the tank lid and place it somewhere safe to avoid breaking it. You’ll need access to the inside of the tank to remove the old lever and install the new one.
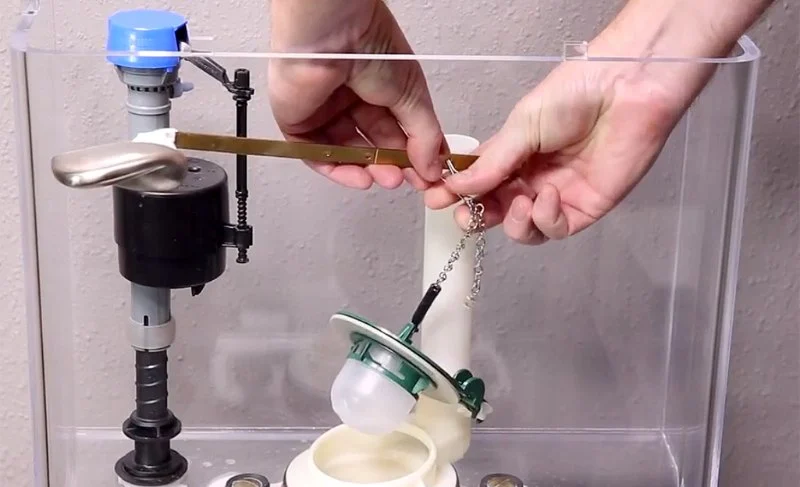
3. Disconnect the Old Lever
Examine the flush lever inside the tank. It’s usually connected to the flush valve by a chain or a rod. Use your wrench or screwdriver to loosen any screws or bolts holding the lever in place. If the lever is attached with a chain, unhook the chain from the flush valve.
4. Install the New Flush Lever
Now it’s time to install the new flush lever. Insert it into the hole where the old lever was attached. Secure it with the bolts or screws provided with the new lever. Make sure the lever is tightly secured and that it moves smoothly when pressed.
5. Reconnect the Chain or Rod
If the flush lever is connected to the flush valve by a chain, reattach the chain to the new lever. Make sure the chain has a bit of slack but isn’t too loose. If it’s connected by a rod, adjust the length to ensure the flush valve operates properly when you press the lever.
6. Test the New Lever
Once everything is securely in place, turn the water supply back on. Let the tank fill, then test the new lever to make sure it functions properly. Press the lever to ensure it flushes the toilet efficiently and smoothly.
5- Tips for Maintaining Your Toilet Flush Lever
Proper maintenance of your toilet flush lever can extend its lifespan and ensure it continues to work effectively. Here are some tips to keep in mind:
1. Regularly Check for Loose Parts
Every few months, check the flush lever for signs of wear or looseness. Tighten any loose bolts or screws to keep the lever working smoothly.
2. Clean the Flush Lever and Tank
Clean the flush lever and the inside of the tank regularly to prevent the buildup of grime and calcium deposits. Use a non-abrasive cleaner and a soft cloth to wipe down the lever.
3. Avoid Overuse
Avoid using excessive force when pressing the flush lever. Gently press the lever to extend its lifespan and avoid damaging the mechanism.
If you need a replacement flush lever or other toilet repair parts, visit Plumbers Supply Hub for the best products and professional advice to keep your bathroom in top shape.


 Good Will Plumbing, LLC5.0 (30 reviews)
 Plumbing Dudes5.0 (19 reviews)
 D and P Plumbing2.0 (35 reviews)
 Lenox Plumbing, LLC4.0 (2555 reviews)
 Ray Vin Zant Plumbing4.0 (35 reviews)
 Unique Plumbing Service Rancho Cucamonga CA3.0 (14 reviews)
 How to Replace a Toilet Tank Gasket | Plumbers Supply Hub
 How to Replace a Galvanized Pipe in Your Home – Step-by-Step Guide
 How to Repair a Clogged Garbage Disposal: Troubleshooting Tips
 How to Repair a Leaking Joint in a Wet Vent System
 How to Test a Backwater Valve in Your Sewer Line: A Step-by-Step Guide
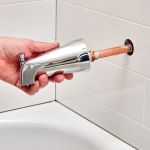 How to Replace a Bathtub Spout with Diverter