Plumbers Supply Hub
Plumbers Supply HubPlumber InsightsPlumbers Near Me
AlabamaCaliforniaGeorgiaIllinoisIndianaIowaKentuckyMichiganMinnesotaMissouriNorth DakotaOhioPennsylvaniaSouth DakotaTennesseeVirginiaWest VirginiaWisconsin

Plumbers Supply HubPlumber Insights

How to Replace a Spigot That Leaks Only When Turned On – A Step-by-Step Guide

How to Replace a Spigot That Leaks Only When Turned On – A Step-by-Step Guide
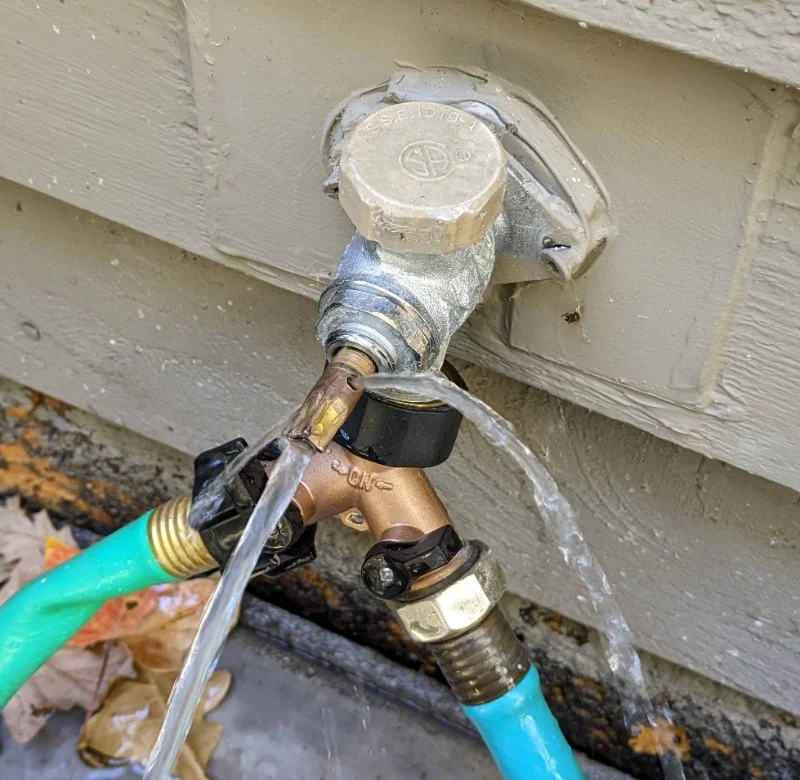
How to Replace a Spigot That Leaks Only When Turned On – A Step-by-Step Guidereplace spigot, leaking spigot, spigot repair, how to replace a spigot, leaking faucet, fix leaky spigot, spigot leaking when turned onLearn how to replace a spigot that leaks only when turned on with this detailed step-by-step guide. Discover common causes of leaky spigots and how to fix them easily.

Why Does My Spigot Leak When Turned On?

A spigot that leaks only when turned on can be caused by several different issues. Understanding why it happens is the first step toward fixing it.Worn-out Washer: A common issue is a worn-out or damaged washer inside the spigot. The washer creates a seal that prevents water from leaking when the spigot is off. Over time, this washer can wear down or crack, causing leaks when the water is turned on.Corroded Valve Seat: Another reason for leaks could be a corroded valve seat. The valve seat is the part of the spigot where the washer presses to create a watertight seal. Corrosion or mineral buildup can prevent the washer from sealing properly.Loose Connections: Sometimes, the leak is due to a loose connection at the spigot, which can allow water to leak when pressure is applied. This is a common issue with older spigots or when the connections haven't been tightened properly.

Tools Needed to Replace a Leaking Spigot

Before beginning the replacement process, gather the following tools to ensure you can complete the job efficiently:Adjustable Wrench: Used to loosen and tighten the spigot nut and the supply line connections.Pipe Wrench: If the spigot is stubborn, a pipe wrench may be necessary to remove it.Plumber’s Tape (Teflon Tape): This will help ensure a watertight seal on the new spigot.Replacement Spigot: Choose a high-quality spigot that fits the existing pipe.Plumber’s Putty (Optional): Helps in sealing the spigot if necessary.

Step-by-Step Guide to Replace a Leaking Spigot

Now that you have the tools, follow this simple guide to replace your leaky spigot.Turn Off the Water Supply:Before doing anything, turn off the main water supply to your home. You don’t want any water flowing while you’re working on the spigot.Remove the Old Spigot:Use an adjustable wrench or pipe wrench to loosen the nut connecting the spigot to the water pipe. If it's stuck, apply gentle pressure with the pipe wrench. Once the nut is loose, carefully remove the old spigot.Prepare the New Spigot:Apply plumber’s tape to the threads of the new spigot to ensure a tight seal. If needed, apply a small amount of plumber’s putty around the base to prevent leaks.Install the New Spigot:Thread the new spigot onto the water pipe, making sure it is aligned properly. Tighten the nut with the adjustable wrench. Be careful not to overtighten, as this can damage the pipe or spigot.Test for Leaks:Turn the water supply back on and check the spigot for leaks. If water starts to leak, it may be necessary to tighten the connections a bit more or reapply plumber’s tape. If the leak persists, ensure that the washer is properly seated and not worn out.

Common Causes of Leaky Spigots

In addition to worn-out washers and corroded valve seats, there are other factors that could cause a spigot to leak. Here are a few common causes:Wear and Tear Over Time: Regular use of the spigot can wear down components, causing leaks to develop. This is especially common with outdoor spigots exposed to the elements.Improper Installation: If the spigot was installed incorrectly or the connections weren’t tightened properly, it could result in leaks. Always ensure the spigot is properly aligned during installation.Freezing: For outdoor spigots in colder climates, freezing temperatures can cause pipes to crack or expand, leading to leaks when the water is turned on. Insulating outdoor pipes can help prevent this issue.

When to Call a Professional Plumber

While replacing a leaky spigot can often be done by a DIYer, there are times when it’s better to call in a professional. Here are some scenarios where you should consider contacting a plumber:Persistent Leaks: If you’ve replaced the spigot but still experience leaks, it could be an issue with the plumbing itself. A plumber can inspect the pipes and identify any underlying issues.Complex Plumbing Setup: If the spigot is part of a more complex plumbing system or is hard to reach, hiring a professional might save you time and trouble.Frozen Pipes: If you suspect that frozen pipes are the cause of the leak, it’s best to leave the repairs to a professional plumber to prevent further damage.

Final Thoughts

Replacing a spigot that leaks only when turned on can be a straightforward DIY task if you have the right tools and knowledge. By following the steps outlined above, you can easily replace the spigot and stop the leak. However, always ensure that you carefully assess the cause of the leak and don't hesitate to call a professional plumber if needed. Remember, regular maintenance and timely repairs will ensure your plumbing system continues to function smoothly for years to come.For high-quality replacement spigots and plumbing tools, visit Plumbers Supply Hub for the best products and services.

Popular Blog Posts

Categories

Top Visited Sites

Trending Plumber Insights Posts