
- Understanding-How-Garbage-Disposal-Units-Work
- Preparing-Your-Kitchen-for-Garbage-Disposal-Installation
- Step-by-Step-Process-for-Installing-a-New-Garbage-Disposal
- Common-Mistakes-Homeowners-Make-During-Installation
- A-Real-Homeowner-Story-Installing-a-Disposal-System
- Maintenance-Tips-to-Extend-the-Life-of-Your-Garbage-Disposal
Understanding How Garbage Disposal Units Work
Garbage disposal units have become a common feature in modern kitchens across the United States. These devices are installed beneath the kitchen sink and help grind food waste into small particles that can safely travel through plumbing systems. For homeowners looking to improve kitchen convenience, installing a disposal unit can significantly reduce food scraps in trash bins and minimize unpleasant odors.
Learning from the ultimate guide to installing a new garbage disposal unit allows homeowners to approach the installation process with confidence. While professional plumbers are always an option, many homeowners successfully install disposal systems themselves when they understand the process and prepare properly.
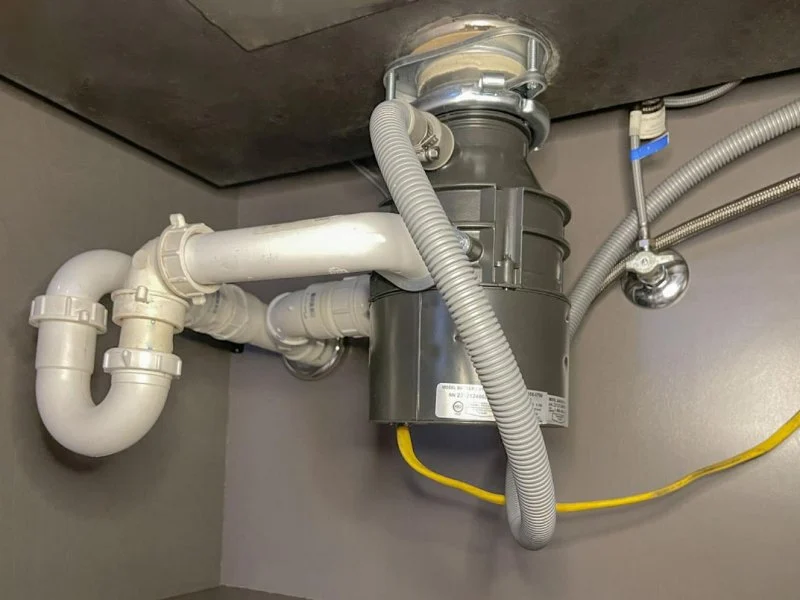
1. Basic Components of a Garbage Disposal System
1.1 Grinding Chamber
The grinding chamber contains rotating plates that break down food scraps into smaller particles. Contrary to popular belief, most disposal units do not use sharp blades but rather impellers that grind food against a stationary ring.

1.2 Drain and Plumbing Connection
Once the food waste is broken down, water carries the particles through the drain system and into the plumbing.
Many homeowners explore installation tools and plumbing equipment through platforms like Plumbers Supply Hub when preparing for projects involving kitchen plumbing upgrades.
Preparing Your Kitchen for Garbage Disposal Installation
Before starting the installation process, proper preparation helps ensure that the project goes smoothly and safely.
2. Inspecting the Existing Sink Setup
2.1 Checking Sink Compatibility
Most modern sinks support disposal units, but older sink designs may require additional adapters or modifications.
2.2 Examining Drain Connections
The drain assembly should allow enough space for the disposal unit and the connecting pipes.
3. Gathering Necessary Tools and Materials
3.1 Essential Installation Tools
Typical tools include a screwdriver, adjustable wrench, plumber’s putty, and electrical connectors.
3.2 Safety Preparation
Turning off the power supply to the kitchen outlet before installation is an important safety step.
Home improvement resources such as Plumbers Supply Hub often provide useful guidance on choosing compatible disposal units and plumbing components for installation projects.
Step-by-Step Process for Installing a New Garbage Disposal
Once preparation is complete, the installation process can begin. Following a structured approach helps reduce mistakes and improves the chances of a successful setup.
4. Removing the Existing Drain Assembly
4.1 Disconnecting the Sink Drain
The first step involves removing the existing drain basket from the sink.
4.2 Cleaning the Sink Opening
Any old sealant or debris should be removed before installing the new mounting system.
5. Installing the Mounting Assembly
5.1 Applying Plumber’s Putty
A ring of plumber’s putty is placed around the sink opening to create a watertight seal.
5.2 Securing the Mounting Ring
The mounting assembly holds the disposal unit securely beneath the sink.
6. Attaching the Garbage Disposal Unit
6.1 Aligning the Disposal with the Mount
The disposal unit is lifted and rotated into place using the mounting ring.
6.2 Locking the Unit Securely
Once aligned, the mounting system locks the disposal in position.
7. Connecting the Drain Pipes
7.1 Attaching the Discharge Tube
The discharge tube directs ground food waste into the plumbing system.
7.2 Checking Pipe Alignment
Proper pipe alignment prevents leaks and ensures efficient drainage.
8. Electrical Connection
8.1 Wiring the Disposal Unit
Many units connect to a power cord that plugs into a nearby outlet.
8.2 Testing Power Function
After wiring, restoring power allows homeowners to test the unit safely.
Many DIY installers refer to equipment guides and supply recommendations from Plumbers Supply Hub when selecting installation accessories or replacement parts.
Common Mistakes Homeowners Make During Installation
Even experienced DIY homeowners sometimes encounter problems during installation. Understanding these common issues can help avoid unnecessary repairs.
9. Improper Sealing Around the Sink
9.1 Water Leakage Risk
If plumber’s putty is not applied correctly, water may leak around the sink flange.
9.2 Long-Term Damage
Leaks beneath the sink can damage cabinets or surrounding materials.
10. Incorrect Plumbing Alignment
10.1 Drain Pipe Misalignment
Pipes must align correctly to prevent pressure on joints.
10.2 Reduced Drain Efficiency
Poor alignment may slow water flow or cause clogging.
A Real Homeowner Story: Installing a Disposal System
A homeowner named Daniel from Ohio once decided to upgrade his kitchen with a new garbage disposal unit. Initially, he planned to hire a plumber but later discovered that the installation process was manageable with the right preparation.
After carefully following a step-by-step approach similar to the ultimate guide to installing a new garbage disposal unit, Daniel successfully completed the installation over the course of a Saturday afternoon.
The most challenging part for him was aligning the mounting assembly beneath the sink, but once secured, the rest of the installation went smoothly. His experience demonstrated how preparation and patience can make DIY kitchen upgrades achievable.
Maintenance Tips to Extend the Life of Your Garbage Disposal
Once installed, proper maintenance helps ensure that the garbage disposal unit operates efficiently for many years.
11. Use Cold Water During Operation
11.1 Solidifying Grease
Cold water helps solidify fats so they can be ground and flushed away more easily.
11.2 Preventing Pipe Build-Up
This practice reduces the risk of grease buildup inside plumbing.
12. Avoid Grinding Hard or Fibrous Materials
12.1 Problematic Food Waste
Items such as bones, corn husks, and large fruit pits can damage disposal components.
12.2 Maintaining Optimal Performance
Using the disposal unit only for appropriate food scraps helps extend its lifespan.
13. Regular Cleaning
13.1 Eliminating Odors
Grinding citrus peels or flushing with baking soda and water can help keep the disposal fresh.
13.2 Preventing Residue Buildup
Routine cleaning prevents grease and food residue from accumulating inside the grinding chamber.
Homeowners often explore replacement parts, cleaning tools, and maintenance supplies through resources like Plumbers Supply Hub to keep kitchen plumbing systems functioning efficiently.
By following the ultimate guide to installing a new garbage disposal unit, homeowners can successfully complete the installation process, improve kitchen functionality, and maintain a cleaner, more convenient cooking environment.


 Gamble's Plumbing3.0 (2 reviews)
 Roto-Rooter Plumbing & Water Cleanup4.0 (376 reviews)
 Metz Plumbing & Sewer Lining LLC4.0 (305 reviews)
 Dublin Plumbing & Drain3.0 (12 reviews)
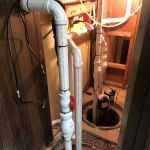 Quality Plumbing Services, Inc.4.0 (167 reviews)
 Southwood Plumbing Inc5.0 (36 reviews)
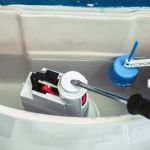 How to Handle a Running Toilet: Quick Fixes and Prevention
 How to Fix a Slow Drain: DIY Solutions for Common Drainage Issues
 Plumbing 101: A Beginner’s Guide to Home Plumbing Repairs
 The Risks of Ignoring a Small Pipe Leak Early On
 How to Clean Out a Septic Tank Filter Safely: Step-by-Step Guide
 What to Do When Your Bathtub Drains Slowly: Solutions and Tips